
Машинки для стрижки Vitek VT-2549 - инструкция пользователя по применению, эксплуатации и установке на русском языке. Мы надеемся, она поможет вам решить возникшие у вас вопросы при эксплуатации техники.
Если остались вопросы, задайте их в комментариях после инструкции.
"Загружаем инструкцию", означает, что нужно подождать пока файл загрузится и можно будет его читать онлайн. Некоторые инструкции очень большие и время их появления зависит от вашей скорости интернета.


6
ENGLISH
6
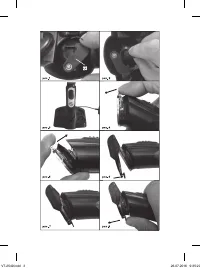
adapter jack to the installation place (pic. 2)
and close the lock (23) until clicking. Turn over
the base (22) again and set the trimmer to
charge (pic. 3).
–
The full charging time for the accumulator
battery is 90 minutes; do not exceed it to
avoid reducing the battery operating life.
–
After the batteries are charged, unplug the
power adapter (
20
) from the mains, remove
the adapter cord plug from the connection
socket (
1
), the indications on the display (
2
)
will go out.
Attention:
–
Do not leave the unit plugged in for more
than 24 hours if the battery is fully charged.
–
To optimize the operation period of the bat-
tery, fully discharge the unit twice a year
leaving it operating until the motor stops
completely. Then fully charge the unit.
–
Do not charge the batteries at temperature
below +5°C and above +35°C.
–
If you haven’t used the trimmer for a month
or longer, charge the battery completely
before using.
–
Never leave the unit connected to the mains
unattended.
Using the power adapter
If you want to continue using the trimmer with
the battery partially discharged, connect the
plug of the power adapter (
20
) cord to the
trimmer socket (
1
) on the lower part of the
unit body, connect the power adapter (
20
)
plug to the mains socket, switch the trimmer
on by pressing the button (
3
), the display (
2
)
will show the current charging level of the
built-in battery.
Lubricating the blade block
Before using the unit for the first time remove
the blade block and lubricate it with oil (
21
)
(supplied with the unit).
–
To remove the blade block, place the trim-
mer with the blades up and press on the
upper edge of the blade block with your
thumb
(pic. 4)
.
–
Apply the lubricating oil to the junctions
between the fixed and moving parts of the
blades.
–
To install the blade block, first insert its
lower part into the installation place and
then carefully press on the upper edge of
the blades until clicking to lock it (
pic. 5
).
–
Let the trimmer operate for approximately
30 seconds to spread the oil across the rub-
bing surfaces. After that remove the surplus
oil with a dry cloth or a paper towel.
Note:
–
Lubricate the blades after every use of the
trimmer.
–
For lubricating the blades use only the
oil (21), supplied with the unit, or the oil
intended for similar devices.
–
Do not use vegetable oil or oil that includes
solvents.
Solvents will evaporate, and the
remaining thick grease may slow down the
blades motion.
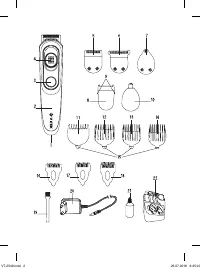
Blade height switch (4)
You can adjust the cutting hair length with the
blade height switch (
4
).
Position 1 – cutting length is 1.8 mm
Position 2 – cutting length is 0.8 mm
Position 3 – cutting length is 0.4 mm
Installing the blade block (5, 6, 7)
–
To install the blade block back (
5, 6
or
7
)
to its place first insert its lower part into the
installation place and then carefully press
on the upper edge of the blades until click-
ing to lock it (
pic. 5
).
–
To remove the blade block (
5
,
6
or
7
) place
the trimmer with the blades up and press on
the upper edge of the blade block (
pic. 4
).
Installing the attachment comb
(11, 12, 13, 14, 16, 17, 18)
–
Before installing, removing and chang-
ing the attachment comb
(11
,
12
,
13
,
14)
switch the unit off by pressing the button
(
3
), if the unit is powered by the adapter,
unplug it.
IM VT-2549.indd 6
26.07.2016 9:35:20
Содержание
- 12 Содержите
- 13 ПЕРЕД ПЕРВЫМ ИСПОЛЬЗОВАНИЕМ:; минут непрерывной работы.
- 14 Использование сетевого адаптера; Используйте только масло
- 15 ИСПОЛЬЗОВАНИЕ ТРИММЕРА
- 16 Напоминание; Шаг первый; жайте стричь волосы ближе к макушке.
- 17 Шаг пятый – заключительная часть; Установите бритвенную насадку (
- 18 ЧИСТК А И УХОД
- 19 Срок службы прибора – 3 года; Информация для связи –
- 36 RUS
Характеристики

Остались вопросы?Не нашли свой ответ в руководстве или возникли другие проблемы? Задайте свой вопрос в форме ниже с подробным описанием вашей ситуации, чтобы другие люди и специалисты смогли дать на него ответ. Если вы знаете как решить проблему другого человека, пожалуйста, подскажите ему :)


