
Машинки для стрижки Valera Vario PRO 7.0 - инструкция пользователя по применению, эксплуатации и установке на русском языке. Мы надеемся, она поможет вам решить возникшие у вас вопросы при эксплуатации техники.
Если остались вопросы, задайте их в комментариях после инструкции.
"Загружаем инструкцию", означает, что нужно подождать пока файл загрузится и можно будет его читать онлайн. Некоторые инструкции очень большие и время их появления зависит от вашей скорости интернета.


8
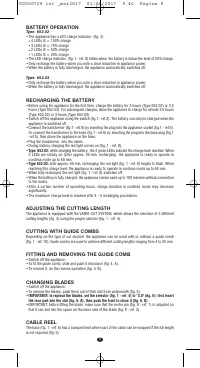
BATTERY OPERATION
Type 652.02
• The appliance has a LED charge indicator (fig. 2).
••
4 LEDs lit = 100% charge
••
3 LEDs lit = 75% charge
••
2 LEDs lit = 50% charge
••
1 LEDs lit = 25% charge
• The LED charge indicator (fig. 1 - ref. 8) blinks when the battery is below the level of 25% charge.
• Only recharge the battery when you note a clear reduction in appliance power.
• When the battery is fully discharged, the appliance automatically switches off.
Type 652.03
• Only recharge the battery when you note a clear reduction in appliance power.
• When the battery is fully discharged, the appliance automatically switches off.
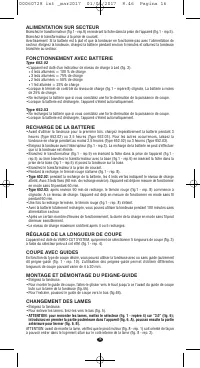
RECHARGING THE BATTERY
• Before using the appliance for the first time, charge the battery for 3 hours (Type 652.02) or 3,5
hours (Type 652.03). For subsequent charges, allow the appliance to charge for at least 2,5 hours
(Type 652.02) or 3 hours (Type 652.03).
• Switch off the appliance using the switch (fig.1 - ref.3). The battery can only be charged when the
appliance is switched off.
• Connect the transformer (fig.1 - ref.9) by inser ting the plug into the appliance socket (fig.1 - ref.5).
Or connect the transformer to the base (fig.1 - ref.6) by inser ting the plug into the base plug (fig.1
-ref.5), then place the appliance on the base.
• Plug the transformer into the mains.
• During battery charging the red light comes on (fig. 1 - ref. 8).
•
Type 652.02:
while charging the battery, the 4 green LEDs indicate the charge level reached. When
3 LEDs are steady on (after approx. 90 min. recharging), the appliance is ready to operate in
cordless mode up to 60 min.
•
Type 652.03:
after approx. 90 min. recharging, the red light (fig. 1 - ref. 8) begins to flash. When
reaching this charge level, the appliance is ready to operate in cordless mode up to 60 min.
• When fully recharged, the red light (fig. 1 - ref. 8) switches off.
• When the battery is fully charged, the appliance can be used up to 100 minutes without connection
to the mains.
• After a cer tain number of operating hours, charge duration in cordless mode may decrease
significantly.
• The maximum charge level is reached after 4 - 5 recharging procedures.
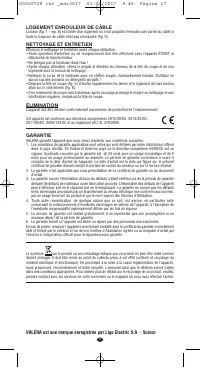
ADJUSTING THE CUTTING LENGTH
The appliance is equipped with the VARIO-CUT SYSTEM, which allows the selection of 5 different
cutting lengths (fig. 3) using the proper selector (fig. 1 - ref. 4).
CUTTING WITH GUIDE COMBS
Depending on the type of cut desired, the appliance can be used with or without a guide comb
(fig. 1 - ref. 10). Guide combs are used to achieve different cutting lengths ranging from 4 to 20 mm.
FITTING AND REMOVING THE GUIDE COMB
• Switch off the appliance.
• To fit the guide comb, slide and push it into place (fig. 4, A).
• To remove it, do the reverse operation (fig. 4, B).
CHANGING BLADES
• Switch off the appliance.
• To remove the blades, push them out of their slot from underneath (fig. 5).
• IMPORTANT: to replace the blades, set the selector (fig. 1 - ref. 4) to "3.0" (fig. 6); first insert
the rear part into the slot (fig. 6, A), then push the front to close it (fig. 6, B).
• IMPORTANT: before fitting the blade, make sure that the motor pin (fig. 8 - ref. 1) is adjusted so
that it can slot into the space on the inner side of the blade (fig. 8 - ref. 2).
CABLE REEL
The base (fig. 1 - ref. 6) has a compar tment where par t of the cable can be wrapped if the full length
is not required (fig. 9).
00060728 int _mar2017 01/03/2017 8.46 Pagina 8
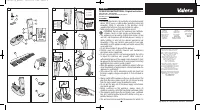
Характеристики

Остались вопросы?Не нашли свой ответ в руководстве или возникли другие проблемы? Задайте свой вопрос в форме ниже с подробным описанием вашей ситуации, чтобы другие люди и специалисты смогли дать на него ответ. Если вы знаете как решить проблему другого человека, пожалуйста, подскажите ему :)


