Магнитолы Pioneer MVH-X460UI - инструкция пользователя по применению, эксплуатации и установке на русском языке. Мы надеемся, она поможет вам решить возникшие у вас вопросы при эксплуатации техники.
Если остались вопросы, задайте их в комментариях после инструкции.
"Загружаем инструкцию", означает, что нужно подождать пока файл загрузится и можно будет его читать онлайн. Некоторые инструкции очень большие и время их появления зависит от вашей скорости интернета.


This unit is equipped with a subwoofer output
which can be turned on or off.
1
Press
M.C.
to select the desired setting.
NOR
(normal phase)
—
REV
(reverse phase)
—
OFF
(subwoofer off)
SUB.W CTRL
(subwoofer adjustment)
Only frequencies lower than those in the selected
range are outputted from the subwoofer.
1
Press
M.C.
to display the setting mode.
2
Press
M.C.
to cycle between the following:
Cut-off frequency
—
Output level
—
Slope level
Rates that can be adjusted will flash.
3
Turn
M.C.
to select the desired setting.
Cut-off frequency:
50HZ
—
63HZ
—
80HZ
—
100HZ
—
125HZ
—
160HZ
—
200HZ
Output level:
–
24
to
+6
Slope level:
–
12
—
–
24
BASS BOOST
(bass boost)
1
Press
M.C.
to display the setting mode.
2
Turn
M.C.
to select a desired level.
0
to
+6
is displayed as the level is increased or
decreased.
HPF SETTING
(high pass filter adjustment)
Use this function when wanting to listen only to
high-frequency sounds. Only frequencies higher
than the high-pass filter (HPF) cutoff are output
from the speakers.
1
Press
M.C.
to display the setting mode.
2
Press
M.C.
to cycle between the following:
Cut-off frequency
—
Slope level
3
Turn
M.C.
to select the desired setting.
Cut-off frequency:
OFF
—
50HZ
—
63HZ
—
80HZ
—
100HZ
—
125HZ
—
160HZ
—
200HZ
Slope level:
–
12
—
–
24
SLA
(source level adjustment)
This function prevents the volume from changing
too dramatically when the source switches.
!
Settings are based on the FM volume level,
which remains unchanged.
!
The MW/LW volume level can also be adjusted
with this function.
!
USB
,
iPod
and
APP
are all set to the same set-
ting automatically.
1
Press
M.C.
to display the setting mode.
2
Turn
M.C.
to adjust the source volume.
Adjustment range:
+4
to
–
4
System menu
Important
PW SAVE
(power saving) is canceled if the ve-
hicle battery is disconnected and will need to be
turned back on once the battery is reconnected.
When
PW SAVE
(power saving) is off, depend-
ing on connection methods, the unit may con-
tinue to draw power from the battery if your
vehicle
’
s ignition doesn
’
t have an ACC (acces-
sory) position.
1
Press M.C. to display the main menu.
2
Turn M.C. to change the menu option
and press to select SYSTEM.
3
Turn M.C. to select the system menu
function.
Once selected, the following system menu func-
tions can be adjusted.
LANGUAGE
(multi-language)
1
Press
M.C.
to select the desired setting.
РУС
(Russian)
—
TUR
(Turkish)
—
ENG
(Eng-
lish)
CLOCK SET
(setting the clock)
1
Press
M.C.
to display the setting mode.
2
Press
M.C.
to select the segment of the clock
display you wish to set.
Hour
—
Minute
3
Turn
M.C.
to adjust the clock.
12H/24H
(time notation)
1
Press
M.C.
to select the desired setting.
12H
(12-hour clock)
—
24H
(24-hour clock)
INFO DISPLAY
(sub information)
The type of text information displayed in the sub
information section can be toggled.
1
Press
M.C.
to display the setting mode.
2
Turn
M.C.
to select the desired setting.
SPEANA
—
LEVEL METER
—
SOURCE
—
CLOCK
—
OFF
!
The signal bar indicator displays for
SPEANA
or
LEVEL METER
when the source is set to
RADIO
.
AUTO PI
(auto PI seek)
The unit can automatically search for a different
station with the same programming, even during
preset recall.
1
Press
M.C.
to turn Auto PI seek on or off.
AUX
(auxiliary input)
Activate this setting when using an auxiliary de-
vice connected to this unit.
1
Press
M.C.
to turn
AUX
on or off.
DIMMER
(dimmer)
1
Press
M.C.
to turn the dimmer on or off.
!
You can also change the dimmer setting by
pressing and holding
/
DIMMER
.
BRIGHTNESS
(brightness adjustment)
You can use this setting to adjust the display
brightness.
The range of settings available for
BRIGHTNESS
will vary depending on whether
DIMMER
is on or
off. For details, refer to
1
Press
M.C.
to display the setting mode.
2
Turn
M.C.
to select the desired setting.
DIMMER
on:
1
to
4
DIMMER
off:
1
to
5
PW SAVE
(power saving)
Switching this function on enables you to reduce
the consumption of battery power.
!
Turning on the source is the only operation al-
lowed when this function is on.
1
Press
M.C.
to turn the power save on or off.
Selecting the illumination color
Illumination function menu
1
Press M.C. to display the main menu.
2
Turn M.C. to display ILLUMI and press to
select.
3
Turn M.C. to select the illumination func-
tion.
Once selected, the following audio functions
can be adjusted.
KEY COLOR
(key section color setting)
You can select desired colors for the keys of this
unit.
1
Press
M.C.
to display the setting mode.
2
Turn
M.C.
to select the illumination color.
!
Preset colors (ranging from
WHITE
to
BLUE
)
!
SCAN
(cycle through a variety of colors au-
tomatically)
!
CUSTOM
(customized illumination color)
English
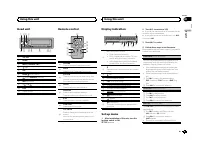
Using this unit
9
Section
Using this unit
En
02
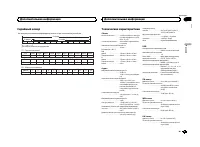
Содержание
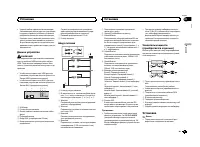
- 19 Установочное меню; Появится надпись; Использование данного устройства
- 20 YES; Меню системы; SRC; Основные операции; использование
- 21 Радиоприемник; SEEK; AF; Переключение дисплея; FREQUENCY; Использование функций; Список; PTY; Настройка функций; FUNCTION
- 22 Подключение по протоколу; Android; Функции кнопки; MIXTRAX
- 24 CONTROL iPod
- 25 Для пользователей; iPhone
- 26 Регулировки параметров звука; AUDIO
- 27 Менюсистемы; PW SAVE; DIMMER; Выбор цвета подсветки; Менюфункции подсветки; ILLUMI
- 28 Настройка цвета подсветки; Информация о; Меню
- 29 Стартовое меню; Меню систе; AUX
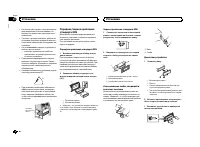
- 30 Соединения; Установка
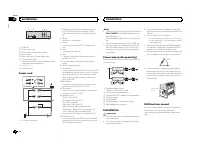
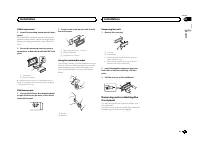
- 31 Данное устройство; ВНИМАНИЕ; Шнур питания; Примечания; настройка выхода заднего канала и; Усилитель мощности; Важно
- 32 Переднее; DIN
- 33 Устранение неисправностей; Сообщения об ошибках; Общие; Запоминающее устройство; Дополнительная информация
- 35 Поддержка
- 38 Примечание


