Лобзики Makita DJV182Z - инструкция пользователя по применению, эксплуатации и установке на русском языке. Мы надеемся, она поможет вам решить возникшие у вас вопросы при эксплуатации техники.
Если остались вопросы, задайте их в комментариях после инструкции.
"Загружаем инструкцию", означает, что нужно подождать пока файл загрузится и можно будет его читать онлайн. Некоторые инструкции очень большие и время их появления зависит от вашей скорости интернета.


8
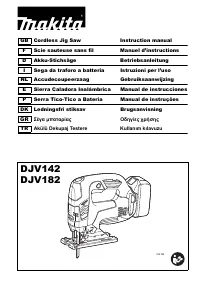
Selecting the cutting action (Fig. 3)
This tool can be operated with an orbital or a straight line
(up and down) cutting action. The orbital cutting action
thrusts the blade forward on the cutting stroke and greatly
increases cutting speed.
To change the cutting action, just turn the cutting action
changing lever to the desired cutting action position. Refer
to the table to select the appropriate cutting action.
006376
Switch action
CAUTION:
• Before inserting the battery cartridge into the tool,
always check to see that the switch trigger actuates
properly and returns to the “OFF” position when
released.
(Fig. 4)
To start the tool:
Press the lock switch to turn the tool into standby mode. It
turns the lamp on, too.
Pull the switch trigger to start the tool. Release the switch
trigger to stop.
For continuous operation, pull the switch trigger and then
push in the lock on button.
To stop the tool from the locked position, pull the switch
trigger fully, and then release it.
In standby mode, press the lock switch to turn the lamp off
and turn the tool into lock-off mode.
NOTE:
• The lock switch does not actuate during cutting
operation.
• When the tool is in standby mode, the lamp keeps
lighting.
• If the tool is left 10 seconds without any operations in
standby mode, the tool is automatically turned into
lock-off mode and the lamp goes off.
Lighting up the lamps
CAUTION:
• Do not look in the lamp or see the source of lamp
directly.
To turn on the lamp, press the lock switch.
To turn off the lamp within 10 seconds, press the lock
switch again.
NOTE:
• Use a dry cloth to wipe the dirt off the lens of lamp. Be
careful not to scratch the lens of lamp, or it may lower
the illumination.
• When the tool is overheated, the lamp flickers. Cool
down the tool fully before operating again.
Speed adjusting dial (Fig. 5)
The tool speed can be infinitely adjusted by turning the
speed adjusting dial. You can get the highest speed at 6
and the lowest speed at 1.
Refer to the table to select the proper speed for the
workpiece to be cut. However, the appropriate speed may
differ with the type or thickness of the workpiece. In
general, higher speeds will allow you to cut workpieces
faster but the service life of the blade will be reduced.
013925
CAUTION:
• The speed adjusting dial can be turned only as far as 6
and back to 1. Do not force it past 6 or 1, or the speed
adjusting function may no longer work.
NOTE:
• When the speed adjusting dial is at 3 or higher, the tool
automatically reduces the no-load speed to reduce the
vibration under no-load. Once the tool gets load, the
tool speed reaches the preset speed. Then the tool
keeps the speed until the tool is switched off.
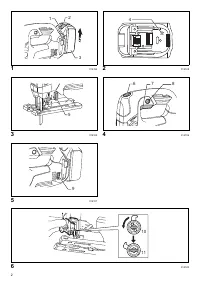
ASSEMBLY
CAUTION:
• Always be sure that the tool is switched off and the
battery cartridge is removed before carrying out any
work on the tool.
Installing or removing saw blade
CAUTION:
• Always clean out all chips or foreign matter adhering to
the blade and/or blade holder. Failure to do so may
cause insufficient tightening of the blade, resulting in a
serious personal injury.
• Do not touch the blade or the workpiece immediately
after operation; they may be extremely hot and could
burn your skin.
• Tighten the saw blade securely. Failure to do so may
cause a serious injury.
• When you remove the saw blade, be careful not to hurt
your fingers with the top of the blade or the tips of
workpiece.
(Fig. 6)
Before installing the blade, make sure that the blade
holder is in the released position.
To install the blade, insert the blade (teeth facing forward)
into the blade holder until it latches. The blade holder
moves to the fixed position by itself and the blade is
locked. Pull the blade lightly to make sure that the blade
does not fall off during operation.
Position
Cutting action
Applications
0
Straight line
cutting action
For cutting mild steel,
stainless steel and plastics.
For clean cuts in wood and
plywood.
Small orbit
cutting action
For cutting mild steel,
aluminum and hard wood.
Medium orbit
cutting action
For cutting wood and
plywood.
For fast cutting in aluminum
and mild steel.
Large orbit
cutting action
For fast cutting in wood and
plywood.
Workpiece to be cut
Number on adjusting dial
Wood
4 - 6
Mild steel
3 - 6
Stainless steel
3 - 4
Aluminum
3 - 6
Plastics
1 - 4
Характеристики

Остались вопросы?Не нашли свой ответ в руководстве или возникли другие проблемы? Задайте свой вопрос в форме ниже с подробным описанием вашей ситуации, чтобы другие люди и специалисты смогли дать на него ответ. Если вы знаете как решить проблему другого человека, пожалуйста, подскажите ему :)


