Кондиционеры Timberk T-AC07-S27 - инструкция пользователя по применению, эксплуатации и установке на русском языке. Мы надеемся, она поможет вам решить возникшие у вас вопросы при эксплуатации техники.
Если остались вопросы, задайте их в комментариях после инструкции.
"Загружаем инструкцию", означает, что нужно подождать пока файл загрузится и можно будет его читать онлайн. Некоторые инструкции очень большие и время их появления зависит от вашей скорости интернета.


IM2019
9
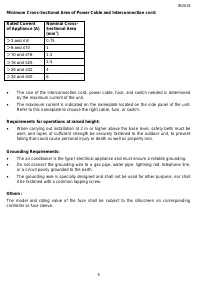
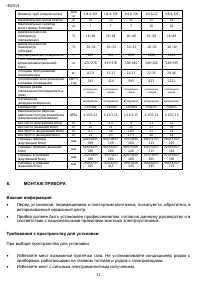
Minimum Cross-Sectional Area of Power Cable and Interconnection cord:
Rated Current
of Appliance (A)
Nominal Cross-
Sectional Area
(mm
2
)
>
3 and ≤ 6
0.75
>
6 and ≤10
1
>
10 and ≤16
1.5
>
16 and ≤25
2.5
>
25 and ≤32
4
>
32 and ≤40
6
The size of the interconnection cord, power cable, fuse, and switch needed is determined
by the maximum current of the unit.
The maximum current is indicated on the nameplate located on the side panel of the unit.
Refer to this nameplate to choose the right cable, fuse, or switch.
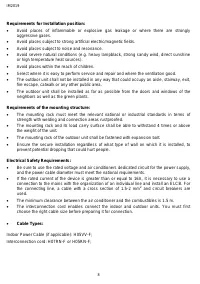
Requirements for operations at raised height:
When carrying out installation at 2 m or higher above the base level, safe ty belts must be
worn and ropes of sufficient strength be securely fastened to the outdoor unit, to prevent
falling that could cause personal injury or death as well as property loss.
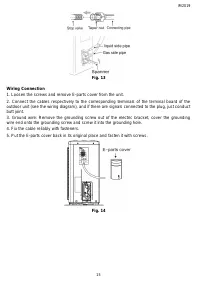
Grounding Requirements:
The air conditioner is the type I electrical appliance and must ensure a reliable grounding.
Do not connect the grounding wire to a gas pipe, water pipe, lightning rod, telephone line,
or a circuit poorly grounded to the earth.
The grounding wire is specially designed and shall not be used for other pu rpose, nor shall
it be fastened with a common tapping screw.
Others:
The model and rating value of the fuse shall be subject to the silkscreen on corresponding
controller or fuse sleeve.
Содержание
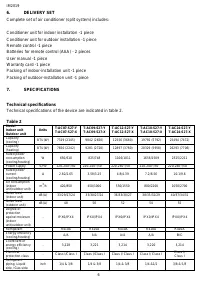
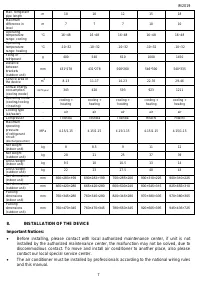
- 29 НАЗНАЧЕНИЕ ПРИБОРА; Охлаждение
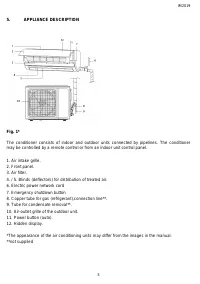
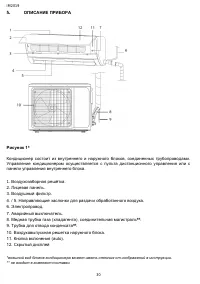
- 30 ОПИСАНИЕ ПРИБОРА; Воздухозаборная решётка.
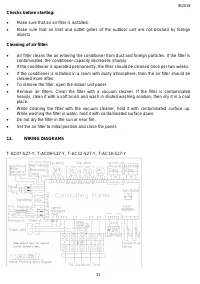
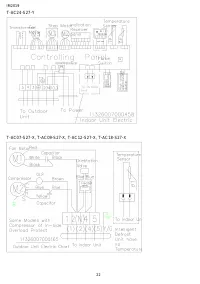
- 32 МОНТАЖ ПРИБОРА; Избегайте мест с сильным электромагнитным излучением.
- 34 Прибор с классом электрозащиты I, должен быть правильно заземлен.
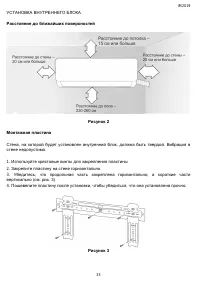
- 35 Рисунок 2; Используйте крестовые винты для закрепления пластины; Рисунок 3
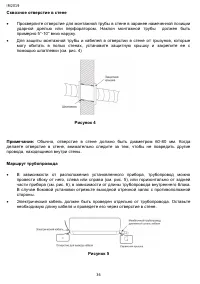
- 36 Рисунок 4; Обычно, отверстие в стене должно быть диаметром 60-80 мм. Когда; Рисунок 5
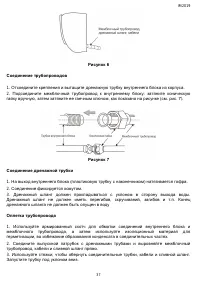
- 37 Соединение фиксируется хомутом.
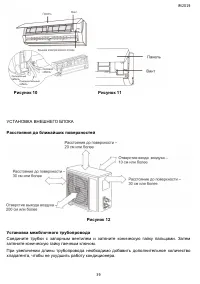
- 39 Рисунок 10 Рисунок 11
- 40 ≤5 метров; Соединение проводов; Ослабьте винты и удалите крышку электрического отсека с прибора.
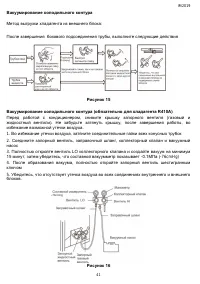
- 41 Метод выгрузки хладагента из внешнего блока:
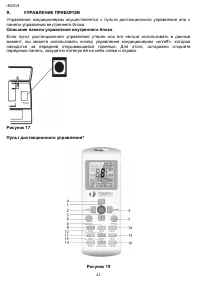
- 44 Функция iCLEAN; Нажмите данную кнопку, когда устройство ВЫКЛ, пульт; DISPLAY
- 45 РЕЖИМ РАБОТЫ В РЕЖИМЕ ОХЛАЖДЕНИЯ/ОБОГРЕВА; При помощи нажатия кнопок «; РЕЖИМ РАБОТЫ ВЕНТИЛЯТОРА; в режиме вентилятора температура не настраивается.; УХОД И ОБСЛУЖИВАНИЕ
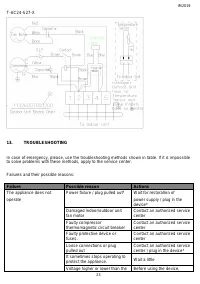
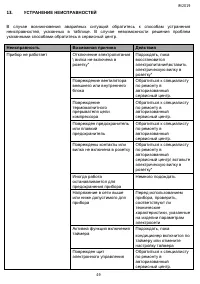
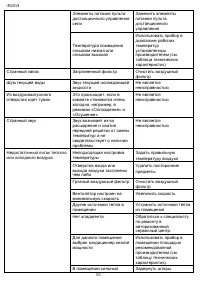
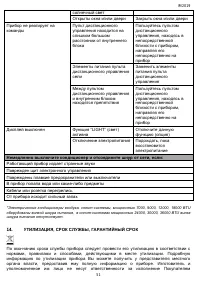
- 49 Прибор не работает
- 51 УТИЛИЗАЦИЯ, СРОК СЛУЖБЫ, ГАРАНТИЙНЫЙ СРОК
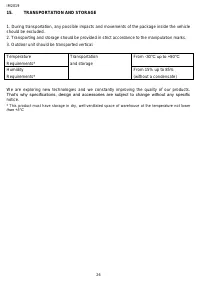
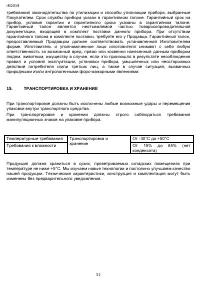
- 52 ТРАНСПОРТИРОВКА И ХРАНЕНИЕ


