Кондиционеры Tesla TA36FFML - инструкция пользователя по применению, эксплуатации и установке на русском языке. Мы надеемся, она поможет вам решить возникшие у вас вопросы при эксплуатации техники.
Если остались вопросы, задайте их в комментариях после инструкции.
"Загружаем инструкцию", означает, что нужно подождать пока файл загрузится и можно будет его читать онлайн. Некоторые инструкции очень большие и время их появления зависит от вашей скорости интернета.

49
ENG
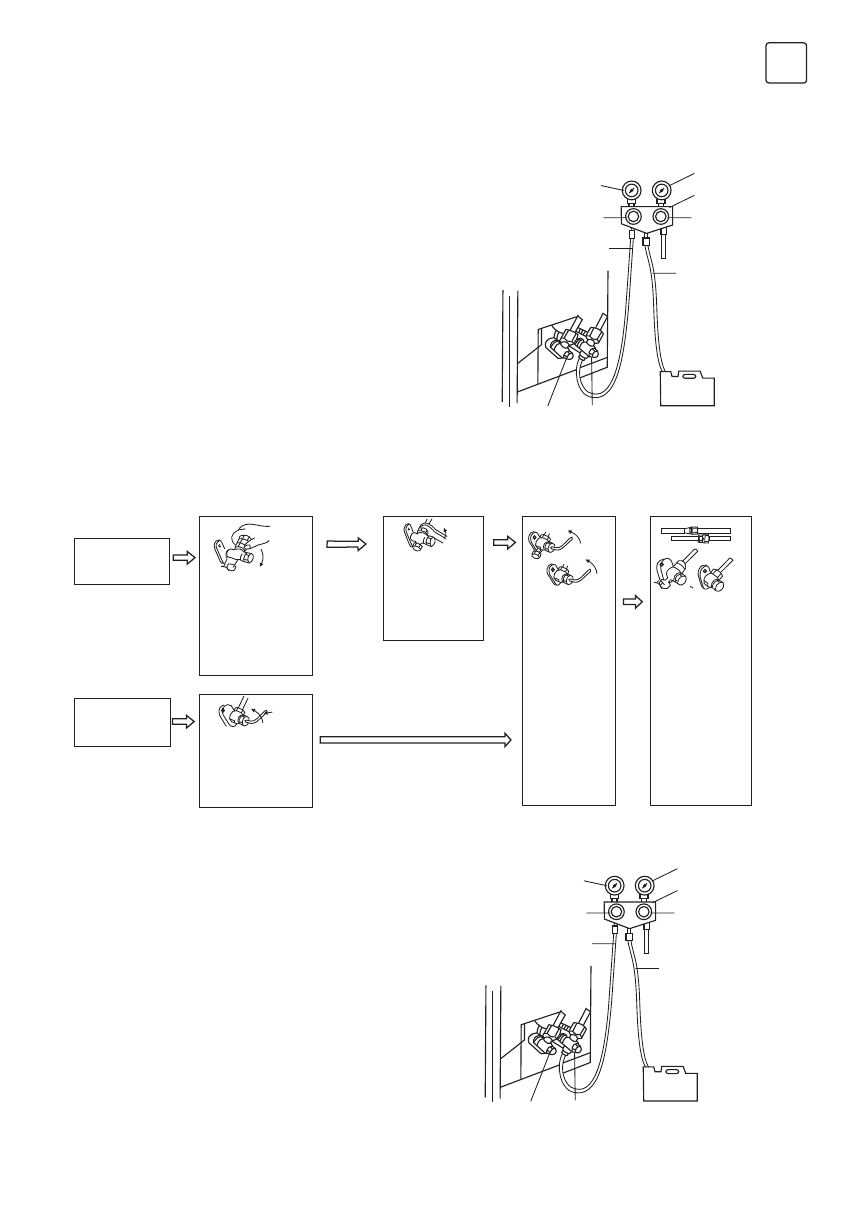
Vacuuming (Gas R32)
Exclusive R32 refrigerant pump must be used in making R32 refrigerant vacuum.
Before working on the air conditioner, remove the cover of
the stop valve(gas and liquid valves)and be sure to retighten it
afterward.(to prevent the potential air leakage).
1. To prevent air leakage and spilling tighten all connecting
nut of all flare tubes.
2. Connect the stop valve, charge hose, manifold valve, and
vacuum pump.
3. Fully open the handle Lo of the manifold valve and
apply vacuum for at least 15 minutes and check that the
compound vacuum gauge reads -0.1MPa (-76cmHg).
4. After applying vacuum, fully open the stop valve with a hex
wrench.
5. Check that both indoor and outdoor connections are free
of air leakage.
Compound meter
-76cmHg
Pressure
gauge
Manifold
valve
Handle Hi
Charge
hose
Vacuum
pump
Stop valve
(gas valve)
Stop valve
(liquid valve)
Charge hose
Handle Lo
Expelling the air (Gas R410a)
Outdoor unit refrigerant discharging method.
After the pipe side connection is complete, proceed as follows.
Vacuum Pumping Method (R410A refrigerant evacuation must use the vacuum pumping method)
.
Before working on the air conditioner, remove the cover
of the stop valve (gas and liquid valves) and be sure to
retighten it afterward (to prevent the potential air leakage).
1. To prevent air leakage and spilling tighten all
connecting nut of all flare tubes.
2. Connect the stop valve, charge hose, manifold valve,
and vacuum pump.
3. Fully open the handle Lo of the manifold valve and
apply vacuum for at least 15 minutes and check that the
compound vacuum gauge reads -0.1 MPa (-76cmHg).
4. After applying vacuum, fully open the stop valve with a
hex wrench.
5. Check that both indoor and outdoor connections are
free of air leakage.
Gas part
Quickly
tighten and
connect the
nut.
Fully open
the spindles
of the liquid
end and of
the other two
ends.
Check that all
indoor and
Outdoor
connections
are free of air
leakage.
The installing torque
is the same as that
of the gas end of the
indoor unit.
Wait for 8
seconds
Loosen the
temporarily
fastened
nut by half turn.
Loosen the Hex
wrench by half
turn.
Liquid part
Compound meter
-76cmHg
Pressure
gauge
Manifold
valve
Handle Hi
Charge
hose
Vacuum
pump
Stop valve
(gas valve)
Stop valve
(liquid valve)
Charge hose
Handle Lo
Содержание
- 3 ВНИМАНИЕ
- 5 ПРЕДУПРЕЖДЕНИЯ ПО ИСПОЛЬЗОВАНИЮ; Состояния при которых система будет работать неисправно
- 6 Примечания по обогреву
- 7 НАИМЕНОВАНИЯ ДЕТАЛЕЙ; Внутренний блок
- 8 Очистите панель; ЧИСТКА И УХОД
- 9 Уход после использования; ПОИСК НЕИСПРАВНОСТЕЙ
- 10 ЗАМЕЧАНИЯ ПО УСТАНОВКЕ; Осмотр при распаковке
- 11 Правила безопасности при установке кондиционера
- 12 Требования к работе на высоте
- 13 Другое; УСТАНОВКА ВНУТРЕННЕГО БЛОКА; Габаритный чертеж установки внутреннего блока
- 14 Монтажная пластина
- 15 Соединение сливной трубы; Крепление внутреннего блока
- 16 Схема подключения
- 17 УСТАНОВКА НАРУЖНОГО БЛОКА; Габаритный чертеж установки наружного блока
- 19 Подключение проводки
- 21 Тестовый запуск; Проверка после установки
- 22 ТЕХНИЧЕСКОЕ ОБСЛУЖИВАНИЕ; Осмотр площадки; Рабочие процедуры
- 23 Осмотр кабеля
- 24 Удаление воздуха; Порядок заправки хладагентов
- 27 Описание кнопок
- 30 Использование
Характеристики
Остались вопросы?Не нашли свой ответ в руководстве или возникли другие проблемы? Задайте свой вопрос в форме ниже с подробным описанием вашей ситуации, чтобы другие люди и специалисты смогли дать на него ответ. Если вы знаете как решить проблему другого человека, пожалуйста, подскажите ему :)


