
Кондиционеры Hyundai H-ALT1-36H-UI032 - инструкция пользователя по применению, эксплуатации и установке на русском языке. Мы надеемся, она поможет вам решить возникшие у вас вопросы при эксплуатации техники.
Если остались вопросы, задайте их в комментариях после инструкции.
"Загружаем инструкцию", означает, что нужно подождать пока файл загрузится и можно будет его читать онлайн. Некоторые инструкции очень большие и время их появления зависит от вашей скорости интернета.

8.
Electric air conditioner. Split system
9.
Electric air conditioner. Split system
EN
EN
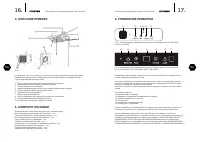
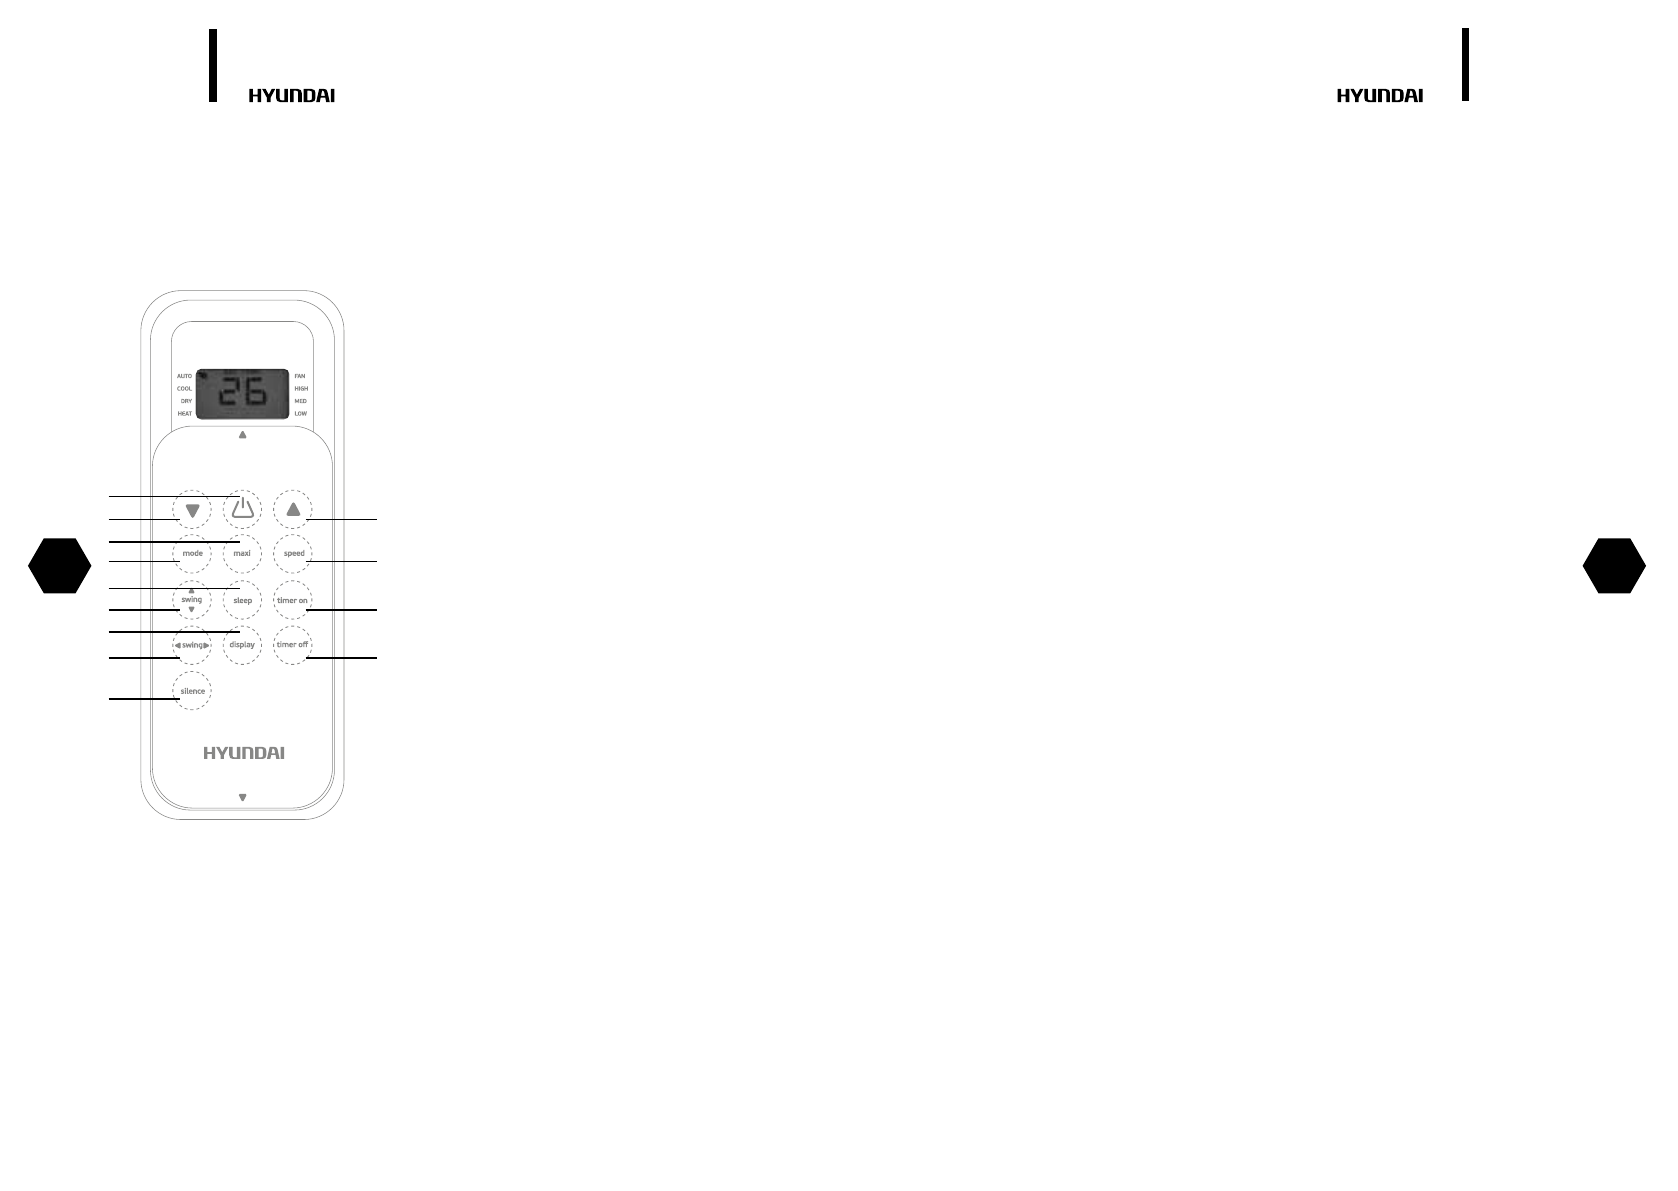
REMOTE CONTROL
Indication of the control board display shall
correspond to selected modes.
Work with remote control board
Mounting and replacement of batteries: mount two LR03 alkaline batteries, according to polarity
indicated on the remote control board.
In order to avoid malfunction of the remote control board do not insert used batteries or batter-
ies of various types.
If the conditioner is not used for a long time, remove batteries from the board or else electrolyte
may leak and damage the board.
In normal operation of the conditioner average service life of batteries will be about a half-year.
Replace batteries, if command receiving is not conirmed with an audio signal, or if the display
does not show a sign of command transfer. When generating commands from the remote con-
trol board, point an IR-radiator at a remote-control signal receiver situated on the indoor unit.
Hold the remote control board at the distance of no more than 8 m from the indoor unit. The re-
mote control board will not work, if there are any curtains, doors or other things between it and
the indoor unit. Protect the board from water and exposure to direct sunlight and heat sources.
7. OPERATING MODES
«AUTO» mode
The auto mode is turned on and of with the use of the button «MODE
» on the remote control
board.
1. During operation in the AUTO mode, the set temperature is maintained. In this mode, the air
conditioner automatically selects the COOLING, VENTILATION, or HEATING mode based on the
set and current temperatures.
2. In the automatic mode, the fan rotation speed is selected automatically and cannot be set
manually.
3. If the AUTO mode does not provide comfort conditions, select the mode manually. In auto-
matic mode, depending on air temperature in the room, the conditioner will select needed
temperature parameters of its operation in the following order:
«COOL», «HEAT» and «FAN»
1.
Turn the conditioner on pressing the «ON/OFF
» button.
2.
Pressing the «MODE
» button, select COOL, HEAT or FAN mode manually.
3.
Pressing the «TEMP
» button (up-down), set the desired air temperature indoors (except for
FAN mode).
4.
Pressing the «FAN SPEED
» button on the remote control board, select the fan rotation speed:
AUTO, LOW, MIDDLE, HIGH, and the conditioner will start working in accordance with the
selected setting.
5.
To turn the conditioner of, press the «ON/OFF
» button once again.
In the «FAN» mode air temperature indoors is not set.
«DRY»
Turn the conditioner on pressing the «ON/OFF
»
button. Pressing the «MODE
» button, select the
DRY mode. The conditioner will start working in the set mode. To turn the conditioner of, press
the «ON/OFF
» button once again.
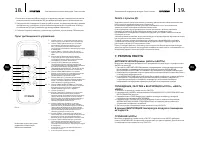
13
12
11
10
2
4
6
5
7
3
1
8
9
2. Forced cooling. The operation indicator blinks and the air conditioner works in the forced
cooling mode. The fan speed is high for 30 min. The remote controller cannot be used.
3.
Of mode. The indicator is extinguished and the air conditioner does not work. The remote
controller can be used.
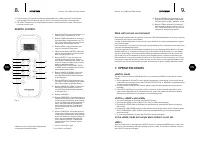
Fig. 4
1.
Button «ON/OFF». Using this button, you
may turn the conditioner on or of.
2.
Button «TEMP» (decrease) for setting of
the required air temperature from 17 to
30°С. Using this button, you may set the
required air temperature indoors.
3.
Button «MAXI». Using this button you
may turn on and of Maxi mode.
4.
Select-mode button «MODE». Using this
button, you may select a required mode:
Auto, Cool, Dry, Heat, Fan.
5.
Button «SLEEP». Press this button to
activate the economy mode. Press it
once again to deactivate the mode. This
function can be activated in the Cooling,
Heating, and Auto modes.
When the ON/OFF, FAN SPEED, SLEEP,
or MODE button is pressed, this mode is
automatically deactivated.
6.
Button «SWING UP-DOWN». Using this
button, you may regulate position of
air-relief blinds and forward treated air
to up and down.
7.
Button «DISPLAY». Using this button you
can may to clear the display on the indoor
unit. Press it again to light the display.
8.
Button «SWING LEFT-RIGHT». Using this
button, you may regulate position of
air-relief blinds and forward treated air
to let and right.*
9.
Button «SILENCE».**
10.
Button «TIMER OFF». Press this button to
initiate the of-delay timer. Each pressing
of the button increases the timer setting
by 30 min. When the reading reaches 10
hours, each pressing will increase the
timer setting by 60 min. To deactivate
the automatic timer function, set the
value at 0.0.
11.
Button «TIMER ON». Press this button to
initiate the on-delay timer. Each pressing
of the button increases the timer setting
by 30 min. When the reading reaches 10
hours, each pressing will increase the
timer setting by 60 min. To deactivate
the automatic timer function, set the
value at 0.0.
* only for ceiling-loor type
** not used for this series
12.
Button «SPEED». Using this button, you
may select rotation speed of the indoor
unit fan: «Auto», «High», «Middle», «Low».
13.
Button «TEMP» (increase) for setting of
the required air temperature from 17 to
30°С. Using this button, you may set the
required air temperature indoors.
Содержание
- 8 Содержание; Уважаемый покупатель!
- 9 ТЕХНИЧЕСКИЕ ХАРАКТЕРИСТИКИ
- 10 УПРАВЛЕНИЕ ПРИБОРОМ
- 12 Ночной режим работы «SLEEP»; УХОД И ОБСЛУЖИВАНИЕ; Неисправность Возможная причина
- 13 УВАЖАЕМЫЙ ПОКУПАТЕЛь!
- 14 Гарантийный талон; Территория действия:; Гарантийные обязательства
- 17 Водонагревательное оборудование
- 18 Кондиционеры, устройства с компрессором; Электрические обогреватели
- 19 Cтандартные гарантийные сроки для изделий,; Кондиционеры воздуха:
- 20 Сведения об установке изделия
- 22 Профилактическое обслуживание изделия.
- 24 KO


