Кондиционеры Daikin EKHWS-B3V3 - инструкция пользователя по применению, эксплуатации и установке на русском языке. Мы надеемся, она поможет вам решить возникшие у вас вопросы при эксплуатации техники.
Если остались вопросы, задайте их в комментариях после инструкции.
"Загружаем инструкцию", означает, что нужно подождать пока файл загрузится и можно будет его читать онлайн. Некоторые инструкции очень большие и время их появления зависит от вашей скорости интернета.

EKUHWBB + EKUHW2WB + EKHWSU150-300B3V3
Domestic hot water tank with option kit for air to water heat pump
system
4P344370-1 – 2013.03
Installation manual
10
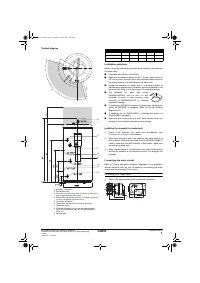
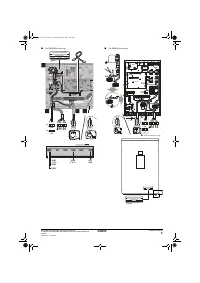
Installation procedure of the option kit
1
Locate the domestic hot water tank in a suitable position to
facilitate the installation of water supply, discharge fittings and
pipework. It is therefore recommended to first read through this
whole procedure.
Refer to the figure on the facing page at the start of this chapter
for full understanding of next procedure steps.
Pre-assembly
2
Pre-assemble the T-piece and tundish (parts
3
and
5
of this kit)
so that tundish is ready for installation.
3
Pre-assemble the adaptor and expansion vessel (parts
2
and
4
of this kit) so that the expansion vessel is ready for installation.
4
Manually operate the temperature and pressure relief valve to
ensure free water flow through discharge pipe. Turn knob left.
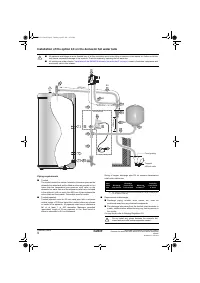
Water main in
5
Fit the elbow/drain valve (part
6
of this kit) in the cold water
connection <C> of the domestic hot water tank.
6
Position both, the pressure reducing valve with integrated non
return valve and line strainer and the expansion relief valve
(part
1
of this kit) as high as possible and connect it to the water
mains inlet.
The pressure reducing valve and expansion relief valve must be
installed higher than the temperature and pressure relief.
Fit a length of copper tube Ø22 mm (field supply) in between the
elbow/drain valve (procedure step
5
) and the pressure reducing
valve.
Make sure to provide for a connection on this pipe to the
expansion vessel (part
4
of this kit).
7
Fit a length of copper tube Ø22 mm (field supply) inbetween the
T-piece (part
7
of this kit) and the pre-assembled expansion
vessel (procedure steps
3
and
6
).
Discharge
8
Install the tundish in a vertical position within a maximum of
600 mm away from the temperature and pressure relief valve
and expansion relief valve. (Procedure step
4
).
Make sure that you install it so that you can still connect the
15 mm outlet of the expansion relief valve and the horizontal
inlet of the T-piece on top of the tundish. (Procedure step
11
)
9
Connect a metal discharge pipe Ø15 mm (field supply) from the
temperature and pressure relief valve to the vertical inlet of the
T-piece on top of the tundish (
≤
600 mm).
10
Connect a metal discharge pipe Ø15 mm (field supply) from the
expansion relief valve to the horizontal inlet of the T-piece on top
of the tundish (
≤
600 mm).
11
Connect a metal discharge pipe from the tundish. Refer to
"Tundish pipework" on page 9
.
All pipework must have a continuous fall and be fitted conform to
the requirements of the Building Regulation G3.
Only when installing the EKUHW2WB option kit
Flow inlet connection
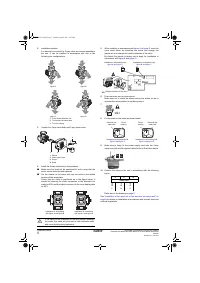
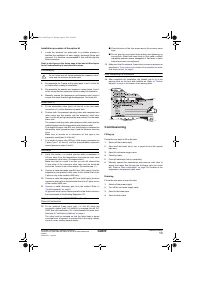
12
Fit the solenoid 2-way valve (part
1
of this kit) using the
connection nipples (part
2
of this kit) for screwing into the 3/4"
FBSP flow inlet connection <F> of the domestic hot water tank.
Also refer to
"Installation guidelines" on page 4
.
The valve must be mounted so that the valve head is above
horizontal level of pipework to prevent that in the highly unlikely
event of a leak, a safety hazard results.
Check direction of the flow arrow cast on the solenoid valve
body.
Do not grip the valve head while making and tightening up
connections. Either hold brass body in your hand or attach
adjustable spanner across hexagonal or flat faces in valve
body at each port’s screw thread.
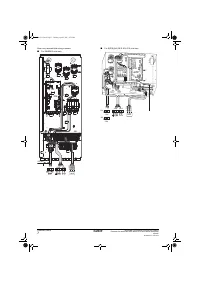
13
Make sure that the solenoid 2-way valve is wired up properly as
described in
"Connections to be made in the domestic hot water
tank electrical box" on page 6
.
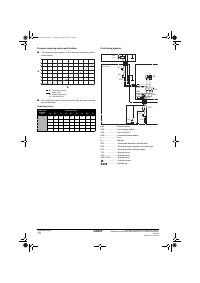
After completing the installation
14
After completing the installation, the installer has to fill in the
warning label on the tank with indelible ink. Refer to
"Outlook
diagram" on page 4
for location of the warning label.
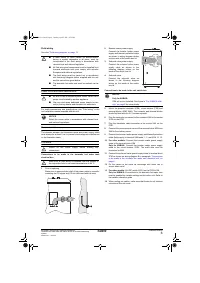
Commissioning
Filling up
Follow the next steps to fill up the tank:
1
Switch off the power supply.
2
Open each hot water tap in turn to expel air from the system
pipe work.
3
Open the cold water supply valve.
4
Check for leaks.
5
Close all water taps if all air is expelled.
6
Manually operate the temperature and pressure relief valve to
ensure free water flow through the discharge pipe (turn knob
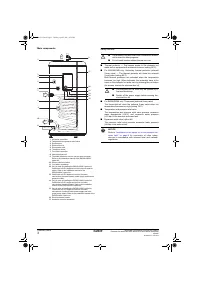
left). Refer to
"Main components" on page 3
for location of the
temperature and pressure relief valve.
Draining
Follow the next steps to drain the tank:
1
Switch off the power supply.
2
Turn off the cold water supply valve.
3
Open the hot water taps.
4
Open the drain valve.
Do not install shut-off valves between the expansion relief
valve and the domestic hot water tank.
4P344370-1.book Page 10 Tuesday, April 2, 2013 2:32 PM


