Коммутаторы NETGEAR GS110EMX 8x1GE - инструкция пользователя по применению, эксплуатации и установке на русском языке. Мы надеемся, она поможет вам решить возникшие у вас вопросы при эксплуатации техники.
Если остались вопросы, задайте их в комментариях после инструкции.
"Загружаем инструкцию", означает, что нужно подождать пока файл загрузится и можно будет его читать онлайн. Некоторые инструкции очень большие и время их появления зависит от вашей скорости интернета.


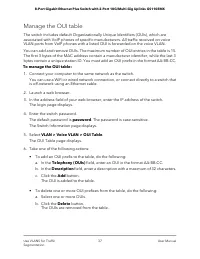


Attach the switch to a wall
The switch provides two mount holes on the bottom panel so that you can attach the
switch to a wall. The switch package provides two screws and anchors for that purpose.
To attach the switch to a wall:
1. Locate the two mount holes on the bottom panel of the switch.
2. Locate the 3.5 mm (diameter) x 16 mm (length) screws and anchors in the switch
package.
3. Mark and drill two mounting holes in the wall where you want to mount the switch.
The two mounting holes must be at a precise distance of 4.25 in. (108 mm) from
each other.
4. Insert the anchors into the wall and tighten the screws with a No. 2 Phillips screwdriver.
Leave about 0.15 in. (4 mm) of each screw protruding from the wall so that you can
insert the screws into the holes on the bottom panel.
5. Line up the holes on the bottom panel with the screws in the wall and mount the
switch to the wall.
Install the switch in a rack
To install the switch in a rack, you need the rack-mount brackets and screws that are
supplied with the switch.
To install the switch in a rack:
1. Attach the supplied mounting brackets to the side of the switch.
Insert the screws provided in the product package through each bracket and into
the bracket mounting holes in the switch.
2. Tighten the screws with a No. 2 Phillips screwdriver to secure each bracket.
3. Align the mounting holes in the brackets with the holes in the rack, and insert two
pan-head screws with nylon washers through each bracket and into the rack.
4. Tighten the screws with a No. 2 Phillips screwdriver to secure mounting brackets to
the rack.
User Manual
77
Mount the Switch
8-Port Gigabit Ethernet Plus Switch with 2-Port 10G/Multi-Gig Uplinks GS110EMX
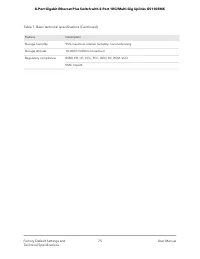
Характеристики

Остались вопросы?Не нашли свой ответ в руководстве или возникли другие проблемы? Задайте свой вопрос в форме ниже с подробным описанием вашей ситуации, чтобы другие люди и специалисты смогли дать на него ответ. Если вы знаете как решить проблему другого человека, пожалуйста, подскажите ему :)
