
Коммутаторы D-LINK DXS-1210-12SC/A3A - инструкция пользователя по применению, эксплуатации и установке на русском языке. Мы надеемся, она поможет вам решить возникшие у вас вопросы при эксплуатации техники.
Если остались вопросы, задайте их в комментариях после инструкции.
"Загружаем инструкцию", означает, что нужно подождать пока файл загрузится и можно будет его читать онлайн. Некоторые инструкции очень большие и время их появления зависит от вашей скорости интернета.


Option 1: Follow these steps to install the DNA
(D-Link Network Assistant) via the autorun
program on the installation CD.
1. Insert the CD into your CD-Rom Drive.
2. The autorun program will pop up automatically
3. Simply click on the ”
Install DNA (D-Link Network
Assistant)
” button and an installation wizard will guide
you through the process.
4. After successfully installing the DNA, you can find it
under Start > Programs > D-Link > DNA.
5. Just connect the Switch to the same L2 network
segment of your PC and use the
DNA (D-Link
Network Assistant)
to discover the Switches.
Option 2: Follow these steps to install the DNA
(D-Link Network Assistant) manually.
1. Insert the Utility CD into your CD-Rom Drive.
2. From the Start menu on the Windows desktop, choose
Computer.
3. Double click on your CD-Rom/DVD-Rom Drive to start
the autorun menu, or right click on the Drive to open
the folder. Select DNA (D-Link Network Assistant) and
double click on the setup.exe file.
4. Follow the on-screen instructions to install the utility.
5. Upon completion, go to
Start > Programs > D-Link >
and open the DNA (D-Link Network Assistant).
6. Just connect the Switch to the same L2 network
segment of your PC and use the
DNA (D-Link
The DNA (D-Link Network Assistant) included on the
installation CD is a program for discovering Switches
with the same L2 network segment connected to your
PC. This tool can support windows 2000, XP, Vista, and
Windows 7. There are two options for the installation
of DNA (D-Link Network Assistant), one is through the
autorun program on the installation CD and the other is
manual installation.
Option 1:
Follow these steps to install DNA via the
autorun program on the installation CD (in case the
installation CD is included):
E
N
G
L
I
S
H
Option 1: Follow these steps to install the DNA
(D-Link Network Assistant) via the autorun
program on the installation CD.
1. Insert the CD into your CD-ROM Drive.
1
2.
. I
T
n
h
se
e
r
a
t
u
th
to
e
ru
C
n
D
p
i
r
n
o
t
g
o
ra
yo
m
ur
w
C
ill
D
p
-
o
R
p
o
u
m
p
D
a
r
u
iv
to
e
m
.
atically.
2
3.
. T
S
h
i m
e
p
a
ly
ut
cl
or
ick
un
o
p
n
ro
t
g
h
r
e
am
"
In
w
st
il
a
l
l
p
l
o
D
p
N
u
A
p
(
a
D
u
-
t
L
o
i
m
nk
at
N
ic
e
a
t
ll
w
y
ork
Assistant)
" button and an installation wizard will guide
3
yo
.
u
Si
t
m
hr
p
o
ly
ug
cl
h
ic
th
k
e
on
pr
t
o
h
c
e
e
”
ss.
Install DNA (D-Link Network
4.A
A
ft
s
e
s
r
i
su
sta
cce
nt)
ss
” b
fu
u
l
t
l
t
y
on
in
a
st
n
a
d
lli
a
n
n
g
i
t
n
h
st
e
a
D
ll
N
at
A
io
,
n
yo
w
u
i za
ca
rd
n
w
fin
il
d
l
g
it
uide
und
yo
e
u
r S
th
ta
ro
rt
u
>
gh
P
t
r
h
o
e
gr
p
a
r
m
oce
s >
ss.
D-Link > DNA.
5. Just connect the Switch to the same L2 network
4
se
.
g
A
m
fte
e
r
n
su
t o
cce
f yo
ssf
ur
u
P
l
C
l y
a
in
n
st
d
a
u
ll
se
ing
th
th
e
e
D
D
N
N
A
A
(
,
D
yo
-L
u
in
ca
k
n
N
f
e
in
tw
d
o
it
rk
As
u
s
n
is
d
t
e
a
r
n
S
t)
ta
to
rt
d
>
isc
Pr
o
o
ve
gra
r
m
th
s
e
>
Sw
D
i
-
t
L
ch
in
e
k
s.
> DNA.
5. Just connect the Switch to the same L2 network
Op
se
tio
g
n
m
2
e
:
n
F
t o
o
f
llo
yo
w
u
t
r
h
P
e
C
se
a
st
n
e
d
p
u
s
s
t
e
o
t
i
h
n
e
st
D
a
N
ll
A
DN
(D
A
-L
m
i
a
n
n
k
ually
(in
N
ca
et
se
wo
th
rk
e
A
i n
s
st
s
a
is
lla
ta
ti
n
o
t
n
)
t
C
o
D
di
i
s
s
co
in
ve
clu
r
d
th
e
e
d)
S
:
witches.
1. Insert the CD into your CD-ROM drive.
O
2.
p
F
t
r
i
o
o
m
n
t
2
h
:
e
F
S
o
ta
ll
r
o
t m
w
e
t
n
h
u
e
o
s
n
e
t
s
h
t
e
e
W
ps
ind
to
ow
in
s
s
d
t
e
a
skt
ll t
o
h
p
e
ch
D
o
N
o
A
se
(
C
D
o
-
m
L
p
in
u
k
ter
N
.
etwork Assistant) manually.
3. Double click on your CD-ROM/DVD-Rom Drive to start
1
th
.
e
Insert the Utility CD into your CD-Rom Drive.
autorun menu, or right click on the Drive to open the
2
fo
.
ld
F
e
ro
r.
m
S
t
e
h
le
e
ct
St
D
a
N
rt
A
m
(
e
D
n
-
u
Li
o
n
n
k
t
N
he
et
W
wo
in
rk
do
A
w
ssi
s
s
d
t
e
a
skt
nt)
o
a
p
n
,
d
ch
d
o
o
o
u
se
ble
click
Co
o
m
n
p
t
u
h
t
e
er
s
.
etup.exe file.
3
4.
. D
Fo
o
l
u
lo
b
w
le
t
cl
he
ick
on
o
-
n
scr
yo
e
u
e
r
n
C
in
D
st
-R
ru
o
ct
m
io
/D
ns
VD
to
-R
i n
o
s
m
tal
D
l t
r
h
ive
e
u
t
t
o
ilit
st
y.
art
5. Upon completion, go to
Start > Programs > D-Link >
DN
th
A
e
a
a
n
u
d
to
o
r
p
u
e
n
n
m
D
e
N
nu
A
,
(
o
D
r
-
r
L
ig
in
h
k
t
N
cl
e
ick
tw
o
o
n
rk
th
A
e
ssi
D
st
rive
ant
t
)
o
.
open
6. Ju
the
st
fo
co
ld
n
e
n
r.
e
S
ct
e
t
l
h
e
e
ct
S
D
w
N
it
A
ch
(D
to
-L
t
i
h
n
e
k
s
N
a
e
m
tw
e
o
L
r
2
k
n
A
e
ssi
tw
st
or
a
k
nt) and
seg
d
m
ou
e
b
n
l
t
e
o
cl
f
i
yo
ck
u
o
r
n
P
t
C
he
an
se
d
tu
u
p
se
.e
D
xe
N
f
A
ile
t
.
o discover the Switch.
4. Follow the on-screen instructions to install the utility.
Option 3:
(in case the installation CD is not included):
5. Upon completion, go to
Start > Programs > D-Link >
Do
D
w
N
nl
fr
A
o
ssi
m
s
G
ta
o
n
o
t
g
).
le
6
P
.
la
Ju
y
st
a
e
n
tw
d
o
fo
rk
llow
the on-screen instructions to install the utility.
segment of your PC and use the
DNA (D-Link
E
sw
swiittch
ch,, e
en
ntte
err tth
he
e
““aaddm
miin
n
”” ffoorr tthhee ddeeffaauulltt uuseserr nnaam
me
e a
an
nd
d
N
D
DN
NA
A ((D
D--L
Liin
nk
k N
Netetwo
worrk
k A
As
ss
siis
sta
tan
nt)t)
p
pa
assw
sswo
orrd
d ffo
orr tth
he
e S
Sw
wiittc
ch
h a
an
nd
d p
prre
ess
ss tth
he
e E
En
ntte
err k
ke
ey.y.
G
L
I
The DNA (D-Link Network Assistant) is a program for
S
H
discovering Switches with the same L2 network segment
SN
SNM
MP-P-B
Bas
ased
ed M
Ma
an
na
ag
ge
emen
mentt
connected
to
your
PC.
This
tool
can
support
windowns
((d
de
ep
pe
en
nd
diin
ng
g o
on
n th
the
e p
pu
urrc
ch
has
ase
ed
d mo
mod
delel))
2000, XP, Vista, and Windows 7. There are two options
for the installation of DNA (D-Link Network Assistant),
Y
Yo
ou
u c
ca
an
n m
ma
an
na
ag
ge
e tth
he
e S
Sw
wiittc
ch
h w
wiitth
h D
D--L
Liin
nk
k D
D--V
Viie
ew
w o
orr a
an
ny
y
one is through the autorun program on the installation CD
S
SN
NM
MP
P--co
com
mp
pa
attiib
blle
e p
prro
og
grra
am
m.. T
Th
he
e S
SN
NM
MP
P ffu
un
nctctiio
on
n iis
s
and the other is manual installation.
d
de
effa
au
ulltt D
Diisa
sab
blle
ed
d..
Optio n 1:
Follow these steps to install DNA via the
A
Ad
dd
diititio
on
na
all IIn
nffo
orrm
ma
attiio
on
n
autorun program on the installation CD (in case the
IIff yo
you
u a
arre
e e
en
nc
co
ou
un
ntte
erriin
ng
g p
prro
ob
blle
em
ms
s s
se
ettttiin
ng
g u
up
p yo
you
urr
installation CD is included):
n
ne
ettw
wo
orrk,k, p
plle
ea
ase
se rre
effe
err tto
o tth
he
e u
use
serr m
ma
an
nu
ua
all tth
ha
att
ca
cam
me
e
1. Insert the CD into your CD-ROM Drive.
w
wiitth
h tth
he
e sw
swiittch
ch.. IItt co
con
ntta
aiin
ns
s m
ma
an
ny
y m
mo
orre
e rru
ulle
es
s,, ch
cha
arrtts,s,
2. The autorun program will pop up automatically.
e
exp
xplla
an
na
attiio
on
ns
s,, a
an
nd
d e
exa
xam
mp
plle
es
s tto
o h
he
ellp
p yo
you
u g
ge
ett yo
you
urr n
ne
ettw
wo
orrk
k
3. Si mply click on the "
Install DNA (D-Link Network
u
up
p a
an
nd
d rru
un
nn
niin
ng
g..
Assistant)
" button and an installation wi zard will guide
A
Ad
dd
diittiio
on
na
all h
he
ellp
p iis
s a
ava
vaiilla
ab
blle
e tth
hrro
ou
ug
gh
h o
ou
urr o
offffiice
ces
s lliis
stte
ed
d a
att
you through the process.
tth
he
e b
ba
ack
ck o
off tth
he
e u
us
se
err m
ma
an
nu
ua
all o
orr o
on
nlliin
ne
e.. T
To
o ffiin
nd
d o
ou
utt m
mo
orre
e
4.After successfully installing the DNA, you can find it
under Start > Programs > D-Link > DNA.
a
ab
bo
ou
utt D
D--L
Liin
nk
k p
prro
orrm
ma
attiio
on
n,, p
plle
ea
ase
se
5. Just connect the Switch to the same L2 network
vivisisitt tth
he
e w
we
eb
bs
siitte
e
h
httttp
p::////w
segment of your PC and use the
DNA (D-Link Network
Assistant)
to discover the Switches.
W
Wa
arrrra
an
nty
ty IIn
nffo
orrma
matitio
on
n
Option 2:
Follow these steps to install DNA manually
(in case the installation CD is included):
T
The
he D
D--LiLink
Wa
Warrrra
antnty
y iinfnfo
orrm
ma
attiio
on
n
iis
s a
ava
vaiillab
ablle
e atat
1. Insert the CD into your CD-ROM drive.
2. From the Start menu on the Windows desktop choose
Computer.
3. Double click on your CD-ROM/DVD-Rom Drive to start
the
autorun menu, or right click on the Drive to open the
folder. Select DNA (D-Link Network Assistant) and
double click on the setup.exe file.
4. Follow the on-screen instructions to install the utility.
5. Upon completion, go to
Start > Programs > D-Link >
DNA
and open DNA (D-Link Network Assistant).
6. Just connect the Switch to the same L2 network
segment of your PC and use
DNA
to discover the Switch.
Option 3:
(in case the installation CD is not included):
Download DNA (D-Link Network Assistant) from Google
Play at
https://play.google.com/store/apps/
and follow the
on-screen instructions to install the utility.
F
Fo
orr d
de
etta
aiille
ed
d iin
nffo
orrm
ma
attiio
on
n o
off D
DN
NA
A,, p
plle
ea
ase
se rre
effe
err tth
he
e u
us
se
er
r m
ma
an
nu
ua
all..
T
Te
elln
ne
ett M
Ma
an
na
ag
ge
eme
men
ntt
(d
(dep
epen
end
diin
ng
g o
on
n tth
he
e p
pu
urrch
chas
ased
ed mo
mod
de
ell))
U
Us
se
errs
s m
ma
ay
y a
alls
so
o a
acce
ccess
ss tth
he
e
sw
swiittch
ch tth
hrro
ou
ug
gh
h T
Te
elln
ne
ett u
usisin
ng
g
yo
you
urr P
PC
C
’’ss C
Co
om
mm
ma
an
nd
d P
Prro
om
mp
ptt.. T
To
o a
ac
cce
cess
ss iitt ffrro
om
m yo
you
urr
co
com
mp
pu
utte
err,, u
us
se
errs
s m
mu
ustst ffiirrs
stt e
en
nsu
surre
e tth
ha
att a
a va
valliid
d
co
con
nn
ne
ectctiio
on
n iis
s m
ma
ad
de
e tth
hrro
ou
ug
gh
h tth
he
e E
Etth
he
errn
ne
ett p
po
orrtt o
off tth
he
e S
Sw
wi
ittch
ch a
an
nd
d yo
you
urr P
PC
C,, a
an
nd
d tth
he
en
n
clcliick
ck S
Stta
arrtt >
> P
Prro
og
grra
am
ms
s >
> A
Acc
cce
esso
ssorriie
es
s >
> C
Co
om
mm
ma
an
nd
d P
Pr
ro
om
mp
ptt o
on
n yo
you
urr co
com
mp
pu
utte
err.. O
On
nce
ce tth
he
e
co
con
nso
solle
e w
wiin
nd
do
ow
w o
op
pe
en
ns,s, e
en
ntte
err tth
he
e
co
com
mm
ma
an
nd
d tte
elln
ne
ett 1
10
0..9
90
0..9
90
0..9
90
0 ((d
de
ep
pe
en
nd
diin
ng
g o
on
n
co
con
nffiig
gu
urre
ed
d IIP
P a
ad
dd
drre
ess)ss) a
an
nd
d p
prre
ess
ss E
En
ntte
err o
on
n yo
you
urr
Option 1: Follow these steps to install the DNA
(D-Link Network Assistant) via the autorun
program on the installation CD.
1. Insert the CD into your CD-Rom Drive.
2. The autorun program will pop up automatically
3. Simply click on the ”
Install DNA (D-Link Network
Assistant)
” button and an installation wizard will guide
you through the process.
4. After successfully installing the DNA, you can find it
under Start > Programs > D-Link > DNA.
5. Just connect the Switch to the same L2 network
segment of your PC and use the
DNA (D-Link
Network Assistant)
to discover the Switches.
Option 2: Follow these steps to install the DNA
(D-Link Network Assistant) manually.
1. Insert the Utility CD into your CD-Rom Drive.
2. From the Start menu on the Windows desktop, choose
Computer.
3. Double click on your CD-Rom/DVD-Rom Drive to start
the autorun menu, or right click on the Drive to open
the folder. Select DNA (D-Link Network Assistant) and
double click on the setup.exe file.
4. Follow the on-screen instructions to install the utility.
5. Upon completion, go to
Start > Programs > D-Link >
and open the DNA (D-Link Network Assistant).
6. Just connect the Switch to the same L2 network
segment of your PC and use the
DNA (D-Link
DNA (D-Link Network Assistant)
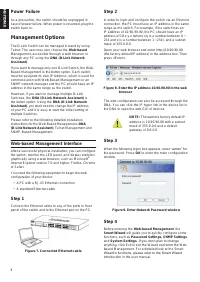
switch, enter the
“admin” for the default user name and
password for the Switch and press the Enter key.
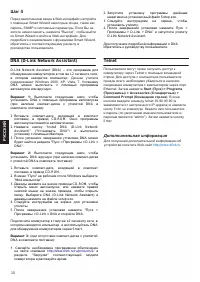
The DNA (D-Link Network Assistant) is a program for
discovering Switches with the same L2 network segment
connected to your PC. This tool can support Windows
2000, XP, Vista, and Windows 7. There are two options
for the installation of DNA (D-Link Network Assistant),
one is through the autorun program on the installation CD
and the other is manual installation.
Option 1:
Follow these steps to install DNA via the
autorun program on the installation CD (in case the
installation CD is included):
1. Insert the CD into your CD-ROM Drive.
2. The autorun program will pop up automatically.
3. Simply click on the "
Install DNA (D-Link Network
Assistant)
" button and an installation wizard will
guide you through the process.
4. After successfully installing the DNA, you can find it
under Start > Programs > D-Link > DNA.
5. Just connect the Switch to the same L2 network
segment of your PC and use the
DNA (D-Link
Network Assistant)
to discover the Switches.
Option 2:
Follow these steps to install DNA manually (in
case the installation CD is included):
1. Insert the CD into your CD-ROM drive.
2. From the Start menu on the Windows desktop choose
Computer.
3. Double click on your CD-ROM/DVD-Rom Drive to start
the autorun menu, or right click on the Drive to open
the folder. Select DNA (D-Link Network Assistant) and
double click on the setup.exe file.
4. Follow the on-screen instructions to install the utility.
5. Upon completion, go to
Start > Programs > D-Link >
DNA
and open DNA (D-Link Network Assistant).
6. Just connect the Switch to the same L2 network
segment of your PC and use
DNA
to discover the Switch.
Option 3:
(in case the installation CD is not included):
Download DNA (D-Link Network Assistant) from Google
Play at
https://play.google.com/store/apps/
and follow the
on-screen instructions to install the utility.
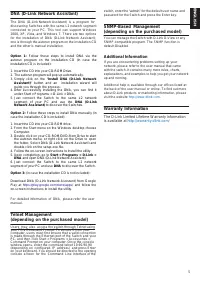
SNMP-Based Management
(depending on the purchased model)
You can manage the Switch with D-Link D-View or any
SNMP-compatible program. The SNMP function is
default Disabled.
Additional Information
If you are encountering problems setting up your
network, please refer to the user manual that came
with the switch. It contains many more rules, charts,
explanations, and examples to help you get your network
up and running.
Additional help is available through our offices listed at
the back of the user manual or online. To find out more
about D-Link products or marketing information, please
visit the website
Warranty Information
The D-Link Limited Lifetime W arranty information
is available at
For detailed information of DNA, please refer the user
manual.
Telnet Management
(depending on the purchased model)
Users may also access the switch through Telnet using
your
PC’s Command Prompt. To access it from your
computer, users must first ensure that a valid connection
is made through the Ethernet port of the Switch and your
PC, and then click Start > Programs > Accessories >
Command Prompt on your computer. Once the console
window opens, enter the command telnet 10.90.90.90
(depending on configured IP address) and press Enter
on your keyboard. You should be directed to the opening
console screen for the Command Line Interface of the
5
EN
GL
IS
H
Содержание
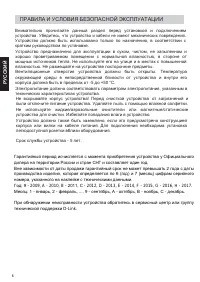
- 6 Для подключения необходима установка; ПРАВИЛА И УСЛОВИЯ БЕЗОПАСНОЙ ЭКСПЛУАТАЦИИ
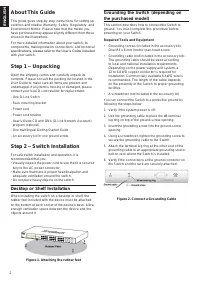
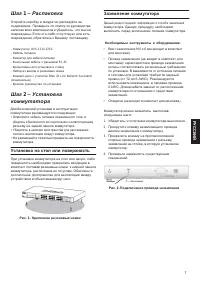
- 7 Шаг 1 – Распаковка; Установка на стол или поверхность; Необходимые инструменты и оборудование:
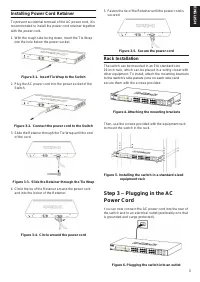
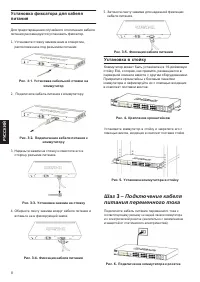
- 8 РУ; коммутатор; коммутатору; Установка в стойку; Рис. 6. Подключение коммутатора к розетке
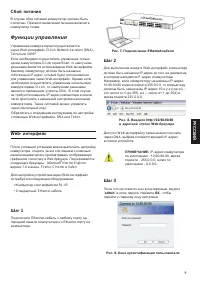
- 9 Сбой питания; Функции управления; интерфейс; admin
- 10 Start; Дополнительная информация; Дополнительная информация
- 11 Технические характеристики; Стандарты
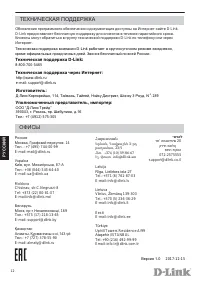
- 12 Техническая поддержка через Интернет:; Հայաստան; ישראל; המגשימים; ТЕХНИЧЕСКАЯ ПОДДЕРЖКА
Характеристики

Остались вопросы?Не нашли свой ответ в руководстве или возникли другие проблемы? Задайте свой вопрос в форме ниже с подробным описанием вашей ситуации, чтобы другие люди и специалисты смогли дать на него ответ. Если вы знаете как решить проблему другого человека, пожалуйста, подскажите ему :)


