
Кофеварка Scarlett SC-CM33015 - инструкция пользователя по применению, эксплуатации и установке на русском языке. Мы надеемся, она поможет вам решить возникшие у вас вопросы при эксплуатации техники.
Если остались вопросы, задайте их в комментариях после инструкции.
"Загружаем инструкцию", означает, что нужно подождать пока файл загрузится и можно будет его читать онлайн. Некоторые инструкции очень большие и время их появления зависит от вашей скорости интернета.


IM020
5
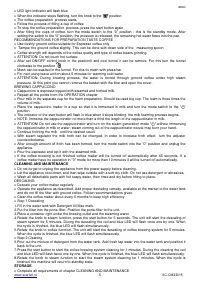
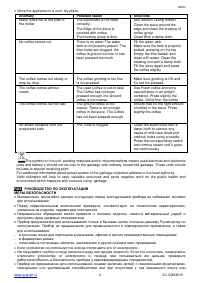
LED light indicator will flash blue
When the indicator stops flashing, turn the knob to the “ ” position
The coffee preparation process starts
Follow the process of filling a cup of coffee
To stop the coffee preparation process, press the start button again
After filling the cups of coffee, turn the mode switch to t
he “0” position - this is the standby mode. After
setting the switch to the “0” position, the pressure is released, the remaining hot water flows into the pan.
RECOMMENDATIONS FOR PREPARATION TASTE COFFEE
Use freshly ground coffee suitable for Espresso coffee only
Tamper the ground coffee slightly. This can be done with down side of the measuring spoon
Coffee strength will depends of the coffee quality and type of coffee beans grinding.
ATTENTION: Do not touch hot surface.
After set ON/OFF control knob in the position0 and cool funnel it can be remove. For this turn the funnel
clockwise to the position
Mesh can be washed in the funnel. For this fix mesh with press bar
For next using leave unit on/about 5 minutes for warming cold water.
ATTENTION: During brewing process, the water is forced through ground coffee under high steam
pressure. At this point you cannot remove the basket with the filter and open the cover.
BREWING CAPPUCCINO
Cappuccino is espresso topped with steamed and frothed milk.
Repeat all the points from the OPERATION chapter
Pour milk in the separate cup for the foam preparation. Should be used big cup. The foam is three times the
volume of milk.
Place the cappuccino maker in a cup so that it is immersed in milk and turn the mode swit
ch to the “ ”
position.
The indicator of the start button will flash in blue when it stops blinking, the milk foaming process begins.
NOTE: Immerse the cappuccinator no more than a third the length of the cappuccinator in milk.
ATTENTION! Do not use the cappuccinator and turn on the steam generation mode "
" without immersing
the cappuccinator in milk or water; steam coming out of the cappuccinator nozzle may burn your hand.
Continue frothing the milk until the desired result.
With steam regulator the milk froth can be changed. In order to increase froth effect turn the adjuster
counterclockwise.
After eno
ugh amount of froth has been formed, turn the mode switch into the “0” position and unplug the
appliance.
Pour the espresso and top it with the steamed milk.
If the coffee brewing is not finished coffee maker will be turned off automatically after 45 seconds. If a
coffee maker have no operation in "0" mode for more than 10 minutes it will be turned off automatically.
CLEANING AND MAINTENANCE
Do not forget to unplug the appliance from the power supply before cleaning.
Let the appliance cool down, and then wipe outside with a soft dry cloth. Do not use detergent or abrasives.
Wash all detachable parts with hot soapy water, then rinse and dry before fitting to place.
DESCALING
Descale your coffee maker regularly.
Operate the appliance as described. Add proper descaling remedy, available at the market to the water tank
and do not fill the filter with ground coffee. Follow recommendations given.
Clean the coffee maker about every 5 months to keep high efficiency.
Step 1 Descaling
1.
Fill in the water tank with Detergent till Max mark.
2.
Put the filter into the porta-filter. Position the porta-filter to the unit.
3.
Place a container right under the brewing outlet and the steaming wand.
4.
Rotate the knob to steam function, press the start button for 5 seconds. The unit will start the descaling of
steam system for 5 minutes. During the descaling the red and blue LED will flash once one by one. When
the cycle is finished, the blue LED will flash simultaneously.
5.
Rotate the knob to coffee function. The unit will start the descaling of coffee brewing system for 5 minutes.
When the cycle is finished, the blue LED will flash simultaneously.
Step 2 Cleaning
6.
Pour out the mixture of detergent from the water tank. Add fresh tap water into the water tank and position it
back to the unit.
7.
Press the start button to start the coffee brewing system cleaning for 1 minutes. During the cleaning the red
and blue LED will flash twice one by one. When the cycle is finished, the blue LED will flash simultaneously.
8.
Rotate the knob to steam function to start the steam system cleaning for 1 minutes. When the cycle is
finished, the machine will return to standby state.
STORAGE
Complete all requirements of chapter CLEANING AND MAINTENANCE.


