Janome 1108 JB - Инструкция по эксплуатации
Швейная машина Janome 1108 JB - инструкция пользователя по применению, эксплуатации и установке на русском языке. Мы надеемся, она поможет вам решить возникшие у вас вопросы при эксплуатации техники.
Если остались дополнительные вопросы — свяжитесь с нами через контактную форму.

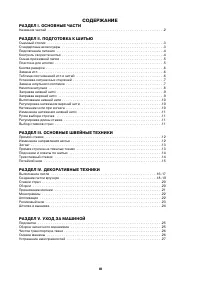


Содержание:
- Страница 2 – Do’s and Don’ts; Что следует и чего не следует делать:
- Страница 3 – III; TABLE OF CONTENTS; SECTION I ESSENTIAL PARTS; СОДЕРЖАНИЕ; РАЗДЕЛ l. ОСНОВНЫЕ ЧАСТИ
- Страница 4 – WARNING; SAVE THESE INSTRUCTIONS; ВАЖНЫЕ ИНСТРУКЦИИ ПО БЕЗОПАСНОСТИ
- Страница 5 – Name of Parts; Названия частей
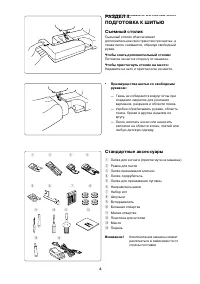
- Страница 6 – SECTION II GETTING READY TO SEW; Extension Table; Standard Accessories; Съемный столик; Чтобы снять дополнительный столик:; Cтандартные аксессуары
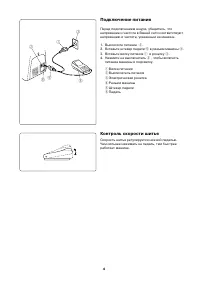
- Страница 7 – Подключение питания
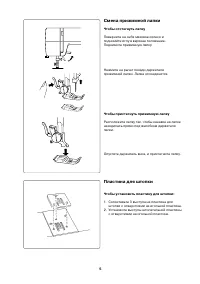
- Страница 8 – To Remove and Attach the Presser Foot; To remove; Darning Plate; Смена прижимной лапки; Чтобы отстегнуть лапку; Пластина для штопки; Чтобы установить пластину для штопки:
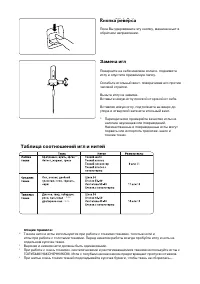
- Страница 9 – Кнопка реверса; Таблица соотношений игл и нитей
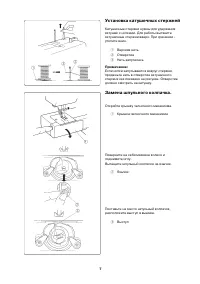
- Страница 10 – Установка катушечных стержней
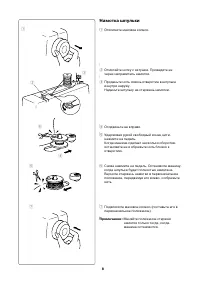
- Страница 11 – Winding the Bobbin; Намотка шпульки
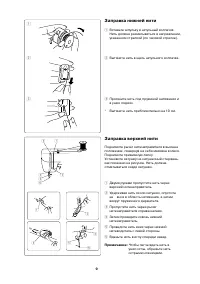
- Страница 12 – Заправка нижней нити; Заправка верхней нити
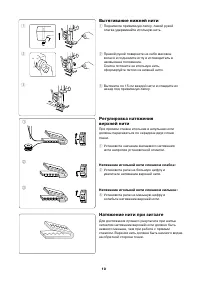
- Страница 13 – Drawing up Bobbin Thread; Balancing Needle Thread Tension; Needle thread tension is too loose:; Thread Tension for Zigzag Sewing; Вытягивание нижней нити; Натяжение игольной нити слишком слабое:; Натяжение нити при зигзаге
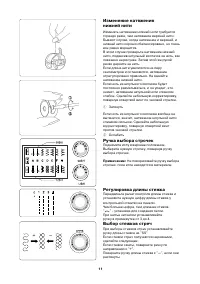
- Страница 14 – Ручка выбора строчек; Регулировка длины стежка
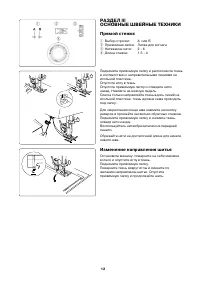
- Страница 15 – Straight Stitch Sewing; SECTION III BASIC SEWING; To Change Sewing Direction; РАЗДЕЛ lll; Прямой стежок; Изменение направления шитья
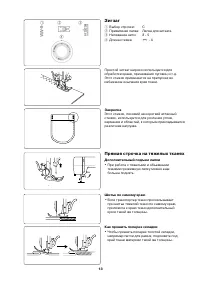
- Страница 16 – Straight Stitching on Heavy Fabrics; Additional Clearance; Zigzag Stitching; Bartacking; Sewing from the extreme edge; Sewing across the fold; Зигзаг; Закрепка; Прямая строчка на тяжелых тканях; Дополнительный подъем лапки
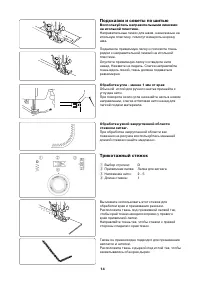
- Страница 17 – Sewing Tips and Advices; Using the Seam Guides on the Needle Plate; Tricot Stitch; Подсказки и советы по шитью; Обработка угла M менее 1 мм от края; Трикотажный стежок
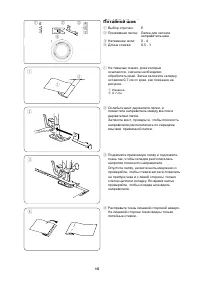
- Страница 18 – Blind Stitch Hemming; Потайной шов
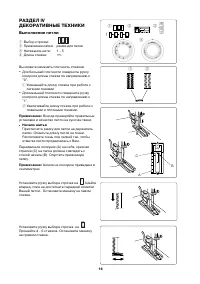
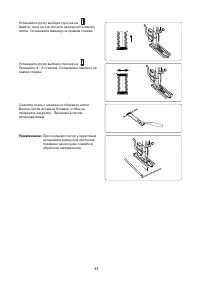
- Страница 19 – Buttonhole; • Starting to sew; SECTION IV DECORATIVE STITCHING; Начало шитья
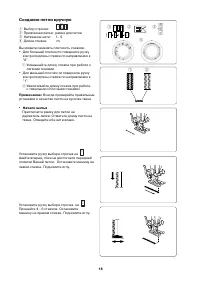
- Страница 21 – Manual; Создание петли вручную
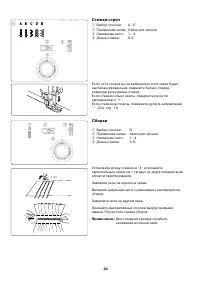
- Страница 23 – Стежки стреч
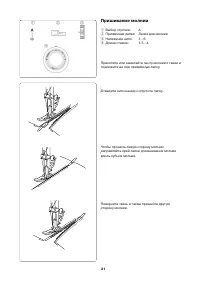
- Страница 24 – Zipper Application; Пришивание молнии
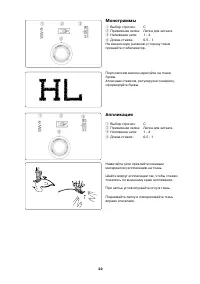
- Страница 25 – Монограммы; Аппликация
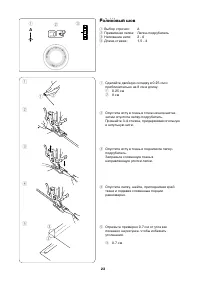
- Страница 26 – Rolled Hem; Роликовый шов
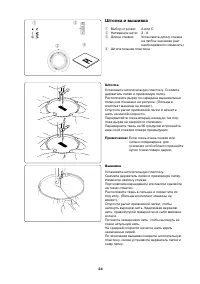
- Страница 27 – Free Hand Mending and Embroidery; Mending; Штопка и вышивка; Штопка; Вышивка
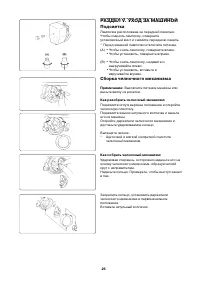
- Страница 28 – SECTION V CARE OF YOUR MACHINE; Sewing Light; To dismantle hook race:; РАЗДЕЛ V. УХОД ЗА МАШИНОЙ; Подсветка; Сборка челночного механизма; Как разобрать челночный механизм:
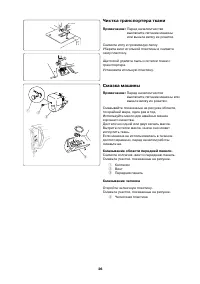
- Страница 29 – Oil behind the face plate; Чистка транспортера ткани; Смазывание области передней панели.; Смазывание челнока
Janome
JB1108
Èíñòðóêöèÿ ïî ýêñïëóàòàöèè
"Загрузка инструкции" означает, что нужно подождать пока файл загрузится и можно будет его читать онлайн. Некоторые инструкции очень большие и время их появления зависит от вашей скорости интернета.
Была ли эта инструкция полезной?
Об этой инструкции
- Бренд
- Janome
- Модель
- 1108 JB
- Тип документа
- Инструкция по эксплуатации
- Категория
- Швейная машина
- Язык(и)
- Русский
- Страницы
- 30
- Размер файла
- 1 MB
- Формат
Краткое содержание
II II Do’s and Don’ts 1. Always be aware of the up-and-down movement of the needle and do not turn your attention from the machine while it is running. 2. When leaving the sewing machine unattended, the main switch of the machine must be switched off or the plug must be removed from the socket-outle...
III TABLE OF CONTENTS SECTION I ESSENTIAL PARTS Name of Parts ...................................................................................................................................................... 2 SECTION II GETTING READY TO SEW Extension Table ........................................
I I IMPORTANT SAFETY INSTRUCTIONS When using an electrical appliance, basic safety precautions should always be followed, including thefollowings:Read all instructions before using this appliance. DANGER – To reduce the risk of electric shock: 1. An appliance should never be left unattended when plu...
Задать вопрос
Похожие инструкции
Популярные швейные машины Janome
 Janome Ami 15 Инструкция по эксплуатации
 Janome Ami 35s Инструкция по эксплуатации
 Janome Ami 25s Инструкция по эксплуатации
 Janome Anna Инструкция по эксплуатации
 Janome MX 77 Инструкция по эксплуатации
 Janome 392 Инструкция по эксплуатации
 Janome My Style 36 Инструкция по эксплуатации
 Janome Memory Craft 350Е Инструкция по эксплуатации
Ещё модели: швейные машины Janome
 Janome 601 DC Инструкция по эксплуатации
 Janome 603 DC Инструкция по эксплуатации
 Janome 625 E Инструкция по эксплуатации
 Janome 659 Инструкция по эксплуатации
 Janome 777 Инструкция по эксплуатации
 Janome 843 Инструкция по эксплуатации
 Janome 1143 Инструкция по эксплуатации
- Janome 1225s Инструкция по эксплуатации
 Janome 1522PG Инструкция по эксплуатации
 Janome 1522RD Инструкция по эксплуатации
 Janome 1543 Инструкция по эксплуатации
- Janome 1547 Инструкция по эксплуатации