
Измельчители Oursson CH3040/DC - инструкция пользователя по применению, эксплуатации и установке на русском языке. Мы надеемся, она поможет вам решить возникшие у вас вопросы при эксплуатации техники.
Если остались вопросы, задайте их в комментариях после инструкции.
"Загружаем инструкцию", означает, что нужно подождать пока файл загрузится и можно будет его читать онлайн. Некоторые инструкции очень большие и время их появления зависит от вашей скорости интернета.


6
7
The knives are very sharp, be careful.
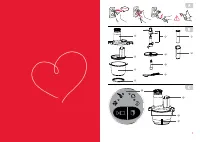
PRODUCT SET,
Рiс. В
ELEmENTS OF DESIGN,
Рiс. C
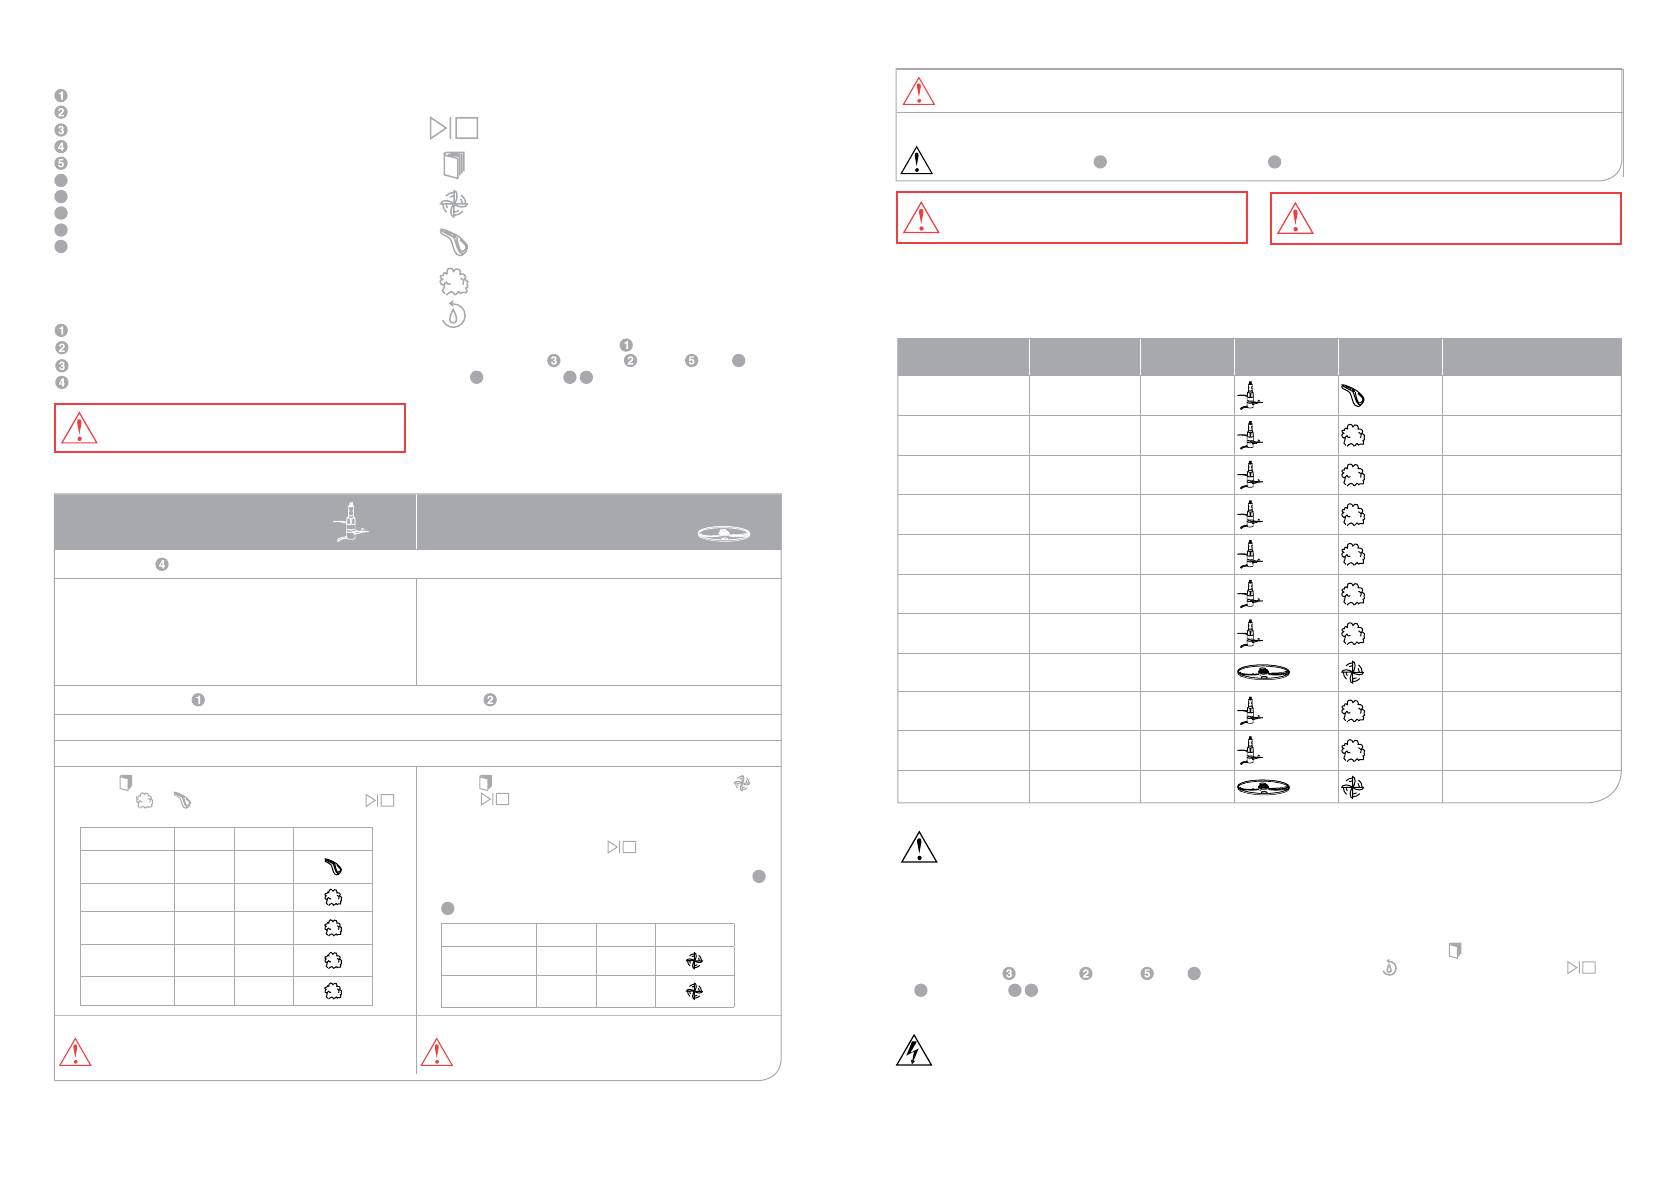
Control panel
Lid latches
Pin for setting knives
Loading hole
used for turning on or stoping the program
Program selecting button
Indication for the straws/slices CHOPPING
program (for vegetables, fruits)
Indication for the CHOPPING program (for
meat and poultry)
Indication for the CHOPPING program (for
fruits and vegetables)
Indication for the CLEANING program
Motor unit with lid ................................................ 1 pc.
Bottom of the lid with loading hole ....................... 1 pc.
Glass bowl ............................................................ 1pc.
Non-slip ring ........................................................ 1 pc.
Stainless steel knife .......................................... 2 pcs.
Double-sided disc-chopper for straws/slices ....... 1 pc.
Chopper holder ................................................... 1 pc.
Cleaning brush .................................................... 1 pc.
Pusher with hole ................................................ 1 pc.
Small pusher ..................................................... 1 pc.
Instructions manual .................................................. 1 pc.
Guarantee sheet ...................................................... 1 pc.
UTILIZATION
Control panel, Рiс. С-1
Before first use,
wipe the body of the device with a
soft, dry cloth. Bowl , bowl’s lid , knives , disc
6
,
holder
7
and pushers
9
10
wash with warm water
and
dishwashing liquid. Thoroughly dry all parts. Wipe them with
a clean dry cloth.
Before assembling or disassembling
the device, make sure that the device is unplugged.
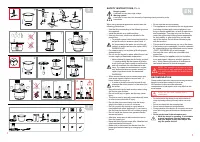
ASSEmBLY AND OPERATION ORDER, PIC. D/E
6
7
8
9
10
For chopping meat, poultry, Pic. D
For chopping fruits, vegetables Pic. E
1. Set the ring at the bottom of the bowl, Pic. D-1/E-1
2. Carefully, holding onto the plastic base, place the
upper knife on the lower one and turn it counter-
clockwise. Holding onto the plastic part, place the
knives inside the glass bowl, Pic. D-2. Prepare the
necessary ingredients and place them inside the
chopping bowl, Pic. D-3.
2. Install the disc-chopper by selecting one of the sides
for coarse chopping or fine chopping on the holder.
Then install the disk chopper with holder in the bowl,
Pic. E-2.
3. Set the motor unit on to the bottom of the lid with a loading hole , Pic. D-4/E-3.
4. Close the latches on the sides of the lid, Pic. D-5/E-4.
5.
Plug in the device. Indication on the display will flash.
6. Press button several times to select the required
program or . To start the program press
button. Press the button again to stop the operation.
Ingredients
Quantity
Time
Indication
Meat, poultry
200 g
dice
30 sec.
Garlic
300 g
15 sec.
Carrot
400 g
dice
15 sec.
Bread
100-
150 g
15 sec.
Parsley/dill
50 g
15 sec.
6. Press button once, select chopping program .
Press
button to start the program.
Using a pusher, place washed, if necessary, peeled
and cut ingredients in the loading hole, Pic. E-5
To stop the program press
повторно.
button again.
For a finer straws/slices chopping, place a pusher
9
in the loading hole and with the help of small pusher
10
place ingredients gradually.
Ingredients
Quantity
Time
Indication
Carrot, potato
350 g
1 min.
Cucumber
1 pc.
30-50
sec.
Maximum time of continued use of the device
– 30 seconds. The interval between the cycles
should be 2-3 minutes.
Maximum time of continued use of the device – 1
min. The interval between the cycles should be 2-3
minutes.
After every 3-rd (third) cycle, the break should be 15 min.
7. After chopping, unplug the device. Make sure the moving parts have stopped, then unlock both latches on the
lid. Remove the motor unit. The device can be disassembled.
Do not use small pusher
10
without standard pusher
9
to avoid damage to the chopping disc, Pic. E-6
NOTE! Do not chop ingredients whose
temperature is above 50°C. Let them cool.
NOTE! The amount of ingredients must not
exceed «MAx» mark.
•
Before chopping, it is recommended to cut ingredients into 2x2x2 cm cubes. The maximum amount of ingredients in the
table is shown for information purposes only. The recommended chopping duration and weight of the ingredients in the
table are advisory and may vary depending on the initial quality, freshness of the products.
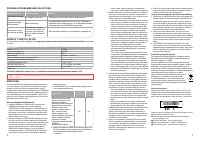
RECOmmENDATION ON PREPARATION
Product name
max.product
quantity
Time
Nozzle
Indication
Note
Meat, poultry
200-400 g
30 sec.
Remove bones, fat, tendons.
Dice 2x2x2 cm.
Onion
300 g
10-15 sec.
Pre-cut the onion head into
4 parts.
Garlic
300 g
15 sec.
Fruits/vegetables
300 g
15 sec.
Remove seeds and hard
peel.
Parsley/dill
50 g
15 sec.
Chili pepper
300 g
15 sec.
Carrot
400 g
15 sec.
Dice 2x2x2 cm.
Carrot, potato
350 g
1 min.
It is recommended to cut
into 3x7 cm slices.
Celery
300 g
15 sec.
Bread crumbs
100-150 g
10 sec.
Cucumber
1 pc.
30-50 sec.
CLEANING AND mAINTENANCE,
Рiс. F
•
Unplug the device. Remove the pusher. Make sure
the moving parts are stopped. Remove the bowl’s lid.
Carefully remove the knives, holding the plastic part.
Disassemble the knives by turning the upper knife
clockwise, and then remove him from the lower one.
•
Wipe the body of the device with damp soft cloth.
•
Wash the bow , bowl’s lid , knives , disc
6
, holder
7
and pushers
9
10
in soapy water
. They can be
washed in a dishwasher.
The water in the dishwasher
must not be higher than 60 C.
•
Never immerse the device in water due to the risk
of electric shock.
•
Thoroughly dry all the parts after cleaning.
Bowl cleaning
To clean the bowl, assemble the device according
to pictures D-1 - D-2. Add warm water and a little
dishwashing liquid into the bowl. Close the lid, Pic. D-4 -
D-5. Plug in the device. Press several times to select
the cleaning mode . To start the program press
. button. After rinsing, disassemble the appliance and
wash it as described above.
Clean all the parts of the device immediately
after use.
Содержание
- 7 Не измельчайте ингредиенты, температура; РЕКОМЕНДАЦИИ ПО ПРИгОТОВЛЕНИю
- 8 ВОЗМОжНЫЕ НЕПОЛА ДКИ И СПОСОБЫ ИХ УСТРАНЕНИЯ; Возможная; СЕРТИФИКАЦИЯ ПРОДУКЦИИ; Технические характеристики; сервисного центра OURSSON AG.; СЕРВИСНОЕ ОБСЛУжИВАНИЕ; Условия гарантийных обязательств; Очистка чаши; Название продукта
- 9 стерты, талон признается недействительным.; Утилизация изделия; OURSSON AG
Характеристики

Остались вопросы?Не нашли свой ответ в руководстве или возникли другие проблемы? Задайте свой вопрос в форме ниже с подробным описанием вашей ситуации, чтобы другие люди и специалисты смогли дать на него ответ. Если вы знаете как решить проблему другого человека, пожалуйста, подскажите ему :)


