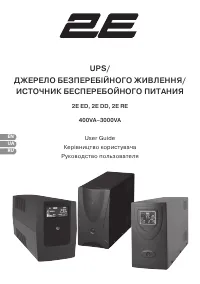
Источники бесперебойного питания 2E DD850 - инструкция пользователя по применению, эксплуатации и установке на русском языке. Мы надеемся, она поможет вам решить возникшие у вас вопросы при эксплуатации техники.
Если остались вопросы, задайте их в комментариях после инструкции.
"Загружаем инструкцию", означает, что нужно подождать пока файл загрузится и можно будет его читать онлайн. Некоторые инструкции очень большие и время их появления зависит от вашей скорости интернета.


10
11
UA
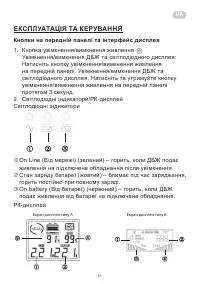
ЕКСПЛУАТАЦІЯ ТА КЕРУВАННЯ
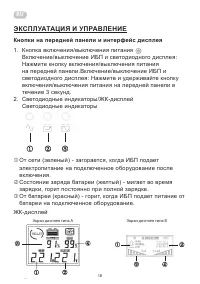
Кнопки на передній панелі та інтерфейс дисплея
1.
Кнопка увімкнення/вимкнення живлення
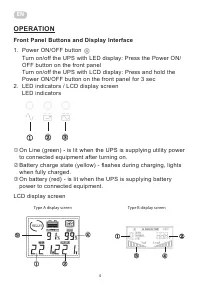
Front Panel Buttons and Display Interface
1.
Power ON/OFF button
Turn on/off the UPS with LED display: Press the Power ON/OFF button on the front panel
Turn o
n/off the UPS with LCD display:
Pre
ss and hold the Power ON/OFF button
on the front panel for 3 sec
2.
LED indicators / LCD display screen
LED indicators
①
On Line (green)
- is lit when the UPS is supplying utility power to connected equipment after turning on.
②
Battery charge state (yellow) - flashes during charging, lights when fully charged.
③
On battery (red)
- is lit when the UPS is supplying battery power to connected equipment.
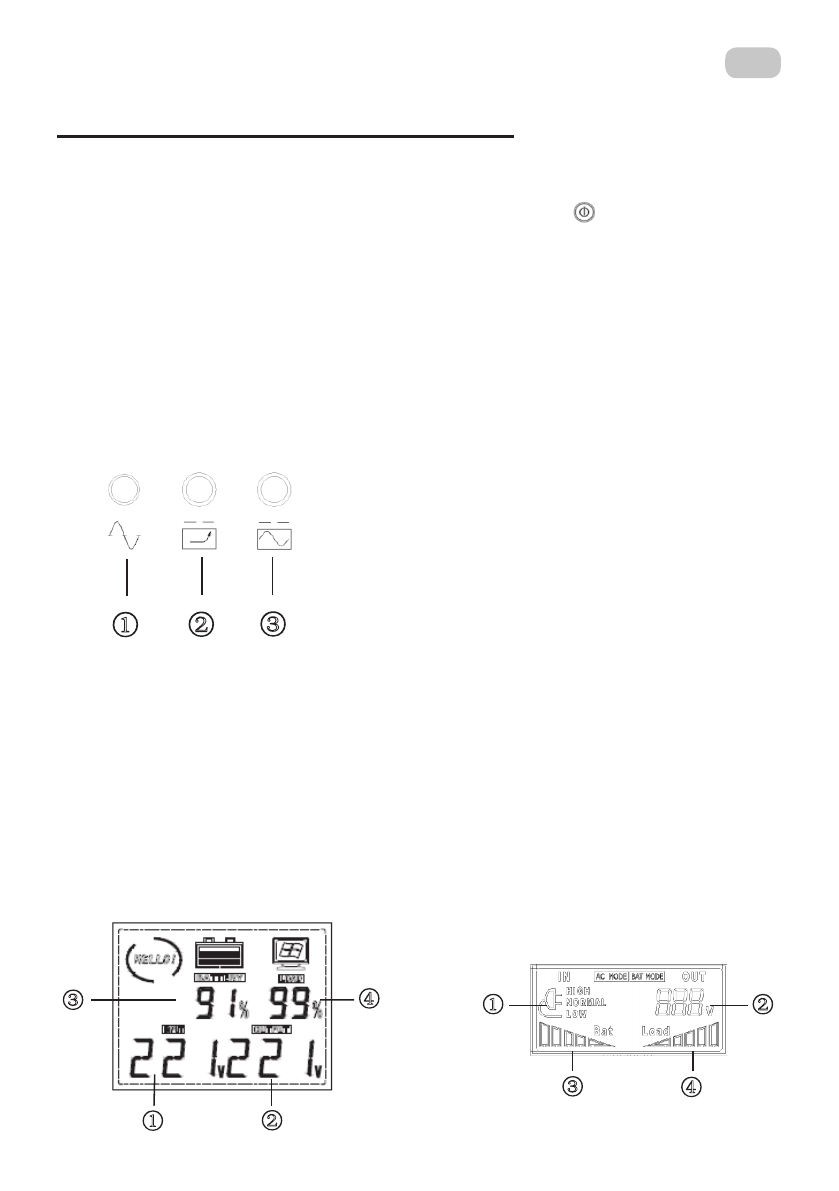
LCD display screen
①
Mains volt
age / mains state
②
Output voltage
③
Battery capacity
④
Load capacity
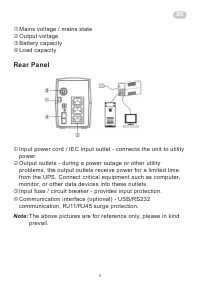
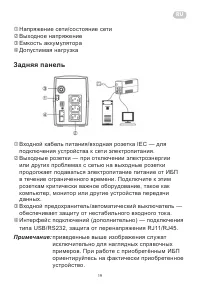
Rear Panel
①
Input power cord / IEC input outlet
- connects the unit to utility power.
②
Output outlets
- during a power outage or other utility problems, the output outlets receive power for a limited
time from the UPS. Connect critical equipment such as computer, monitor, or other data devices into these
outlets.
③
Input fuse / circuit breaker
- provides input protection.
④
Communication interface (optional) -
USB/RS232 communication, RJ11/RJ45 s
urge protection
Note: The above pictures are for
reference only, please in kind prevail.
①
③
①
②
②
③
Type A display screen
Type B display screen
②
③
④
④
①
Operation
Увімкнення/вимкнення ДБЖ та світлодіодного дисплея:
Натисніть кнопку увімкнення/вимкнення живлення
на передній панелі. Увімкнення/вимкнення ДБЖ та
світлодіодного дисплея: Натисніть та утримуйте кнопку
увімкнення/вимкнення живлення на передній панелі
протягом 3 секунд.
2.
Світлодіодні індикатори/РК-дисплей
Світлодіодні індикатори
Front Panel Buttons and Display Interface
1.
Power ON/OFF button
Turn on/off the UPS with LED display: Press the Power ON/OFF button on the front panel
Turn o
n/off the UPS with LCD display:
Pre
ss and hold the Power ON/OFF button
on the front panel for 3 sec
2.
LED indicators / LCD display screen
LED indicators
①
On Line (green)
- is lit when the UPS is supplying utility power to connected equipment after turning on.
②
Battery charge state (yellow) - flashes during charging, lights when fully charged.
③
On battery (red)
- is lit when the UPS is supplying battery power to connected equipment.
LCD display screen
①
Mains volt
age / mains state
②
Output voltage
③
Battery capacity
④
Load capacity
Rear Panel
①
Input power cord / IEC input outlet
- connects the unit to utility power.
②
Output outlets
- during a power outage or other utility problems, the output outlets receive power for a limited
time from the UPS. Connect critical equipment such as computer, monitor, or other data devices into these
outlets.
③
Input fuse / circuit breaker
- provides input protection.
④
Communication interface (optional) -
USB/RS232 communication, RJ11/RJ45 s
urge protection
Note: The above pictures are for
reference only, please in kind prevail.
①
③
①
②
②
③
Type A display screen
Type B display screen
②
③
④
④
①
Operation
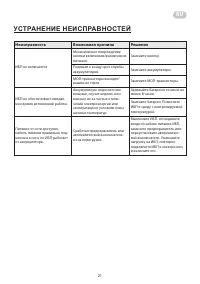
On Line (Від мережі) (зелений) – горить, коли ДБЖ подає
живлення на підключене обладнання після увімкнення.
Стан заряду батареї (жовтий) – блимає під час заряджання,
горить постійно при повному заряді.
On battery (Від батареї) (червоний) – горить, коли ДБЖ
подає живлення від батареї на підключене обладнання.
РК-дисплей
Екран дисплея типу А
Екран дисплея типу В
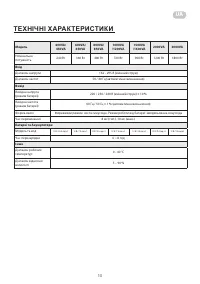
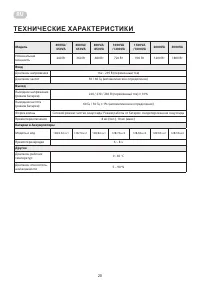
Характеристики

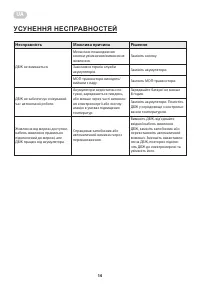
Остались вопросы?Не нашли свой ответ в руководстве или возникли другие проблемы? Задайте свой вопрос в форме ниже с подробным описанием вашей ситуации, чтобы другие люди и специалисты смогли дать на него ответ. Если вы знаете как решить проблему другого человека, пожалуйста, подскажите ему :)
