
Гравировальные машинки Dremel F0138220JN - инструкция пользователя по применению, эксплуатации и установке на русском языке. Мы надеемся, она поможет вам решить возникшие у вас вопросы при эксплуатации техники.
Если остались вопросы, задайте их в комментариях после инструкции.
"Загружаем инструкцию", означает, что нужно подождать пока файл загрузится и можно будет его читать онлайн. Некоторые инструкции очень большие и время их появления зависит от вашей скорости интернета.
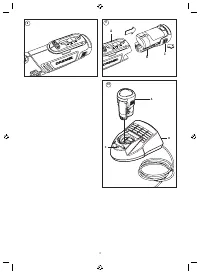
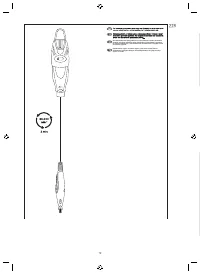
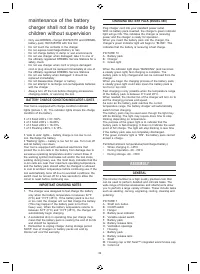


CHARGING BATTERY PACK (MODEL 880)
Plug charger cord into your standard power outlet.
With no battery pack inserted, the charger’s green indicator
light will go ON. This indicates the charger is receiving
power and the charger is ready for operation.
When you insert the battery pack into the charger, the
charger’s green indicator light will begin to “BLINK”. This
indicates that the battery is receiving a fast charge.
PICTURE 10
A. Battery pack
B. Charger
C. Green light
When the indicator light stops “BLINKING” (and becomes
a steady green light) fast charging is complete. The
battery pack is fully charged and can be removed from the
charger.
When you begin the charging process of the battery pack,
a steady green light could also mean the battery pack is
too hot or too cold.
Fast charging is only possible when the temperature range
of the battery pack is between 0°C and 45°C.
When needed, the internal fan of the charger will turn on to
aid the charging process and speed.
As soon as the battery pack reaches the correct
temperature range, the battery charger will automatically
switch to fast charging.
The battery pack may be used even though the light may
still be blinking. The light may require more time to stop
blinking depending on temperature.
The purpose of the green light is to indicate that the
battery pack is fast-charging. It does not indicate the exact
point of full charge. The light will stop blinking in less time
if the battery pack was not completely discharged.
If the green indicator light is “ON”, the battery pack cannot
accept a charge.
Permitted ambient temperatures(tool/charger/battery):
•
When charging 0...+45’C
•
During Operation -20...+50’C
•
During storage -20...+50’C
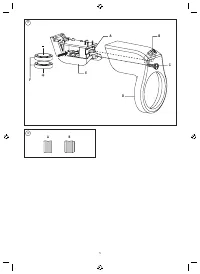
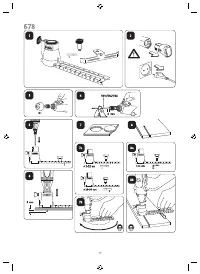
ASSEMBLY
GENERAL
The Dremel multitool is a high quality precision tool that
can be used to perform detailed and intricate tasks. The
wide range of Dremel accessories and attachments allow
you to perform a large variety of tasks. These include tasks
such as sanding, carving, engraving, routing, cleaning and
polishing.
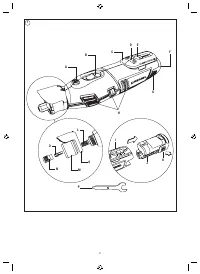
PICTURE 1
A. Shaft lock button
B. On/Off switch
C. Hanger
D. Battery level indicator
E. Variable speed switch
F. Battery pack
G. Battery release tabs
H. Ventilation openings
I. Housing
J. Battery pack
K. Battery release tabs
L. Shaft
M. Housing cap or EZ Twist™ integrated wrench/nose cap
N. Collet nut
O. Collet
P. Collet wrench
Q.
Light module
COLLETS
The Dremel accessories available for the multitool come
with various shank sizes. Four size collets are available to
accommodate the different shank sizes. Collet sizes are
identified by the rings on the back of the collet.
PICTURE 2
A. Collet nut
B.
3.2 mm Collet without ring (480)
C.
2.4 mm Collet with three rings (481)
D.
1.6 mm Collet with two rings (482)
E.
0.8 mm Collet with one ring (483)
F.
Indentification rings
NOTE: Some multitool kits may not include all four collet
sizes. Collets are available separately.
Always use the collet that matches the shank size of the
accessory you plan to use. Do not force a larger diameter
shank into a smaller collet.
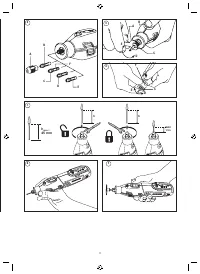
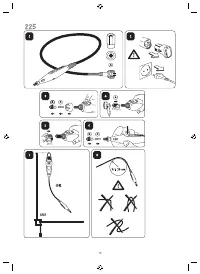
CHANGING COLLETS
PICTURE 3
A. Collet wrench
B. Shaft lock button
C. Collet nut
D. To loosen
E. To tighten
1. Press the shaft lock button, hold down and rotate the
shaft by hand until it engages the shaft lock. Do not
engage the shaft lock button while multitool is running.
2. With the shaft lock button engaged, loosen and remove
the collet nut. Use the collet wrench if necessary.
3. Remove the collet by pulling it free from the shaft.
4. Install the appropriate size collet fully into the shaft and
reinstall the collet nut finger tight. Do not fully tighten
the nut when there is no bit or accessory installed.
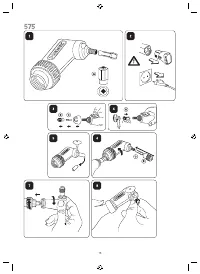
CHANGING ACCESSORIES
1. Press the shaft lock button and rotate the shaft by
hand until it engages the shaft lock.
Do not engage the
shaft lock button while multitool is running.
2.
With the shaft lock button engaged, loosen (do
not remove) the collet nut. Use the collet wrench if
necessary.
3. Insert the bit or accessory shank fully into the collet.
4.
With the shaft lock button engaged, finger tighten the
collet nut until the bit or accessory shank is gripped by
the collet.
NOTE: Be sure to read the instructions supplied with your
Dremel accessory for further information on its use.
Use only Dremel tested, high performance accessories.
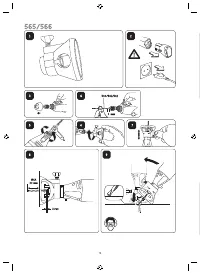
EZ TWIST™ INTEGRATED WRENCH/NOSE CAP
PICTURE 4
F.
EZ Twist™ integrated wrench/nose cap (not available
on every 8220 tool)
This nose cap has an integrated wrench allowing you to
loosen and tighten the collet nut without the use of the
standard collet wrench.
1. Unscrew the nose cap from the tool, line-up the steel
insert on inside of the cap with the collet nut.
2. With the shaft lock engaged twist nose cap counter
clockwise to loosen the collet nut. Do not engage the
shaft lock button while multitool is running.
3. Insert the bit or accessory shank fully into the collet.
4. With the shaft lock engaged twist nose cap clockwise
to tighten the collet nut.
5. Screw the nose cap back into its original position.
NOTE: Be sure to read the instructions supplied with
your Dremel accessory for further information on its
use.
Use only Dremel tested, high performance accessories.
BALANCING ACCESSORIES
For precision work, it is important that all accessories
be in good balance (much the same as the tires on
your automobile). To true up or balance an accessory,
slightly loosen collet nut and give the accessory or collet
a 1/4 turn. Re tighten collet nut and run the Rotary Tool.
You should be able to tell by the sound and feel if your
accessory is running in balance. Continue adjusting in this
fashion until best balance is achieved.
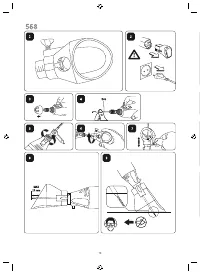
USE
GETTING STARTED
The first step in using the multitool is to get the “feel” of it.
Hold it in your hand and feel its weight and balance. Feel
the taper of the housing. This taper permits the tool to be
grasped much like a pen or pencil.
Always hold the tool away from your face. Accessories
can be damaged during handling and can fly apart as
they come up to speed.
When holding tool, do not cover the ventilation
openings with your hand. Blocking the ventilation
openings could cause the motor to overheat.
IMPORTANT! Practice on scrap material first to see how
the tool’s high-speed action performs. Keep in mind that
your multitool will perform best by allowing the speed,
along with the correct Dremel accessory and attachment,
to do the work for you. Do not put pressure on the
tool during use, if possible. Instead, lower the spinning
accessory lightly to the work surface and allow it to touch
the point at which you want to begin. Concentrate on
guiding the tool over the work using very little pressure
from your hand. Allow the accessory to do the work.
Usually it is better to make a series of passes with the tool
rather than to do the entire job with one pass. A gentle
touch gives the best control and reduces the chance of
error.
HOLDING THE TOOL
For best control in close work, grip the multitool like a
pencil between your thumb and forefinger. PICTURE 6
The “golf” grip method is used for heavier operations such
as grinding or cutting. PICTURE 7
OPERATING SPEEDS
To select the right speed for each job, use a practice piece
of material.
SLIDE “ON/OFF” SWITCH
The tool is switched “ON” by the slide switch located on
the top side of the motor housing.
25
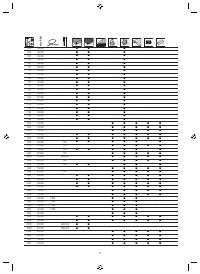
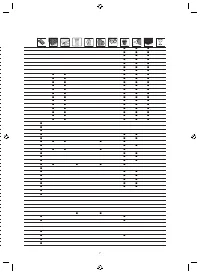
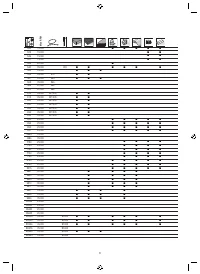
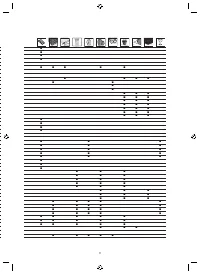
Характеристики

Остались вопросы?Не нашли свой ответ в руководстве или возникли другие проблемы? Задайте свой вопрос в форме ниже с подробным описанием вашей ситуации, чтобы другие люди и специалисты смогли дать на него ответ. Если вы знаете как решить проблему другого человека, пожалуйста, подскажите ему :)


