
Гравировальные машинки Dremel F0138220JN - инструкция пользователя по применению, эксплуатации и установке на русском языке. Мы надеемся, она поможет вам решить возникшие у вас вопросы при эксплуатации техники.
Если остались вопросы, задайте их в комментариях после инструкции.
"Загружаем инструкцию", означает, что нужно подождать пока файл загрузится и можно будет его читать онлайн. Некоторые инструкции очень большие и время их появления зависит от вашей скорости интернета.
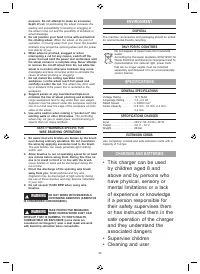


maintenance of the battery
charger shall not be made by
children without supervision
• Only use DREMEL charger 2607226153 and DREMEL
battery pack 1607A3505W with this tool
• Do not touch the contacts in the charger
• Do not expose tool/charger/battery to rain
• Do not charge battery in damp or wet environments
• Do not use charger when damaged; take it to one of
the officially registered DREMEL Service Stations for a
safety check
• Do not use charger when cord or plug is damaged;
cord or plug should be replaced immediately at one of
the officially registered DREMEL Service Stations
• Do not use battery when damaged; it should be
replaced immediately
• Do not disassemble charger or battery
• Do not attempt to recharge non-rechargeable batteries
with the charger
• Always turn off the tool before changing accessories,
changing collets, or servicing the tool.
BATTERY CHARGE CONDITION INDICATOR LIGHTS
Your tool is equipped with charge condition indicator
lights (picture 1, D). The indicator lights shows the charge
condition of the battery.
3 of 3 Solid LED’s = 67-100%
2 of 3 Solid LED’s = 34-66%
1 of 3 Solid LED’s = 16-33%
1 of 3 Flashing LED’s = 0-15%
3 “side to side” lights – battery charge is too low to run
tool. Recharge the battery.
3 “flashing” lights – battery is too hot for use. Turn tool off
and let battery cool down.
Your tool is equipped with advanced electronics that
protect the Li-Ion cells in the battery from damage due to
excessive operating temperature and/or current draw. If
the warning symbol illuminates red and/or the tool stops
working during heavy use, this most likely indicates that the
Li-Ion cells are near their maximum operating temperature,
and the battery pack should either be changed or allowed
to cool to ambient temperature before continuing use. If the
tool automatically turns off due to overload conditions, the
switch must be turned off for a few seconds to allow the
circuit to reset before continuing use.
IMPORTANT CHARGING NOTES
1. The charger was designed to fast charge the battery
only when the battery temperature is between 32°F
(0°C) and 113°F (45°C). If the battery pack is too hot
or too cold, the charger will not fast charge the battery.
(This may happen if the battery pack is hot from
heavy use). When the battery temperature returns to
between 32°F (0°C) and 113°F (45°C), the charger will
automatically begin charging.
2. A substantial drop in operating time per charge may
mean that the battery pack is nearing the end of its life
and should be replaced.
3. Remember to unplug charger during storage period.
NOTE: Use of chargers or battery packs not sold by
Dremel will void the warranty.
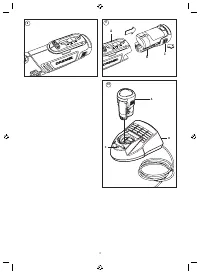
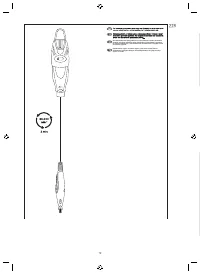
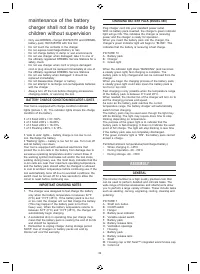
CHARGING BATTERY PACK (MODEL 880)
Plug charger cord into your standard power outlet.
With no battery pack inserted, the charger’s green indicator
light will go ON. This indicates the charger is receiving
power and the charger is ready for operation.
When you insert the battery pack into the charger, the
charger’s green indicator light will begin to “BLINK”. This
indicates that the battery is receiving a fast charge.
PICTURE 10
A. Battery pack
B. Charger
C. Green light
When the indicator light stops “BLINKING” (and becomes
a steady green light) fast charging is complete. The
battery pack is fully charged and can be removed from the
charger.
When you begin the charging process of the battery pack,
a steady green light could also mean the battery pack is
too hot or too cold.
Fast charging is only possible when the temperature range
of the battery pack is between 0°C and 45°C.
When needed, the internal fan of the charger will turn on to
aid the charging process and speed.
As soon as the battery pack reaches the correct
temperature range, the battery charger will automatically
switch to fast charging.
The battery pack may be used even though the light may
still be blinking. The light may require more time to stop
blinking depending on temperature.
The purpose of the green light is to indicate that the
battery pack is fast-charging. It does not indicate the exact
point of full charge. The light will stop blinking in less time
if the battery pack was not completely discharged.
If the green indicator light is “ON”, the battery pack cannot
accept a charge.
Permitted ambient temperatures(tool/charger/battery):
•
When charging 0...+45’C
•
During Operation -20...+50’C
•
During storage -20...+50’C
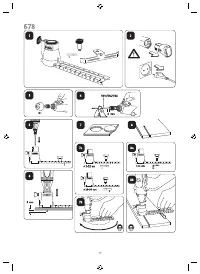
ASSEMBLY
GENERAL
The Dremel multitool is a high quality precision tool that
can be used to perform detailed and intricate tasks. The
wide range of Dremel accessories and attachments allow
you to perform a large variety of tasks. These include tasks
such as sanding, carving, engraving, routing, cleaning and
polishing.
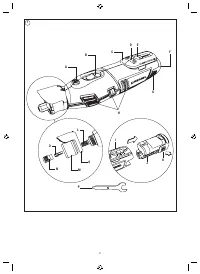
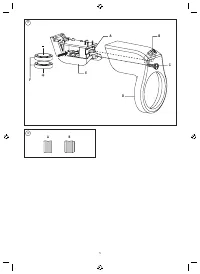
PICTURE 1
A. Shaft lock button
B. On/Off switch
C. Hanger
D. Battery level indicator
E. Variable speed switch
F. Battery pack
G. Battery release tabs
H. Ventilation openings
I. Housing
J. Battery pack
K. Battery release tabs
L. Shaft
M. Housing cap or EZ Twist™ integrated wrench/nose cap
N. Collet nut
O. Collet
P. Collet wrench
Q.
Light module
COLLETS
The Dremel accessories available for the multitool come
with various shank sizes. Four size collets are available to
accommodate the different shank sizes. Collet sizes are
identified by the rings on the back of the collet.
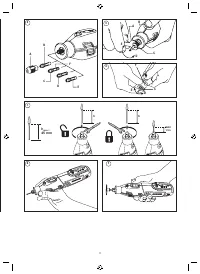
PICTURE 2
A. Collet nut
B.
3.2 mm Collet without ring (480)
C.
2.4 mm Collet with three rings (481)
D.
1.6 mm Collet with two rings (482)
E.
0.8 mm Collet with one ring (483)
F.
Indentification rings
NOTE: Some multitool kits may not include all four collet
sizes. Collets are available separately.
Always use the collet that matches the shank size of the
accessory you plan to use. Do not force a larger diameter
shank into a smaller collet.
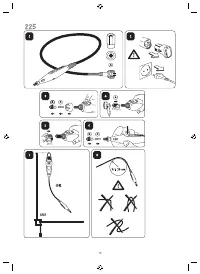
CHANGING COLLETS
PICTURE 3
A. Collet wrench
B. Shaft lock button
C. Collet nut
D. To loosen
E. To tighten
1. Press the shaft lock button, hold down and rotate the
shaft by hand until it engages the shaft lock. Do not
engage the shaft lock button while multitool is running.
2. With the shaft lock button engaged, loosen and remove
the collet nut. Use the collet wrench if necessary.
3. Remove the collet by pulling it free from the shaft.
4. Install the appropriate size collet fully into the shaft and
reinstall the collet nut finger tight. Do not fully tighten
the nut when there is no bit or accessory installed.
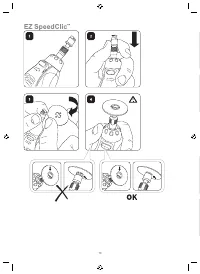
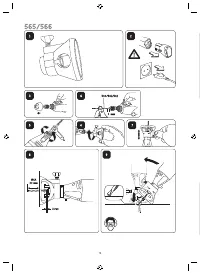
CHANGING ACCESSORIES
1. Press the shaft lock button and rotate the shaft by
hand until it engages the shaft lock.
Do not engage the
shaft lock button while multitool is running.
2.
With the shaft lock button engaged, loosen (do
not remove) the collet nut. Use the collet wrench if
necessary.
3. Insert the bit or accessory shank fully into the collet.
4.
With the shaft lock button engaged, finger tighten the
collet nut until the bit or accessory shank is gripped by
the collet.
NOTE: Be sure to read the instructions supplied with your
Dremel accessory for further information on its use.
Use only Dremel tested, high performance accessories.
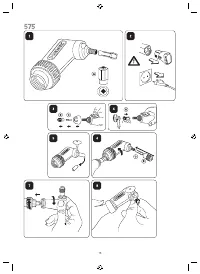
EZ TWIST™ INTEGRATED WRENCH/NOSE CAP
PICTURE 4
F.
EZ Twist™ integrated wrench/nose cap (not available
on every 8220 tool)
This nose cap has an integrated wrench allowing you to
loosen and tighten the collet nut without the use of the
standard collet wrench.
24
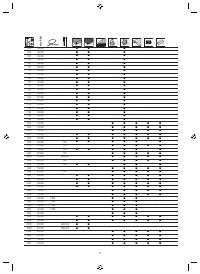
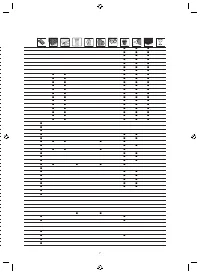
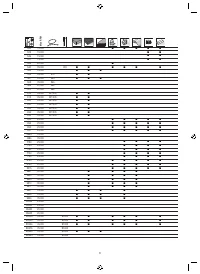
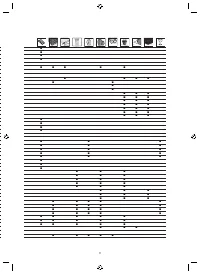
Характеристики

Остались вопросы?Не нашли свой ответ в руководстве или возникли другие проблемы? Задайте свой вопрос в форме ниже с подробным описанием вашей ситуации, чтобы другие люди и специалисты смогли дать на него ответ. Если вы знаете как решить проблему другого человека, пожалуйста, подскажите ему :)


