Гайковерты Dremel 4250 – 35 - инструкция пользователя по применению, эксплуатации и установке на русском языке. Мы надеемся, она поможет вам решить возникшие у вас вопросы при эксплуатации техники.
Если остались вопросы, задайте их в комментариях после инструкции.
"Загружаем инструкцию", означает, что нужно подождать пока файл загрузится и можно будет его читать онлайн. Некоторые инструкции очень большие и время их появления зависит от вашей скорости интернета.
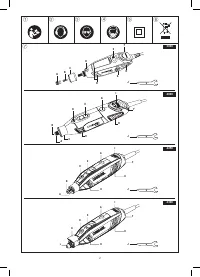
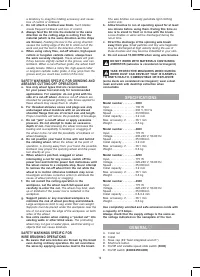


F. Hanger
G. Brush cover
H. Ventilation openings
I. Variable speed dial
(4000/4250/4300)
J. Collet wrench
K. Light module
(4300)
L. Dremel chuck
(4300)
*) not standard included
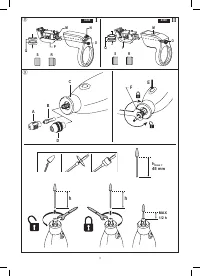
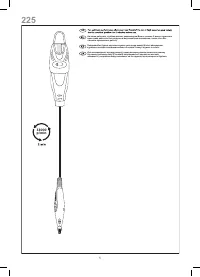
LIGHT MODULE
I
&
II
(4300)
8
M. On/Off switch
N. Slider (
I
)
O. Screw
P. Battery compartment
Q. Batteries (2 x CR1025)
R. New style nose cap
S. Old style nose cap
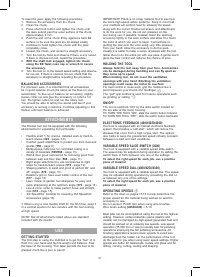
The light of this power tool is intended to illuminate the
power tool’s direct area of working operation and is not
suitable for household room illumination.
This product contains a lithium button/coin cell
battery. If a new or used lithium button/coin cell
battery is swallowed or enters the body, it can cause
severe internal burns and can lead to death in as little
as 2 hours. Always completely secure the battery
compartment. If the battery compartment does not
close securely, stop using the product, remove the
batteries, and keep it away from children. If you think
batteries might have been swallowed or placed inside
any part of the body, seek immediate medical attention.
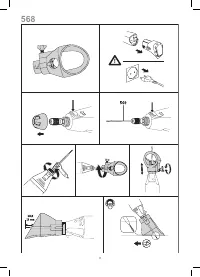
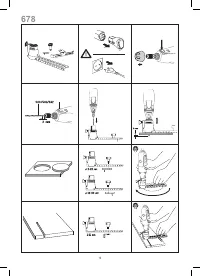
INITIAL SET-UP
In order to use the light for the first time, you will have to
remove the battery tab from the battery compartment. Pull
this tab out and test the light using the switch on top. If the
light does not work, use a small screwdriver to check the
placement of the batteries and to check that all of the tab
has been removed.
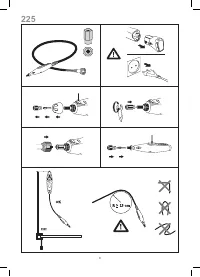
CHANGING BATTERIES
To change the batteries for the light module, begin by
unscrewing the nose cap to remove the light module. Once
it is removed, use a small screwdriver to loosen the screw
on the battery compartment.
Do not pull the screw out
completely.
Remove the battery compartment housing
from the underside of the module.
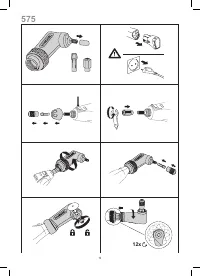
Slide the old batteries out and replace with new batteries
making sure to replicate the orientation of the original
batteries. With the new batteries in place, replace the
battery compartment housing and re-tighten the screw.
When reassembling make sure that the switch and the
slider are both in the same ON (I) or OFF (O) position.
This way the switch will match the ‘fork’ of the slider. (
I
)
INSTALLATION AND USE
To install the light module on the tool, begin by unscrewing
the nose cap from the end of the tool. Slide the light
module onto the end of the tool with the light pointing
forward. Re-tighten the nose cap on the end of the tool to
squeeze the light module ring in place.
The light module
will only work with the new style nose cap R that came
with the tool.
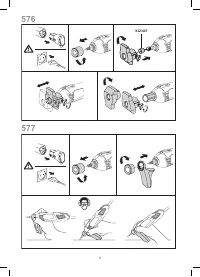
To turn the light on or off
–
put the slider in ON- or OFF position (
I
)
–
press the on/off switch (
II
)
To reposition the light module, simply loosen the nose cap,
rotate the light module as desired, and re-tighten the nose
cap.
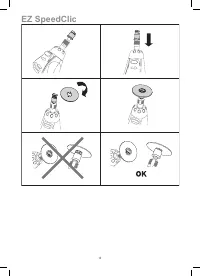
ACCESSORIES
ALWAYS UNPLUG THE TOOL BEFORE CHANGING
ACCESSORIES
Use only Dremel tested, high performance accessories.
Be sure to read the instructions supplied with your
Dremel accessory for further information on its use.
Handle and store accessories carefully to avoid
chipping and cracking.
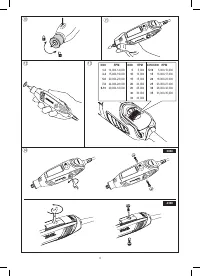
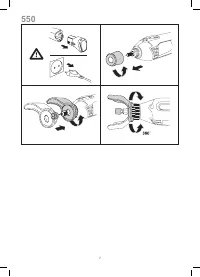
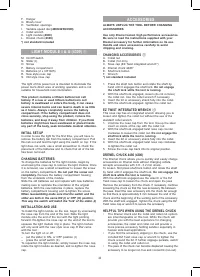
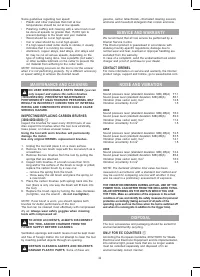
CHANGING ACCESSORIES
9
A. Collet nut
B. Collet (3.2 mm)
C. Nose cap (EZ Twist integrated wrench*)
D. Dremel chuck 4486*
E. Shaft lock button
F. Wrench
*) not standard included
1. Press the shaft lock button and rotate the shaft by
hand until it engages the shaft lock.
Do not engage
the shaft lock while the tool is running.
2. With the shaft lock engaged, loosen (do not remove)
the collet nut. Use the collet wrench if necessary.
3. Insert the bit or accessory shank fully into the collet.
4. With the shaft lock engaged, tighten the collet nut.
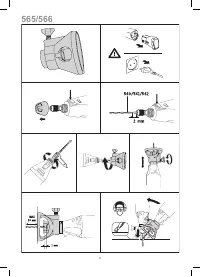
EZ TWIST INTEGRATED WRENCH
A
q
This nose cap has an integrated wrench allowing you to
loosen and tighten the collet nut without the use of the
standard collet wrench.
1. Unscrew the nose cap from the tool, line-up the steel
insert on inside of the cap with the collet nut.
2. With the shaft lock engaged twist nose cap counter
clockwise to loosen the collet nut.
Do not engage the
shaft lock while the tool is running.
3. Insert the bit or accessory shank fully into the collet.
4. With the shaft lock engaged twist nose cap clockwise
to tighten the collet nut.
5. Screw the nose cap back into its original position.
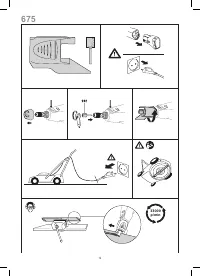
DREMEL CHUCK 4486 (4300)
The Dremel chuck allows you to quickly and easily change
accessories on Dremel tools without changing collets.
Accepts accessories with 0.8 - 3.2 mm shank.
To loosen, first press shaft lock button and rotate the shaft
by hand until it engages the shaft lock.
Do not engage the
shaft lock while the tool is running.
With the shaft lock engaged use the wrench or the EZ
Twist nose cap to loosen the chuck and open the jaws.
Remove the accessory from the chuck. If necessary, continue
loosening the chuck so that the new accessory fits between
the jaws. Insert the new accessory into the chuck far enough
so that there is approximately 6 mm between the end of the
chuck and the beginning of the working part of the accessory.
With the shaft lock engaged, tighten the chuck using the EZ
Twist nose cap or wrench to secure the accessory.
HELPFUL TIPS WHEN USING THE DREMEL CHUCK
• The Dremel chuck and the collet and collet nut system
are interchangeable on this tool. While the chuck will
provide you with the best experience for changing
accessories, the collet and collet nut will provide a
more precise accessory holding solution especially in
heavier side load applications.
• If you find the accessory slipping in the chuck, use the
included EZ Twist nose cap or wrench to tighten the
chuck around the bit. If further slippage persists, switch
to using the collet and collet nut.
• The jaws of the chuck can become displaced causing the
accessory to no longer run true and concentric (run-out).
20
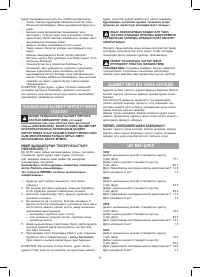
Содержание
- 23 БЕЗОПАСНОСТЬ РАБОЧЕГО МЕСТА
- 26 ТЕХНИЧЕСКИЕ ХАРАКТЕРИСТИКИ
- 27 ПЕРВОНАЧАЛЬНАЯ НАЛАДКА; СБОРКА И ПРИМЕНЕНИЕ; ПРИНА ДЛЕЖНОСТИ; СМЕНА ПРИНАДЛЕЖНОСТЕЙ
- 28 НАСА ДКИ; РАБОТА С ИНСТРУМЕНТОМ; НАЧАЛО РАБОТЫ
- 29 ТЕХНИЧЕСКОЕ ОБСЛУЖИВАНИЕ И; ПРОВЕРКА/ЗАМЕНА ГРАФИТОВЫХ ЩЕТОК
- 30 ОБСЛУЖИВАНИЕ И ГАРАНТИЯ; КОНТАКТНЫЕ ДАННЫЕ DREMEL; ШУМ И ВИБРАЦИЯ; ТОЛЬКО ДЛЯ СТРАН-ЧЛЕНОВ ЕС
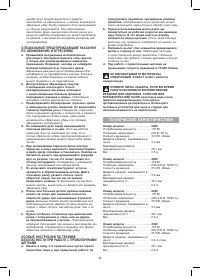
Характеристики

Остались вопросы?Не нашли свой ответ в руководстве или возникли другие проблемы? Задайте свой вопрос в форме ниже с подробным описанием вашей ситуации, чтобы другие люди и специалисты смогли дать на него ответ. Если вы знаете как решить проблему другого человека, пожалуйста, подскажите ему :)


