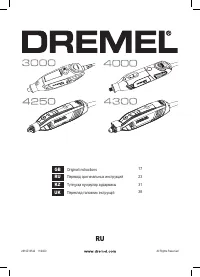
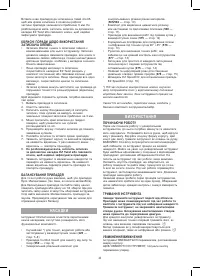
Гайковерты Dremel 4250 – 35 - инструкция пользователя по применению, эксплуатации и установке на русском языке. Мы надеемся, она поможет вам решить возникшие у вас вопросы при эксплуатации техники.
Если остались вопросы, задайте их в комментариях после инструкции.
"Загружаем инструкцию", означает, что нужно подождать пока файл загрузится и можно будет его читать онлайн. Некоторые инструкции очень большие и время их появления зависит от вашей скорости интернета.
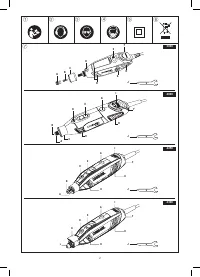


To reset the jaws, apply the following procedure:
1. Remove the accessory from the chuck.
2. Clean the chuck.
3. Press shaft lock button and tighten the chuck until
the jaws extend past the outer surface of the chuck,
approximately 3 mm.
4. Push the end of the chuck firmly against a hard flat
surface to be sure the jaws are all seated axially.
5. Continue to hand tighten the chuck until the jaws
completely close.
6. Loosen the chuck, and reinsert a straight accessory.
7. Turn the tool by hand and observe if there is any runout.
If there is obvious run-out, repeat the procedure.
8.
With the shaft lock engaged, tighten the chuck
using the EZ Twist nose cap or wrench to secure
the accessory.
9. Turn the tool on to the lowest speed setting and observe
for run-out. If there is obvious run-out, check that the
accessory is straight before repeating the procedure.
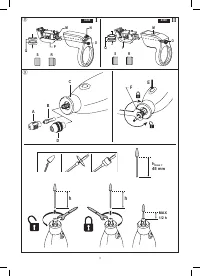
BALANCING ACCESSORIES
For precision work, it is important that all accessories
be in good balance (much the same as the tires on your
automobile). To true up or balance an accessory, slightly
loosen collet nut and give the accessory or collet a 1/4
turn. Re tighten collet nut and run the rotary tool.
You should be able to tell by the sound and feel if your
accessory is running in balance. Continue adjusting in this
fashion until best balance is achieved.
ATTACHMENTS
The Dremel tool can be equipped with the following
attachments for expanding its functionality:
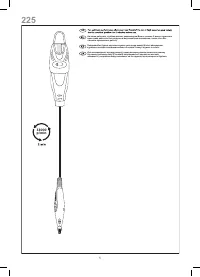
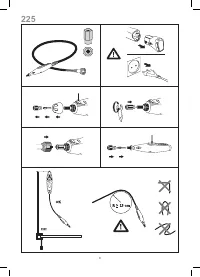
• Flexible shaft *) for precise, detailed work or hard-to-
reach places (
225
- pages 7-8)
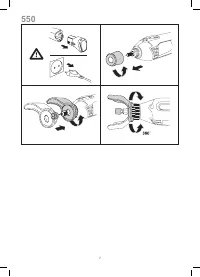
• Comfort guard attachment to protect you from dust and
sparks (
550
- page 9)
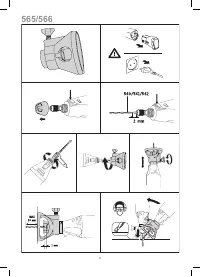
• Multipurpose cutting kit for controlled cutting in a
variety of materials (
565/566
- page 10)
• Wall & floor grout removal kit for removing grout from
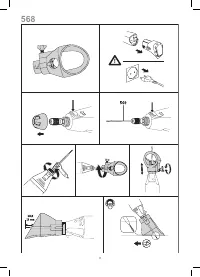
between wall and floor tiles (
568
- page 11)
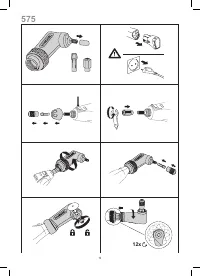
• Right angle attachment to use accessories in right
angle for hard-to-reach places (
575
- page 12)
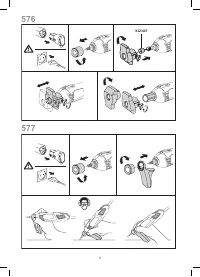
• Shaping platform to sand and grind at perfect 90° and
45° angles (
576
- page 13)
• Detailer’s grip to have even better control of the tool
(
577
- page 13)
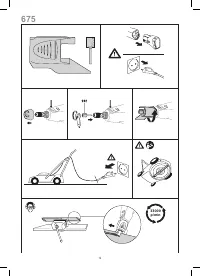
• Lawn mower & garden tool sharpener for easy and
quick sharpening at the optimum angle (
675
- page 14)
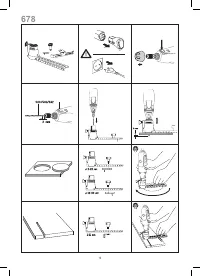
• Line & circle cutter to make perfect holes and straight
cuts (
678
- page 15)
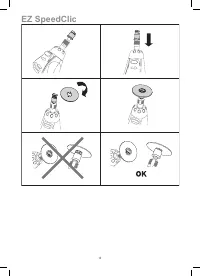
• ‘EZ SpeedClic’ mandrel for mounting ‘EZ SpeedClic’
accessories (page 16)
*) When using a new flexible shaft for the first time, keep it
in a vertical position for two minutes with the tool running
at high speed.
NOTE: Not all attachments listed above are standard
included with the tool/kit
USE
GETTING STARTED
The first step in using the multitool is to get the “feel” of it.
Hold it in your hand and feel its weight and balance. Feel
the taper of the housing. This taper permits the tool to be
grasped much like a pen or pencil.
IMPORTANT! Practice on scrap material first to see how
the tool’s high-speed action performs. Keep in mind that
your multitool will perform best by allowing the speed,
along with the correct Dremel accessory and attachment,
to do the work for you. Do not put pressure on the
tool during use, if possible. Instead, lower the spinning
accessory lightly to the work surface and allow it to touch
the point at which you want to begin. Concentrate on
guiding the tool over the work using very little pressure
from your hand. Allow the accessory to do the work.
Usually it is better to make a series of passes with the tool
rather than to do the entire job with one pass. A gentle touch
gives the best control and reduces the chance of error.
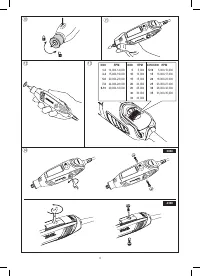
HOLDING THE TOOL
Always hold the tool away from your face. Accessories
can be damaged during handling and can fly apart as
they come up to speed.
When holding tool, do not cover the ventilation
openings with your hand. Blocking the ventilation
openings could cause the motor to overheat.
For best control in close work, grip the multitool like a
pencil between your thumb and forefinger.
A
a
The “golf” grip method is used for heavier operations such
as grinding or cutting.
A
s
ON/OFF
The tool is switched “ON” by the slide switch located on
the top side of the motor housing.
TO TURN THE TOOL “ON”, slide the switch button forward.
TO TURN THE TOOL “OFF”, slide the switch button backward.
ELECTRONIC FEEDBACK (4000/4250/4300)
Your tool is equipped with an internal electronic feedback
system that provides a ‘soft start’, which will reduce the
stresses that occur from a high torque start. The system
also helps to keep the preselected speed virtually constant
between no-load and load conditions.
VARIABLE SPEED SLIDE SWITCH (3000)
Your tool is equipped with a variable speed slide switch.
The speed may be adjusted during operation by sliding the
switch back or forth between any one of the settings.
To select the right speed for each job, use a practice
piece of material.
VARIABLE SPEED DIAL (4000/4250/4300)
Your tool is equipped with a variable speed dial. The speed
may be adjusted during operation by presetting the dial on
or between any one of the settings.
To select the right speed for each job, use a practice
piece of material.
OPERATING SPEEDS
A
d
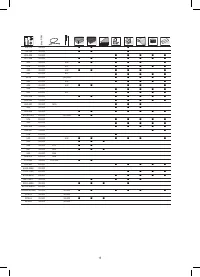
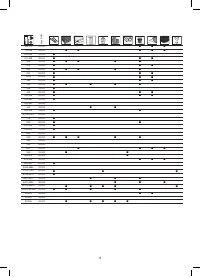
Refer to the chart on pages 17-18 to help determine the
proper speed for the material being worked on and the
accessory to use.
Do not exceed 15,000 rpm when using wire brushes.
Wire brush setting
(4250/4300)
= 5-10
Most jobs can be accomplished using the tool at the highest
setting. However, certain materials (some plastics and
metals) can be damaged by high-speed generated heat and
should be worked on at relatively low speeds. Low speed
operation (15,000 rpm or less) is usually best for polishing
operations employing the felt polishing accessories. All
brushing applications require lower speeds to avoid wire
discharge from the holder. Let the performance of the tool
do the work for you when using lower speed settings. Higher
speeds are better for hardwoods, metals and glass and for
drilling, carving, cutting, routing and shaping.
21
Содержание
- 23 БЕЗОПАСНОСТЬ РАБОЧЕГО МЕСТА
- 26 ТЕХНИЧЕСКИЕ ХАРАКТЕРИСТИКИ
- 27 ПЕРВОНАЧАЛЬНАЯ НАЛАДКА; СБОРКА И ПРИМЕНЕНИЕ; ПРИНА ДЛЕЖНОСТИ; СМЕНА ПРИНАДЛЕЖНОСТЕЙ
- 28 НАСА ДКИ; РАБОТА С ИНСТРУМЕНТОМ; НАЧАЛО РАБОТЫ
- 29 ТЕХНИЧЕСКОЕ ОБСЛУЖИВАНИЕ И; ПРОВЕРКА/ЗАМЕНА ГРАФИТОВЫХ ЩЕТОК
- 30 ОБСЛУЖИВАНИЕ И ГАРАНТИЯ; КОНТАКТНЫЕ ДАННЫЕ DREMEL; ШУМ И ВИБРАЦИЯ; ТОЛЬКО ДЛЯ СТРАН-ЧЛЕНОВ ЕС
Характеристики

Остались вопросы?Не нашли свой ответ в руководстве или возникли другие проблемы? Задайте свой вопрос в форме ниже с подробным описанием вашей ситуации, чтобы другие люди и специалисты смогли дать на него ответ. Если вы знаете как решить проблему другого человека, пожалуйста, подскажите ему :)


