
Фрезеры Makita 3709 - инструкция пользователя по применению, эксплуатации и установке на русском языке. Мы надеемся, она поможет вам решить возникшие у вас вопросы при эксплуатации техники.
Если остались вопросы, задайте их в комментариях после инструкции.
"Загружаем инструкцию", означает, что нужно подождать пока файл загрузится и можно будет его читать онлайн. Некоторые инструкции очень большие и время их появления зависит от вашей скорости интернета.


4
10.
Before using the tool on an actual workpiece,
let it run for a while. Watch for vibration or
wobbling that could indicate improperly
installed bit.
11.
Be careful of the bit rotating direction and the
feed direction.
12.
Do not leave the tool running. Operate the tool
only when hand-held.
13.
Always switch off and wait for the bit to come
to a complete stop before removing the tool
from workpiece.
14.
Do not touch the bit immediately after
operation; it may be extremely hot and could
burn your skin.
15.
Do not smear the tool base carelessly with
thinner, gasoline, oil or the like. They may
cause cracks in the tool base.
16.
Draw attention to the need to use cutters of the
correct shank diameter and which are suitable
for the speed of the tool.
17.
Some material contains chemicals which may
be toxic. Take caution to prevent dust
inhalation and skin contact. Follow material
supplier safety data.
18.
Always use the correct dust mask/respirator
for the material and application you are
working with.
SAVE THESE INSTRUCTIONS.
WARNING:
DO NOT let comfort or familiarity with product
(gained from repeated use) replace strict adherence
to safety rules for the subject product. MISUSE or
failure to follow the safety rules stated in this
instruction manual may cause serious personal
injury.
FUNCTIONAL DESCRIPTION
CAUTION:
•
Always be sure that the tool is switched off and
unplugged before adjusting or checking function on
the tool.
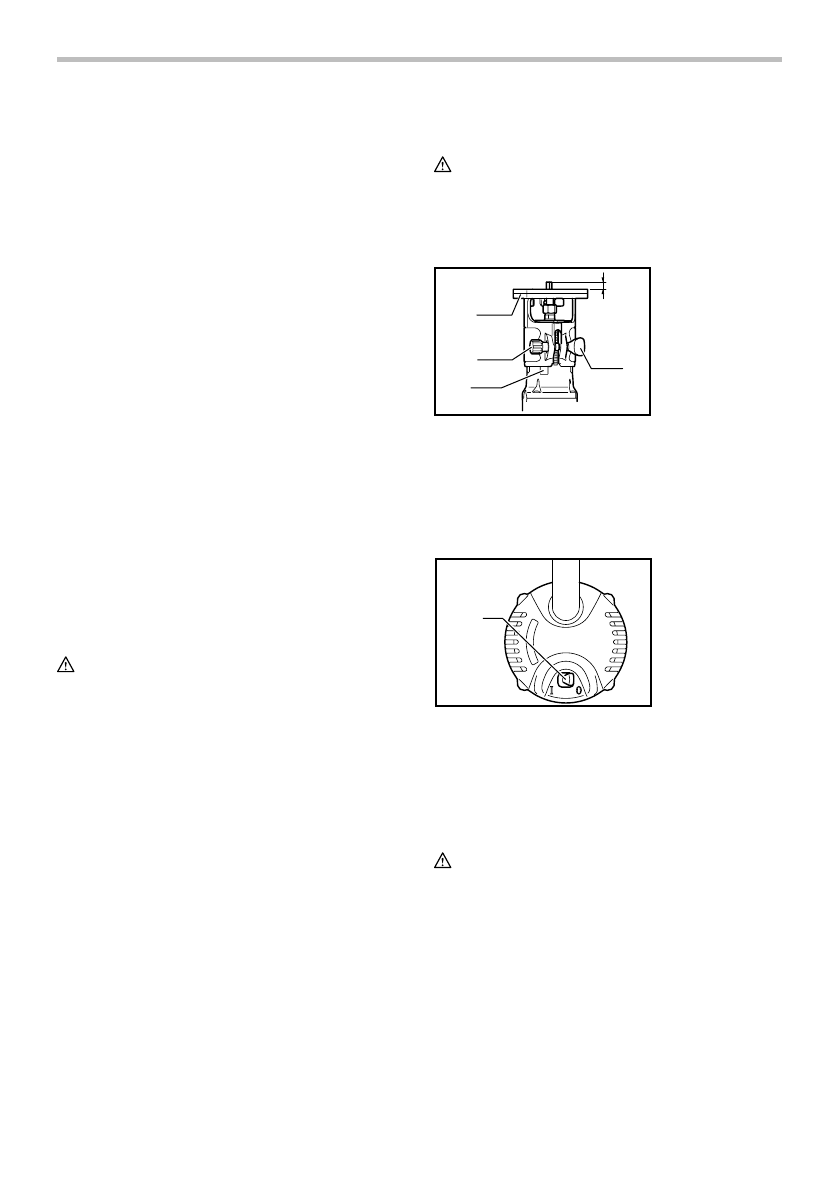
Adjusting bit protrusion
1
2
3
4
5
006613
To adjust the bit protrusion, loosen the clamping nut and
move the tool base up or down as desired by turning the
adjusting screw. After adjusting, tighten the clamping nut
firmly to secure the tool base.
Switch action
1
006614
To start the tool, move the switch lever to the I (ON)
position. To stop the tool, move the switch lever to the O
(OFF) position.
ASSEMBLY
CAUTION:
•
Always be sure that the tool is switched off and
unplugged before carrying out any work on the
tool.
1. Switch lever
1. Base
2. Scale
3. Bit protrusion
4. Clamping nut
5. Adjusting screw
Характеристики

Остались вопросы?Не нашли свой ответ в руководстве или возникли другие проблемы? Задайте свой вопрос в форме ниже с подробным описанием вашей ситуации, чтобы другие люди и специалисты смогли дать на него ответ. Если вы знаете как решить проблему другого человека, пожалуйста, подскажите ему :)


