Фрезеры Einhell TE-BJ 18 Li (4350630) - инструкция пользователя по применению, эксплуатации и установке на русском языке. Мы надеемся, она поможет вам решить возникшие у вас вопросы при эксплуатации техники.
Если остались вопросы, задайте их в комментариях после инструкции.
"Загружаем инструкцию", означает, что нужно подождать пока файл загрузится и можно будет его читать онлайн. Некоторые инструкции очень большие и время их появления зависит от вашей скорости интернета.


GB
- 18 -
•
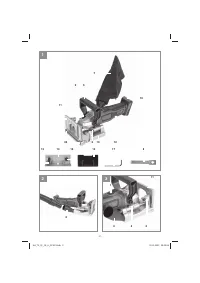
It can be rotated by the user into any position
in order to make the work comfortable.
•
If the dust bag (7) is full or you have finished
your work, then it can be taken off again and
emptied by opening the zip fastener.
•
It is also possible to connect a dust extractor
(vacuum cleaner) to the dust bag adapter (6)
(Fig. 2).
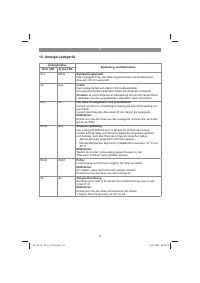
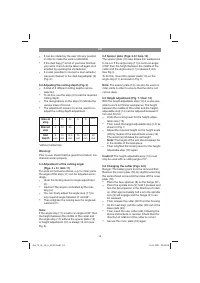
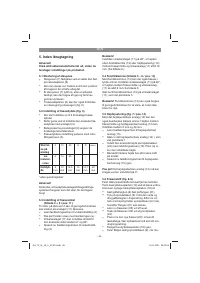
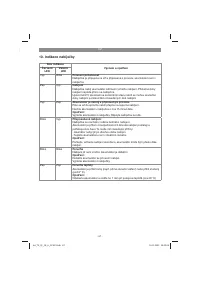
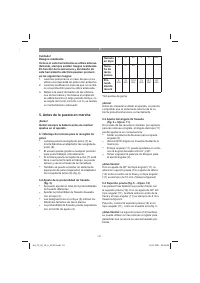
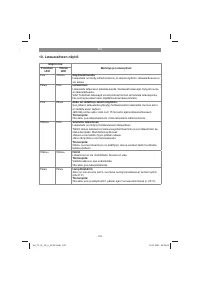
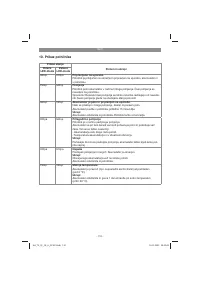
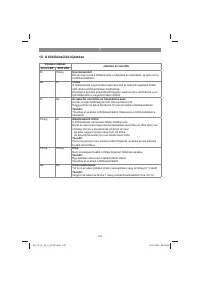
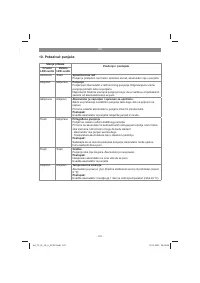
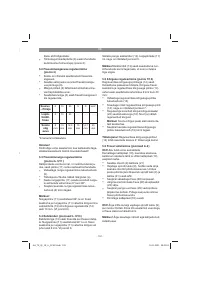
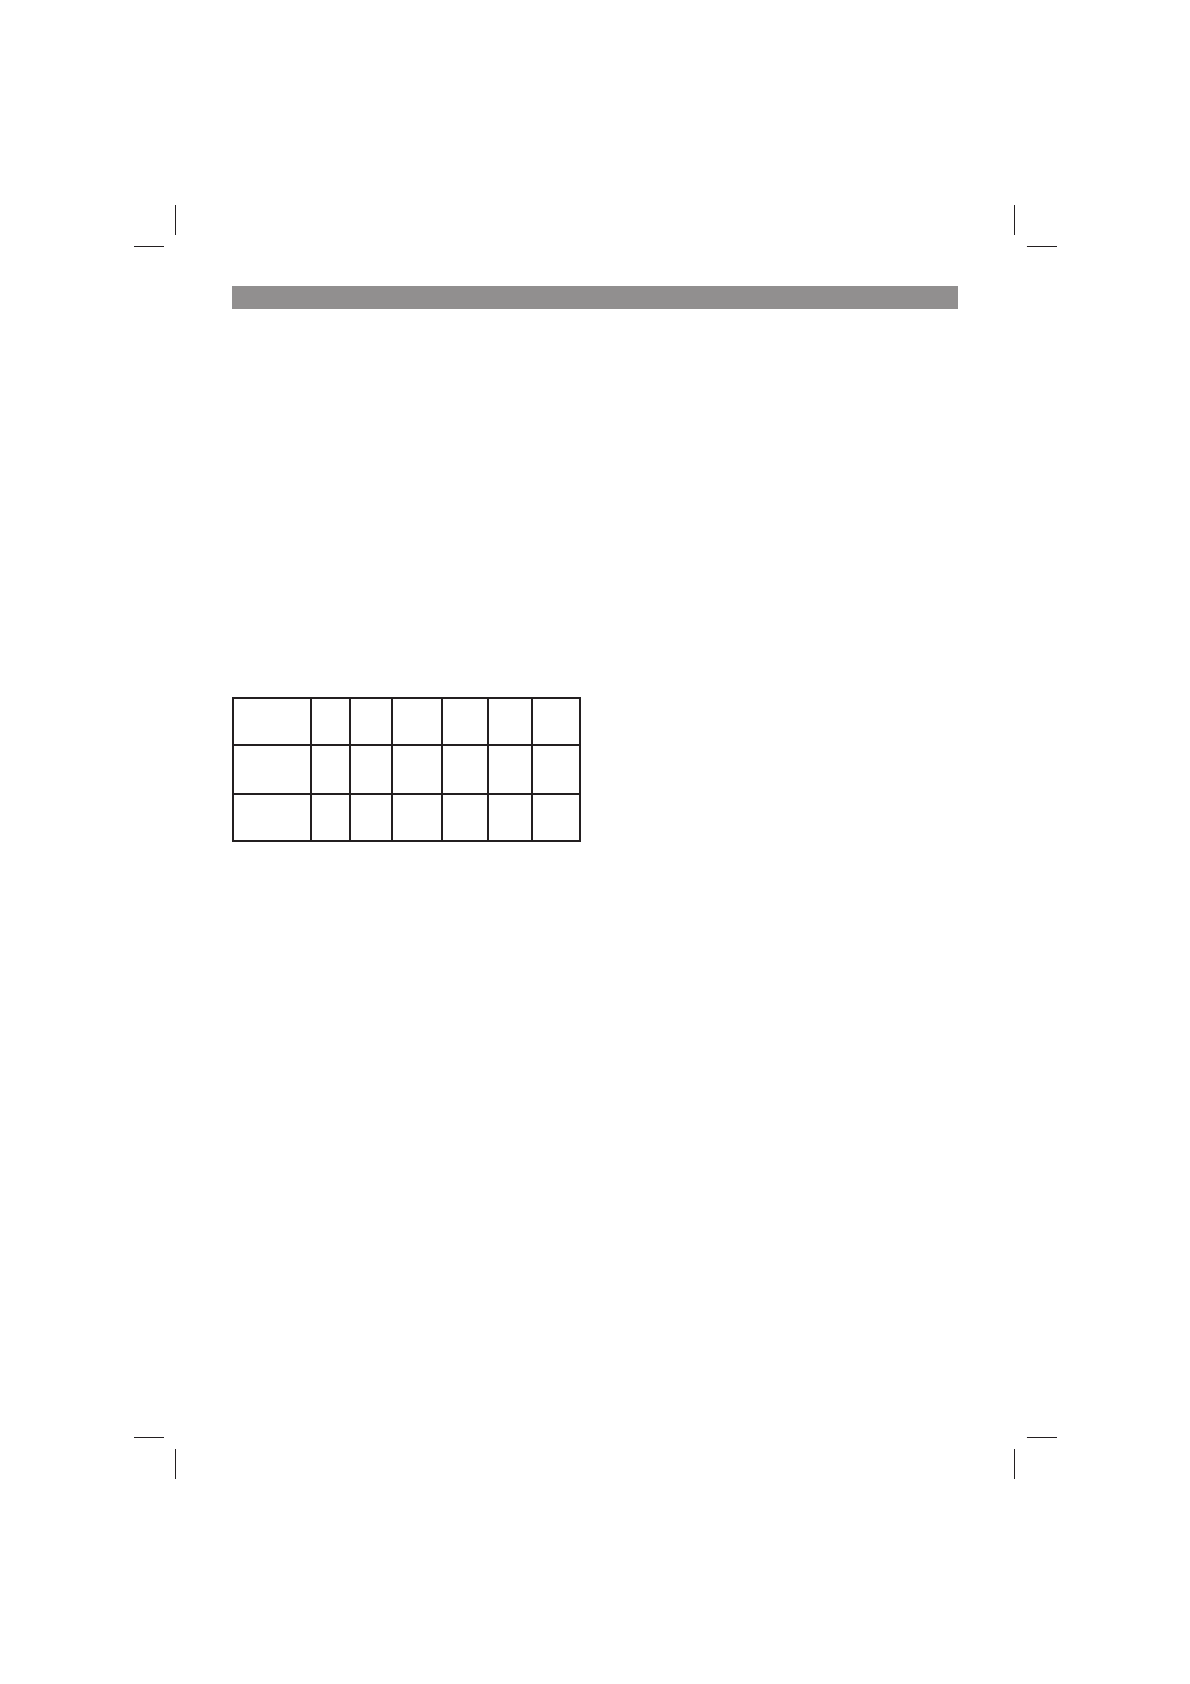
5.2 Adjusting the cutting depth (Fig. 3)
•
A total of 6 different cutting depths can be
selected.
•
To do this, use the stop (3) to set the required
cutting depth.
•
The designations on the stop (3) indicate the
various sizes of biscuit.
•
The adjustment screw (4) can be used to re-
adjust the cutting depth adjustment.
Size at
stop
0
10
20
S
D
MAX*
Biscuit
size
0
10
20
-
-
-
Slot
depth
8
mm
10
mm
12,3
mm
13
mm
14,7
mm
20
mm
*without rubber tips
Warning!
Prior to use, check that the guard hood return me-
chanism works properly.
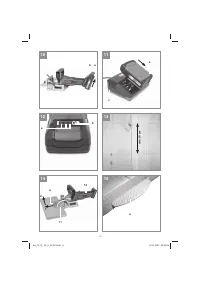
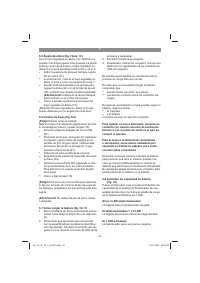
5.3 Adjustment of the cutting angle
(Figs. 4 + 5 / item 11)
For slots on inclined surfaces, e.g. for miter joints,
the angle of the stop (11) can be adjusted accor-
dingly.
•
Undo the locking lever for angle adjustment
(2).
•
Caution! The angle is indicated by the mar-
king (a).
•
You can freely adjust the angle stop (11) to
any required angle between 0° and 90°.
•
Then retighten the locking lever for angle ad-
justment (2).
Note:
If the angle stop (11) is set to an angle of 90° then
the height between the middle of the cutter and
the angle stop (11) without the spacer plate (13)
or height adjustment (14) is always 10 mm (see
Fig. 6).
5.4 Spacer plate (Figs. 5-6 / item 13)
The spacer plate (13) also allows thin workpieces
to be cut. If the angle stop (11) is set to an angle
of 90° then the height between the middle of the
cutter and the angle stop (11) is always 6 mm.
See Fig. 6.
To do this, mount the spacer plate (13) on the
angle stop (11) as shown in Fig. 5.
Note:
The spacer plate (13) can also be used on
miter joints in order to ensure that the slot is not
cut too deep.
5.5 Height adjustment (Fig. 7 / item 14)
With the height-adjustable stop (14) it is also pos-
sible to work on thinner workpieces. The height
between the middle of the cutter and the height-
adjustable stop (14) can be adjusted between 0
mm and 40 mm.
•
Undo the locking lever for the height-adjus-
table stop (15).
•
Then insert the height-adjustable stop (14) as
shown in Fig. 7.
•
Adjust the required height on the height scale
(22) by means of the adjustment screw (16).
The arrow (a) indicates the set height.
Note:
The height of the slot should always be
in the middle of the workpiece.
•
Then retighten the locking lever for the height-
adjustable stop (15) again.
Caution!
The height-adjustable stop (14) must
only be used with a cutting angle of 0°.
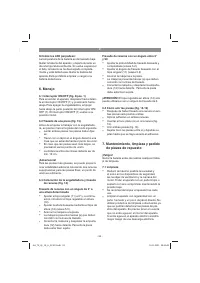
5.6 Changing the cutter (Figs. 8-9)
Danger: The battery pack must be removed
fi
rst.
Remove the cover plate (10) by slightly loosening
the socket head screw and then take o
ff
the cover
plate (10).
•
Place the face spanner (8) on the flange (21).
•
Press the spindle lock (9); hold it pressed and
turn the face spanner in the direction of rotati-
on. After approximately half a turn the spindle
lock (9) will engage and the flange (21) can
be released.
•
Then release the cutter (20) from the housing.
•
As the next step, pull the cutter (20) out of the
base plate (23).
•
Then insert the new cutter (20), following the
above instructions in reverse. Check that the
direction of rotation of the cutter is correct.
•
Secure the cover plate (10) again.
Anl_TE_BJ_18_Li_SPK13.indb 18
10.11.2021 08:20:28
Характеристики

Остались вопросы?Не нашли свой ответ в руководстве или возникли другие проблемы? Задайте свой вопрос в форме ниже с подробным описанием вашей ситуации, чтобы другие люди и специалисты смогли дать на него ответ. Если вы знаете как решить проблему другого человека, пожалуйста, подскажите ему :)


