Электробритвы Panasonic ER508 - инструкция пользователя по применению, эксплуатации и установке на русском языке. Мы надеемся, она поможет вам решить возникшие у вас вопросы при эксплуатации техники.
Если остались вопросы, задайте их в комментариях после инструкции.
"Загружаем инструкцию", означает, что нужно подождать пока файл загрузится и можно будет его читать онлайн. Некоторые инструкции очень большие и время их появления зависит от вашей скорости интернета.


6
7
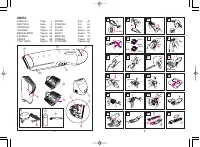
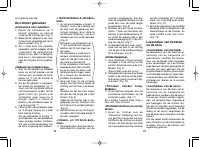
How to use
<Charging instructions>
1) Set the switch to “0·charge”, and plug
the cord into the clipper body. (Fig.1)
2) Plug the AC adaptor into an AC
o u t l e t . T h e c h a r g i n g i n d i c a t o r
lamp will light up. (Fig.2)
3) When charging is completed unplug
the AC adaptor from an AC outlet.
The charging time is 12 hours; 1 full
charge will provide approximately 60
minutes of continuous operation.
<AC operation>
1) Connect the AC adaptor to the body in
the same way as for charging, and set
the switch to “1” to use the clipper.
2) If the AC adaptor is connected while
the switch is in the “1” position, the
clipper may not operate. If this occurs,
s e t t h e s w i t c h t o t h e “ 0 · c h a r g e ”
position, wait about 1 minute and then
set it back to the “1” position.
3) Be sure to set the switch “0·charge”
to when finished using the clipper.
I f t h e s w i t c h i s l e f t i n t h e “ 1 ”
position, the rechargeable battery
will become completely discharged,
shortening the life of the battery.
<10/20/30/40mm 4-Step Comb
Attachment>
1) With the power switch turned off
(“0·charge”), adjust the attachment
to the desired trimming height by
sliding it until a click is felt at one
of the 4 steps. (Fig. 3)
Moving the switch to “1” will lock the
attachment so that it cannot slide.
The switch is designed not to work if
the attachment is not in the correct
position.
If the switch will not work, move the
attachment up or down to make fine
adjustments to its position, while
operating the switch.
2) Cut hair to the correct height by
moving the clipper back against
the flow of the hair.
(Actual hair length will be a little longer
than the height you set.) (Fig. 4)
( D o n o t u s e t h e c l i p p e r i n a n
i n v e r t e d p o s i t i o n . T h i s c a n c u t
hair too deeply.) (Fig. 5)
3) Turn off the clipper (“0·charge”)
before changing the trim height or
removing the attachment.
<3/6mm, 9/12mm comb
attachments>
1) The cutting heights are indicated
on the insides and sides of the
attachments, so be sure to look
for the height indication in order
to mount the attachment correctly
f o r t h e d e s i r e d c u t t i n g h e i g h t .
(Fig.6)
2) To mount the comb attachment to
the clipper, place one side of the
hooks of the comb attachment into
the attachment mounting
B
, then
s l i d e t h e o t h e r s i d e t o a n o t h e r
m o u n t i n g
B
i n t h e d i r e c t i o n
indicated with the arrow. (Fig.7)
3) To remove the comb attachment
from the clipper, slide one side of
the attachment off the mounting
B
in the direction indicated with the
arrow. (Fig.8)
<Thinning Attachment>
1) To thin hair (1/3 of hair), install
the thinning attachment over the
trimming blades in the direction of
the arrow. (Fig.9)
(Push in until a click is heard.)
2) To remove the attachment, push
both sides in the directions of the
arrow while pulling the attachment.
(Fig.10)
<Trimming With No
Attachments>
1) Cut hair by placing the clipper head
directly on the scalp. (Fig.11)
Cutting without an attachment will
trim hair length to 1mm or less.
<Mounting and removal of
the blade>
1) H o l d t h e c l i p p e r b o d y w i t h t h e
“Panasonic” mark facing upward and
push the blade with your thumb in
the direction indicated by the arrow.
When doing this, catch the blade in
your other hand. Be sure the switch
is set to “0·charge” before attempting
to remove the blade. (Fig.12)
2) T o r e m o u n t t h e b l a d e , f i t t h e
m o u n t i n g h o o k i n t o t h e b l a d e
mounting on the clipper body and
push in until it “clicks”. (Fig.13)
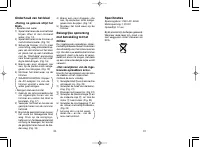
Life of the blade and battery
<Blade Life>
Blade life will vary according to the
frequency and length of use. The life
of the blades is expected to be about
6 years when using the clipper twice
a month for 20 minutes each time. If
cutting efficiency is reduced substially
d e s p i t e p r o p e r m a i n t e n a n c e , t h e
blades have exceeded their service
life and should be changed.
<Battery life>
Battery life will vary according to the
f r e q u e n c y a n d l e n g t h o f u s e . I f t h e
batteries are charged 3 times a month,
the service life will be approximately 6
y e a r s . I f t h e u n i t i s l e f t w i t h o u t b e i n g
charged for more than 6 months, the
charge will drain from the batteries and
t h e i r s e r v i c e l i f e m a y b e s h o r t e n e d .
Therefore, even when not in regular use,
i t i s r e c o m m e n d e d t h a t t h e u n i t b e
recharged at least every 6 months.
Blade Maintenance
<Always clean the blade after
each use>
B
If washing in water
1) Rinse off any hairs that are sticking
to the blade in running water. (Fig.14)
2) Rinse out any hairs that are inside the
clipper with running water. (Fig.15)
3) S h a k e t h e c l i p p e r 4 ~ 5 t i m e s
gently, wipe off any water drops
from the clipper and blade, and
then place it onto a towel with the
“ W a s h a b l e ” i n d i c a t o r f a c i n g


