
Духовые шкафы Korting OKB 752 CMX - инструкция пользователя по применению, эксплуатации и установке на русском языке. Мы надеемся, она поможет вам решить возникшие у вас вопросы при эксплуатации техники.
Если остались вопросы, задайте их в комментариях после инструкции.
"Загружаем инструкцию", означает, что нужно подождать пока файл загрузится и можно будет его читать онлайн. Некоторые инструкции очень большие и время их появления зависит от вашей скорости интернета.
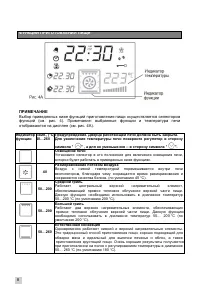

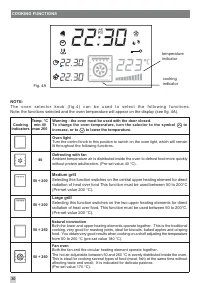

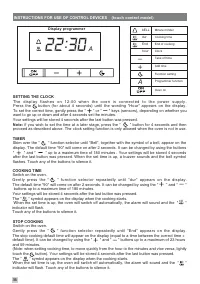
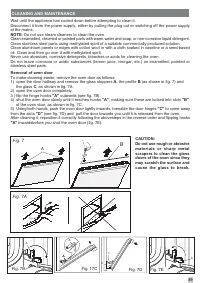


Note: the functions selected and the oven temperature will appear on the display (see fig. 5).
Warning : the oven must be used with the door closed.
Note: gently press the keys (sensors) to increase or decrease
the oven temperature.
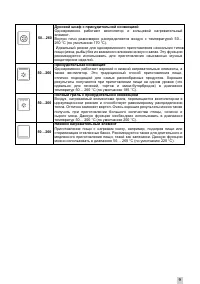
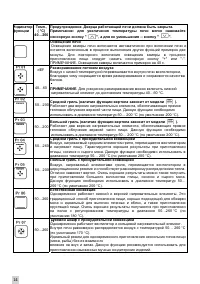
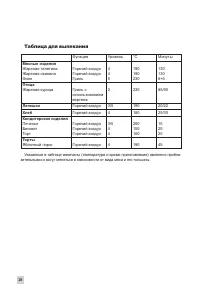
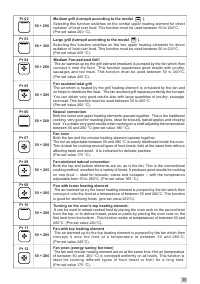
Cooking
indicators
Temp. °C
min 40
max 260
Defrosting with fan
Ambient temperature air is distributed inside the oven to defrost food more quickly
without protein adulteration.
dEF
NOTE:
It is possible to turn on the ovenfs bottom heating element by varying the
temperature between 40 and 60 °C if you want to speed up the defrosting process.
40 ÷ 60
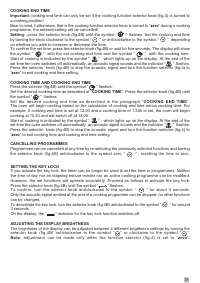
Turning the oven on and off
Press the button .
On will appear on the display and the ovens internal light will come after two seconds.
If no cooking function is set within the following minute, the oven sets itself to OFF automatically.
To switch off the oven during cooking, lightly touch the button.
.
Controls lock.
Every time the oven is turned off, or when a programmed cooking function is active, the controls lock
is automatically activated (child safety). When the lock is active the
lock
symbol appears on the
temperature display.
To use the oven, the lock must be released by pressing the button for several
seconds; then switch on the oven again by touching the button. The lock can be activated even
while the oven is in use by pressing the button for a few seconds.
The following cooking functions can be set by using the programmer (Fig. 5):
Pr 01
Oven light
The ovens internal light comes on automatically when the oven is turned on and
remains on during other functions for about 2 minutes.
To turn the light back on whilst cooking, touch the buttons (sensors) + or -.
NOTE: The light will stay on for about 40 seconds.
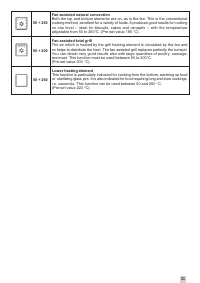
NOTE: The oven has a special "fast preheat" function (circular heating element + fan) which is
automatically activated when an oven cooking function is selected. It is deactivated when the oven
reaches the set temperature, leaving the selected cooking function to continue. Oven preheating
is not activated for the defrost, medium grill and large grill functions.
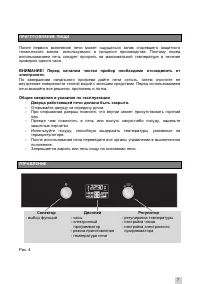
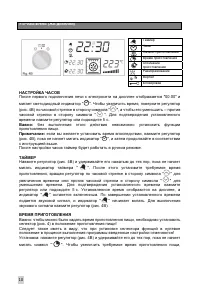
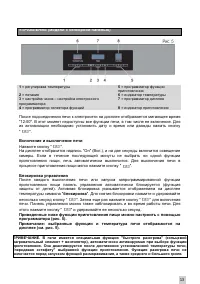
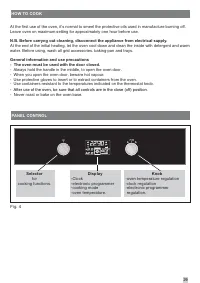
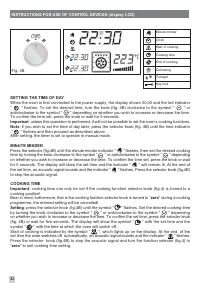
PANEL CONTROL (touch control model )
Fig. 5
1
2 3 4
5
6
7
8
5
= cooking function programmer.
6
= temperature indicator.
7
= Display programmer.
8
= cooking indicator.
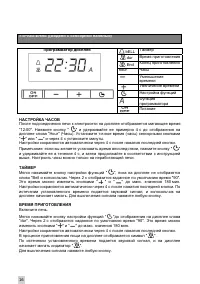
The display flashes on 12:00 when the oven is connected to the power supply and all oven functions,
including switching on, will be active only after setting the day and time or after lightly touching the
button twice.
1
= oven temperature regulation.
2
= Oven on
.
3
= clock regulation - electronic programmer regulation.
4
= selector functions programmer.
34
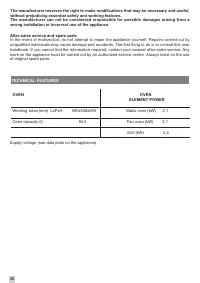
Характеристики

Остались вопросы?Не нашли свой ответ в руководстве или возникли другие проблемы? Задайте свой вопрос в форме ниже с подробным описанием вашей ситуации, чтобы другие люди и специалисты смогли дать на него ответ. Если вы знаете как решить проблему другого человека, пожалуйста, подскажите ему :)


