
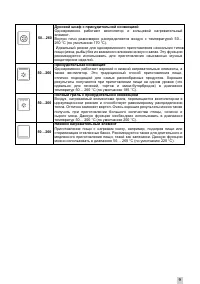
Духовые шкафы Korting OKB 752 CMX - инструкция пользователя по применению, эксплуатации и установке на русском языке. Мы надеемся, она поможет вам решить возникшие у вас вопросы при эксплуатации техники.
Если остались вопросы, задайте их в комментариях после инструкции.
"Загружаем инструкцию", означает, что нужно подождать пока файл загрузится и можно будет его читать онлайн. Некоторые инструкции очень большие и время их появления зависит от вашей скорости интернета.

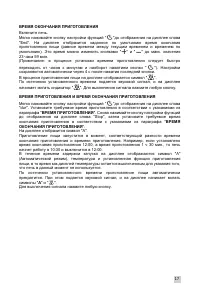
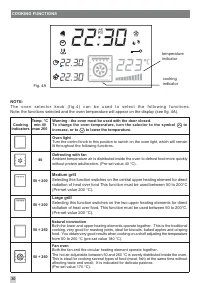

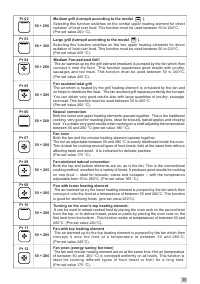

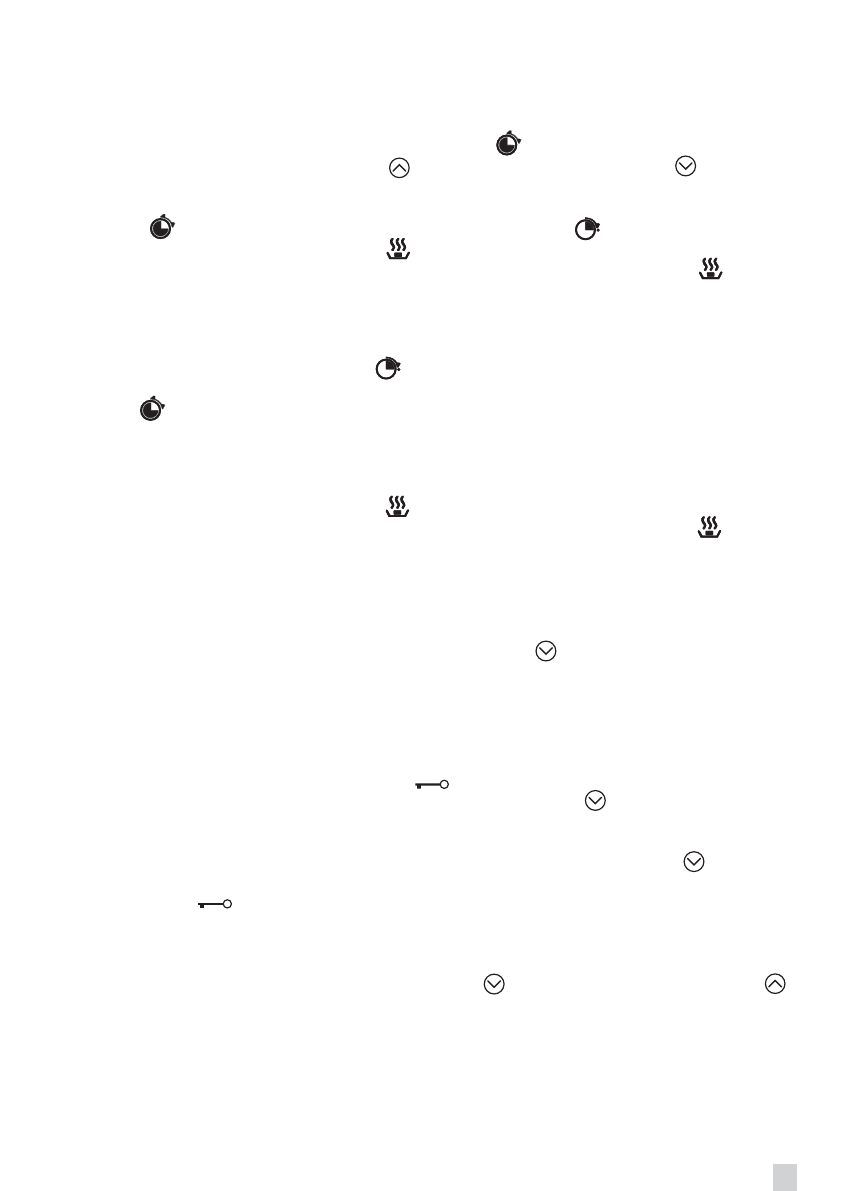
COOKING END TIME
Important
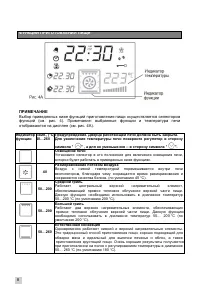
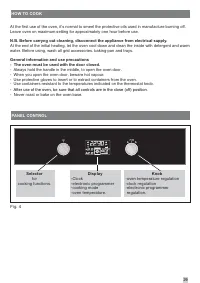
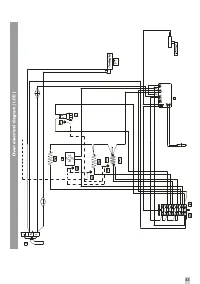
: cooking end time can only be set if the cooking function selector knob (fig.4) is turned to
a cooking position!
Bear in mind, furthermore, that is the cooking function selector knob is turned to
zero
during a cooking
programme, the entered setting will be cancelled!
Setting
: press the selector knob (fig.4B) until the symbol flashes. Set the cooking end time
by turning the knob clockwise to the symbol or anticlockwise to the symbol depending
on whether you wish to increase or decrease the time.
To confirm the set time, press the selector knob (fig.4B) or wait for five seconds. The display will show
the symbol with the set cooking end time and the symbol with the cooking time.
Start of cooking is indicated by the symbol , which lights up on the display. At the end of the
set time the oven switches off automatically, an acoustic signal sounds and the indicator flashes.
Press the selector knob (fig.4B) to stop the acoustic signal and turn the function selector (fig.4) to
zero
to exit cooking end time setting.
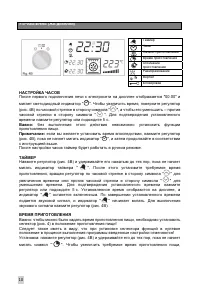
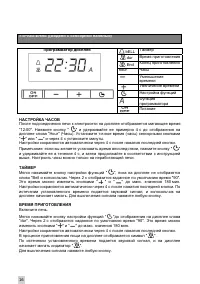
COOKING TIME AND COOKING END TIME
Press the selector (fig.4B) until the symbol flashes.
Set the desired cooking time as described at
COOKING TIME
. Press the selector knob (fig.4B) until
the symbol flashes.
Set the desired cooking end time as described in the paragraph
COOKING END TIME
.
The oven will begin cooking based on the calculation of cooking end time minus cooking time. For
example, if cooking end time is set at 12.00 and a cooking time of 1.30h is set, the oven will begin
cooking at 10.30 and will switch off at 12.00.
Start of cooking is indicated by the symbol , which lights up on the display. At the end of the
set time the oven switches off automatically, an acoustic signal sounds and the indicator flashes.
Press the selector knob (fig.4B) to stop the acoustic signal and turn the function selector (fig.4) to
zero
to exit cooking time and cooking end time setting.
CANCELLING PROGRAMMES
Programmes can be cancelled at any time by re-selecting the previously selected functions and turning
the selector knob (fig.4B) anticlockwise to the symbol zero , resetting the time to zero.
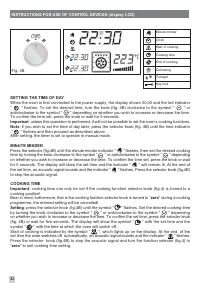
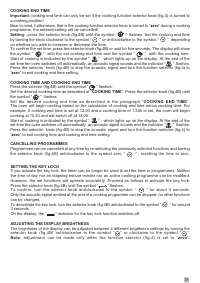
SETTING THE KEY LOCK
If you activate the key lock, the timer can no longer be used to set the time or programmes. Neither
the time of day nor an elapsing minute minder nor an active cooking programme can be modified.
However, the set functions will operate accurately. Proceed as follows to activate the key lock:
Press the selector knob (fig.4B) until the symbol
flashes.
To confirm, turn the selector knob anticlockwise to the symbol
for about 3 seconds.
Only the acoustic signal emitted at the end of a cooking programme can be stopped, no other functions
can be changed.
To deactivate the key lock, turn the selector knob (fig.4B) anticlockwise to the symbol
for around
3 seconds.
On the display, the
indicator for the key lock function switches off.
ADJUSTING THE DISPLAY BRIGHTNESS
The brightness of the display can be adjusted between 4 different brightness settings by turning the
selector knob (fig.4B) anticlockwise to the symbol
or
clockwise to the symbol
.
Note
: adjustment can be made only when the function selector (fig.4) is set to
zero
.
33
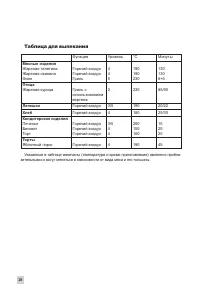
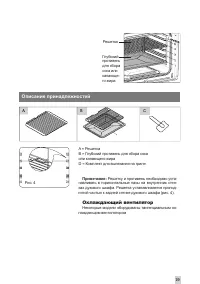
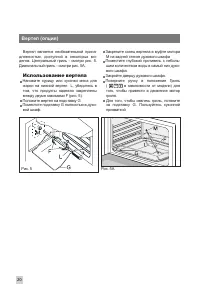
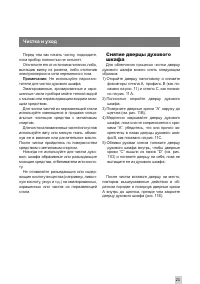
Характеристики

Остались вопросы?Не нашли свой ответ в руководстве или возникли другие проблемы? Задайте свой вопрос в форме ниже с подробным описанием вашей ситуации, чтобы другие люди и специалисты смогли дать на него ответ. Если вы знаете как решить проблему другого человека, пожалуйста, подскажите ему :)


