Блендеры VITEK VT-3401 BK - инструкция пользователя по применению, эксплуатации и установке на русском языке. Мы надеемся, она поможет вам решить возникшие у вас вопросы при эксплуатации техники.
Если остались вопросы, задайте их в комментариях после инструкции.
"Загружаем инструкцию", означает, что нужно подождать пока файл загрузится и можно будет его читать онлайн. Некоторые инструкции очень большие и время их появления зависит от вашей скорости интернета.


4
ENGLISH
BEFORE USING THE UNIT
Note:
After unit transportation or storage at low
temperature it is necessary to keep it for at least two
hours at room temperature before switching on.
–
Wash the attachments that will contact food with
warm water and a neutral detergent and dry them
thoroughly before use.
–
Wipe the motor unit (4), whisk gear (6) and pro-
cessing bowl geared lid (12) with a soft slightly
damp cloth.
Attention!
–
Do not immerse the motor unit (4), whisk gear (6),
mash making attachment gear (8), processor bowl
geared lid (12), power cord and plug into water or
any other liquids.
–
Do not put the attachments and bowls in a dish-
washing machine.
OPERATION TIME
Continuous operation time while working with
attachments (5, 7, 9) should not exceed 1 minute.
Operation time of the processor should not exceed 20-
30 seconds. Make at least a two-minute break between
operation cycles.
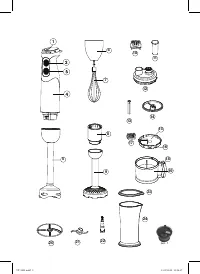
USING THE BLENDER AT TACHMENT
Warning: Before assembling make sure that the
plug is not inserted into the socket.
•
Insert the blender attachment (5) into the motor
unit (4), and turn it counterclockwise until bumping.
•
Insert the plug into the mains socket.
•
Immerse the blender attachment (5) into the bowl
with products that you want to chop/mix; you can
use the measuring cup (24) for it.
Note: When using the measuring cup (24) for
chopping/mixing
products,
the
amount
of
ingredients should not exceed 200 ml. Otherwise
the mixed products can splash.
•
To switch the blender on, press and hold the button
(2). Set the required operation speed (from 1 to 20)
using the control knob (1). Use this operation mode
for mixing liquid products.
•
If you press and hold the button (3), the unit will op-
erate in the turbo mode, that is, at maximum rotation
speed. Use this operation mode for combined pro-
cessing of liquid and hard products.
Notes:
–
Products should be put into the bowl before the unit
is switched on.
–
Before you start chopping/mixing, we recommend
to peel fruit, remove inedible parts, such as stones,
and to cut fruit into approximately 2х2 cm cubes.
•
After you finish using the unit, take the plug out of
the socket and remove the blender attachment (5),
turning it clockwise.
Attention!
–
Do not remove the blender-attachment (5) during
operation.
–
To avoid damage of the blades, do not process
too hard products such as cereals, rice, spices,
coffee beans, ice, cheese, frozen food.
–
If the products are difficult to process, add
some liquid into the bowl.
USING THE WHISK
Use the whisk attachment (7) only to beat cream, make
biscuit dough or for mixing ready desserts.
Warning: before assembling make sure that the
plug is not inserted into the mains socket.
•
Insert the whisk (7) into the gear (6).
•
Insert the whisk gear (6) into the motor unit (4), and
turn it counterclockwise until bumping.
•
Insert the plug into the mains socket.
•
Put the whisk (7) into the bowl with products.
•
Set the required operation speed (from 1 to 20) us-
ing the control knob (1).
•
To switch the blender on, press and hold the but-
ton (2). Use this operation mode for mixing liquid
products.
•
If you press and hold the button (3), the unit will op-
erate at maximum rotation speed.
•
After you finish using the unit, take the plug out of
the socket, disconnect the whisk (7) from the gear
(6) and disconnect the gear (6) from the motor unit
(4) turning it clockwise.
Attention!
–
Do not use the whisk (7) to make tight dough.
–
Products for beating/mixing should be put into
the bowl before switching the unit on.
USING THE MASH MAKING AT TACHMENT
Attention!
–
Use the attachment (9) to make mash from
boiled potatoes, carrots or other vegetables.
–
To make mash, it is recommended to use mealy
sorts of potato.
–
Do not immerse the mash making attachment
into boiling liquids, for example, when cook-
ing soup.
–
Do not use the attachment (9) for process-
ing hard products and products that haven’t
passed temperature processing, because it
can damage the attachment.
Warning: before assembling make sure that the
plug is not inserted into the mains socket.
•
Insert the attachment (9) into the gear (8).
•
Insert the attachment gear (8) into the motor unit
(4), and turn it counterclockwise until bumping.
•
Insert the plug into the mains socket.
•
Put the attachment (9) into the bowl with products.
VT-3401.indd 4
15.07.2013 11:36:58


