Блендеры VITEK VT-1480 GY - инструкция пользователя по применению, эксплуатации и установке на русском языке. Мы надеемся, она поможет вам решить возникшие у вас вопросы при эксплуатации техники.
Если остались вопросы, задайте их в комментариях после инструкции.
"Загружаем инструкцию", означает, что нужно подождать пока файл загрузится и можно будет его читать онлайн. Некоторые инструкции очень большие и время их появления зависит от вашей скорости интернета.


5
ENGLISH
•
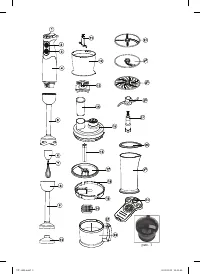
Insert the whisk gear (6) into the motor unit (4),
and turn it counterclockwise until bumping.
•
Insert the plug into the socket.
•
Put the whisk (7) into the bowl with products.
•
Set the required operation speed 1-20 using
the control (1).
•
To switch the blender on press and hold the
button (2). Use this operation mode for mix-
ing liquid products.
•
If you press and hold the button (3), the unit
will switch on at maximum rotation.
•
After you finish using the unit, take the plug
out of the socket, disconnect the whisk (7)
from the gear (6) and disconnect the gear
(6) from the motor unit (4) by turning it clock-
wise.
Attention!
–
Do not use the whisk (7) to make tight dough.
–
Products for beating/mixing should be put
into the bowl before switching the unit on.
USING THE MASH MAKING AT TACHMENT
Attention!
–
The attachment (9) is used to make mash
from boiled potatoes, carrot or other veg-
etables.
–
To make mash it is recommended to use
mealy sorts of potato.
–
Do not immerse the mash making attach-
ment into boiling liquids, for example, when
cooking soup.
–
Do not use the attachment (9) for process-
ing hard products and products that haven’t
passed temperature processing, because it
can damage the attachment.
Warning:
Before assembling make sure that the
power plug is not inserted into the socket.
•
Insert the attachment (9) into the gear (8).
•
Insert the attachment gear (8) into the motor
unit (4), and turn it counterclockwise until
bumping.
•
Insert the plug into the socket.
•
Put the attachment (9) into the bowl with
products.
•
Set the required operation speed 1-20 using
the control (1).
•
To switch the blender on press and hold the
button (2).
•
When the button (3) is pressed, the unit oper-
ates at maximal rotation speed.
•
After you finish using the unit, take the plug
out of the socket, disconnect the gear (8)
from the motor unit (4) by turning it clock-
wise.
Using the mini-chopper
The mini-chopper is used to chop meat, onion,
herbs, garlic, vegetables and fruit.
Attention!
–
Do not chop very hard products, such as
nutmegs, coffee beans and cereals.
Before you start chopping:
•
Remove bones, sinews and cartilage from
meat.
•
Cut meat, onion, garlic, carrot etc. into
approximately equal slices.
•
When chopping greens, remove stems of
herbs.
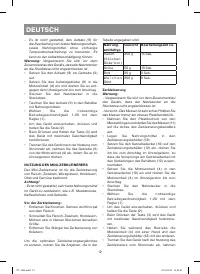
To achieve the best results refer to the table
below.
Product type Weight Approximate
processing time
Meat
(1 cm slices)
250 g.
15 sec.
Greens
50 g.
10 sec.
Bread
80 g.
8 sec.
Soft fruit
200 g.
8 sec.
Chopping
Warning:
-
Before assembling make sure that the
power plug is not inserted into the socket.
-
Be careful – the knife is very sharp! Always
hold the knife by the upper plastic end.
•
Remove the plastic protection from the
blades and set the knife (11) on the axis of
chopper bowl.
•
Put the products into the chopper bowl (12).
•
Put the geared lid (10) on the bowl (12)
by matching the ledges on the lid with the
grooves on the bowl and turn it clockwise
until bumping.
•
Insert the motor unit (4) into the geared lid
(10) and turn the motor unit (4) clockwise
until bumping.
•
Insert the plug into the socket.
VT-1480.indd 5
02.08.2012 15:15:40
Содержание
- 18 Не разрешайте детям играть с; ПРОДОЛЖИТЕЛЬНОСТЬ РАБОТЫ; Перед
- 19 Вставьте сетевую вилку в розетку.; ИСПОЛЬЗОВАНИЕ ВЕНЧИК А; теста или перемешивания готовых десертов.
- 20 ИСПОЛЬЗОВАНИЕ МИНИ-ЧОППЕРА; Зелень; Измельчение
- 21 Не переполняйте чашу процессора.
- 22 Соблюдайте правильность; ЧИСТК А УСТРОЙСТВА
- 23 ХРАНЕНИЕ; Срок службы устройства – 3 года.


