Блендеры BRAYER 1201BR - инструкция пользователя по применению, эксплуатации и установке на русском языке. Мы надеемся, она поможет вам решить возникшие у вас вопросы при эксплуатации техники.
Если остались вопросы, задайте их в комментариях после инструкции.
"Загружаем инструкцию", означает, что нужно подождать пока файл загрузится и можно будет его читать онлайн. Некоторые инструкции очень большие и время их появления зависит от вашей скорости интернета.


8
9
en
en
•
Install the knife block (5) on the bowl (3), turn the
knife block (5) clockwise (pic. 9).
•
To avoid damage of the sealing gasket (4) when
tightening the knife block (5), do not apply excessive
effort.
•
Wash the used parts of the blender (8, 9, 10) with
warm water and neutral detergent, rinse and dry.
•
Wash the knife block (12) (only from the knives side)
and the sealing gasket (11) with warm water and
neutral detergent, rinse them and dry.
•
Clean the motor unit body (6) with a soft, slightly
damp cloth, and then wipe it dry.
•
do not use abrasives and solvents to clean the motor
unit body (6) and the removable parts.
•
do not immerse the motor unit body (6) into any
liquids, do not put it and the removable parts in a
dishwashing machine.
STORAGE
•
Clean the unit before taking it away for storage.
•
keep the unit in a dry cool place out of reach of
children and disabled persons.
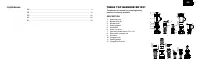
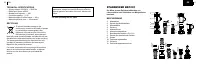
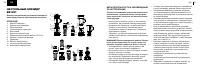
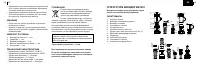
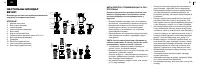
DELIVERY SET
1. Tabletop blender — 1 pc.
2. Container — 1 pc.
3. Container lid — 1 pc.
4. Chopper bowl assembled — 1pc.
5. Manual — 1 pc.
•
To avoid damage of the sealing gasket (11) when
turning the knife block (12), do not apply excessive
effort (pic. 7).
•
Install the bowl (10) on the motor unit (6), slightly
press on it and turn it clockwise until bumping (pic.
8).
•
Use the pulse mode to grind coffee beans.
•
To switch the pulse mode on, turn the switch (7) to
the position “P” and hold it.
ATTENTION! Continuous operation time of the unit
should not exceed 30 seconds.
• After the unit operation is finished, set the operation
mode switch (7) to the «0» position and unplug the
unit.
•
Remove the bowl (10) from the motor unit (6) by
turning it counterclockwise (pic. 8).
•
Remove the knife block (12) from the bowl (10)
turning the knife block (12) counterclockwise (pic. 7).
•
Put the ground coffee into a suitable sealed
container.
•
Wash the knife block (12) (only from the knives side)
and the sealing gasket (11) with warm water and
neutral detergent, rinse them and dry.
CLEANING AND MAINTENANCE
•
After using the bowl (3) wash it preliminary, to do
this pour some water into the bowl (3) and add some
neutral detergent.
• After the unit operation is finished, set the operation
mode switch (7) to the «0» position and unplug the
unit.
•
Remove the container (9) from the motor unit (6) by
turning it counterclockwise (Pic. 3).
•
Remove the knife block (5) from the container (9)
turning the knife block (5) counterclockwise (pic. 4).
•
Place the lid (8) on the container (9) turning it
clockwise (pic. 5) and put the container (9) away
for storage in the fridge or use it for the intended
purpose.
•
Wash the knife block (5) (only from the knives side)
and the sealing gasket (4) with warm water and
neutral detergent, rinse them and dry.
ATTENTION: The knives (5) are sharp and
dangerous. Handle the knives (5) carefully.
CHOPPER BOwL (10)
•
you can use the chopper bowl (10) as a coffee
grinder.
•
Remove the knife block (12) from the chopper
bowl (10), to do this turn the knife block (12)
counterclockwise.
•
Put the coffee beans into the bowl (10), maximal
weight of the coffee beans is 60 g.
•
Install the sealing gasket (11) on the knife block (12),
install the knife block (12) on the bowl (10) and turn
it clockwise.
•
Cover the bowl (3) with the lid (2) with installed
measuring cup (1).
•
Insert the power plug into the mains socket.
•
Use the pulse mode to wash the bowl (3).
•
To switch the pulse mode on, turn the switch (7) to
the position “P” and hold it.
•
After washing the bowl (3) set the operation mode
switch (7) to the «0» position and unplug the unit.
•
Remove the lid (2) from the bowl (3).
•
Remove the bowl (3) from the motor unit (6) by
turning it counterclockwise (pic. 1), drain the washing
solution, wash the bowl, rinse it and dry.
•
Wash the measuring cup (1), the lid (2) with warm
water and neutral detergent, rinse it and dry.
REMOVING AND INSTALLING THE kNIFE BLOCk
(5)
•
To remove the knife block (5) turn it
counterclockwise. Remove the knife block (5) and the
sealing gasket (4) (pic. 9) from the blender bowl (3).
ATTENTION: The knives (5) are sharp and
dangerous. Handle the knives (5) carefully.
•
Wash the knife block (5) (only from the knives side)
and the sealing gasket (4) with warm water and
neutral detergent, rinse them and dry.
•
Wash the blender bowl (3) with warm water and
neutral detergent, rinse and dry.
•
Set the sealing gasket (4) on the knife block (5).
Характеристики

Остались вопросы?Не нашли свой ответ в руководстве или возникли другие проблемы? Задайте свой вопрос в форме ниже с подробным описанием вашей ситуации, чтобы другие люди и специалисты смогли дать на него ответ. Если вы знаете как решить проблему другого человека, пожалуйста, подскажите ему :)


