Заточные станки Einhell GE-CS 18 Li - инструкция пользователя по применению, эксплуатации и установке на русском языке. Мы надеемся, она поможет вам решить возникшие у вас вопросы при эксплуатации техники.
Если остались вопросы, задайте их в комментариях после инструкции.
"Загружаем инструкцию", означает, что нужно подождать пока файл загрузится и можно будет его читать онлайн. Некоторые инструкции очень большие и время их появления зависит от вашей скорости интернета.


GB
- 22 -
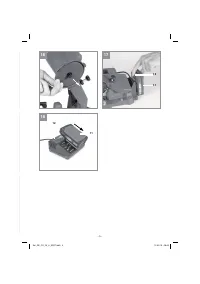
2. Check that your mains voltage is the same as
that marked on the rating plate of the battery
charger. Insert the power plug of the charger
(12) into the socket outlet. The green LED will
then begin to
fl
ash.
3. Push the battery pack onto the battery char-
ger.
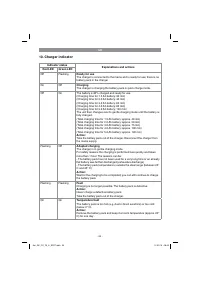
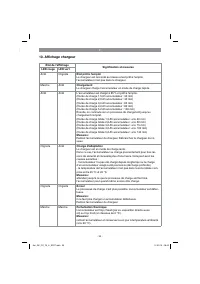
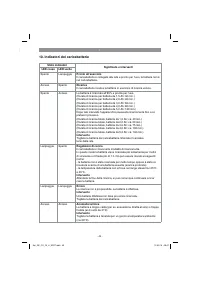
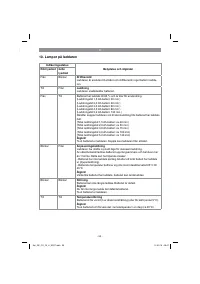
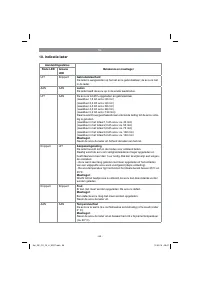
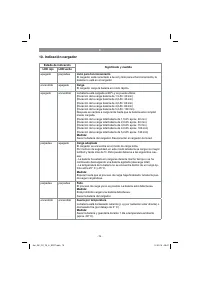
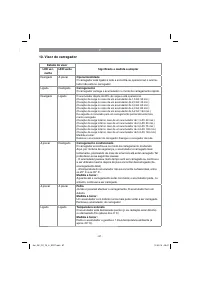
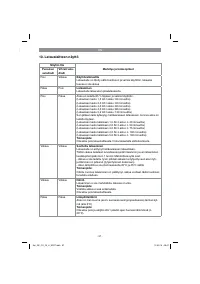
In section 10 (Charger indicator) you will
fi
nd a
table with an explanation of the LED indicator on
the charger.
If the battery pack fails to charge, check for the
following:
•
voltage at the power socket
•
whether there is good contact at the charging
contacts of the charging unit
If the battery pack still fails to charge, send
•
the charger and charging adapter
•
and the battery pack
to our customer service center.
To ensure that the Li battery pack provides
long service you should take care to recharge
it promptly. You must recharge the battery pack
when you notice that the performance of the
equipment drops.
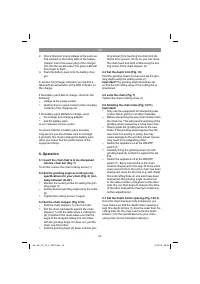
6. Operation
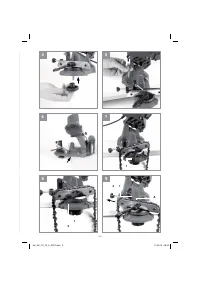
6.1 Insert the chain that is to be sharpened
into the chain bar (Fig. 7)
To do this, loosen the chain locking screw (1)
6.2 Set the grinding angle according to the
speci
fi
cations for your chain (Fig. 8) (nor-
mally between 30-35°)
•
Slacken the locking screw for setting the grin-
ding angle (1)
•
Set the desired grinding angle using the scale
(2)
•
Tighten the locking screw (1) again
6.3 Set the chain stopper (Fig. 9/10)
•
Fold the chain stopper (1) onto the chain
•
Pull the chain backwards against the chain
stopper (1) until the latter stops a cutting link
(A). Important! You must make sure that the
angle of the stopped cutting link coincides
with the grinding angle. If it does not, pull the
chain one link further.
•
Fold the grinding head (4) down until the grin-
ding wheel (5) is touching the chain link (A)
that is to be ground. (To do so, you can move
the chain back and forth a little using the set-
ting screw of the chain stopper (2)
6.4 Set the depth limit (Fig. 10)
Fold the grinding head (4) down and set the grin-
ding depth using the setting screw (7)
Important!
The grinding depth should be set
so that the full cutting edge of the cutting link is
sharpened.
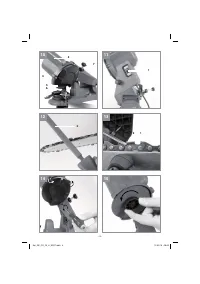
6.5 Lock the chain (Fig. 7)
Tighten the chain locking screw (1)
6.6 Grinding the chain links (Fig. 10/11)
Important!
•
Only use the equipment for sharpening saw
chains. Never grind or cut other materials.
•
Before sharpening the saw chain clamp it into
the chain bar. This will prevent jamming of the
grinding wheel caused by a loose saw chain.
•
Slowly guide the grinding wheel to the saw
blade. If the grinding wheel approaches the
saw chain too quickly or jerkily, this may
cause damage to the grinding wheel. Injuries
may result from catapulting parts!
•
Switch the appliance on at the ON/OFF
switch (1)
•
Carefully bring the grinding wheel (5) with
grinding head (4) so that it is against the set
link
•
Switch the appliance off at the ON/OFF
switch (1). Every second link in the chain
must be sharpened in this way. To know when
every second link in the entire chain has been
sharpened, mark the first link (e.g. with chalk).
Once all cutting links on one side have been
sharpened, the grinding angle must be set
to the same number of degrees on the other
side. You can then begin to sharpen the links
of the other side(without having to make any
further adjustments).
6.7 Set the depth limiter spacing (Fig. 12/13)
Once the chain has been fully sharpened, you
must make sure that the depth limiter spacing is
kept (the depth limiters (1) must be lower than the
cutting links (2). You may need to
fi
le the depth
limiters (1) to the speci
fi
cations for your chain
using a
fi
le (3) (not included in delivery).
Anl_GE_CS_18_Li_SPK7.indb 22
Anl_GE_CS_18_Li_SPK7.indb 22
12.05.16 08:46
12.05.16 08:46
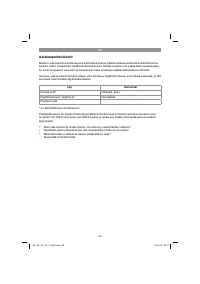
Характеристики

Остались вопросы?Не нашли свой ответ в руководстве или возникли другие проблемы? Задайте свой вопрос в форме ниже с подробным описанием вашей ситуации, чтобы другие люди и специалисты смогли дать на него ответ. Если вы знаете как решить проблему другого человека, пожалуйста, подскажите ему :)


