Вытяжки Kuppersberg FW 610 - инструкция пользователя по применению, эксплуатации и установке на русском языке. Мы надеемся, она поможет вам решить возникшие у вас вопросы при эксплуатации техники.
Если остались вопросы, задайте их в комментариях после инструкции.
"Загружаем инструкцию", означает, что нужно подождать пока файл загрузится и можно будет его читать онлайн. Некоторые инструкции очень большие и время их появления зависит от вашей скорости интернета.


5
English
TEchnical passporT
Extractor hood
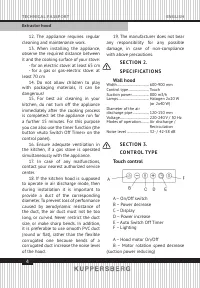
С – Display shows motor rotation
speed
D – Motor rotation speed increase
(suction power increasing)
E – When you press on the Timer,
the motor will automatically be shut
down after 15 minutes. To activate the
function, press and hold the Timer for
3 seconds (rotation speed level starts
to fl ash on the display). To cancel, press
once on the Timer.
F – Lighting On/Off
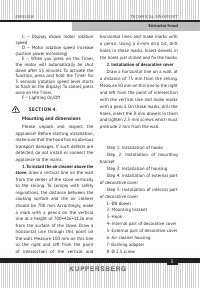
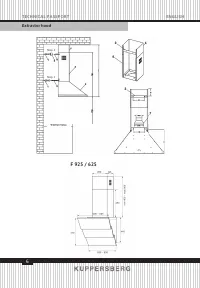
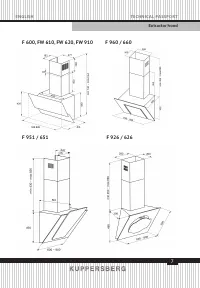
S E CT I O N 4.
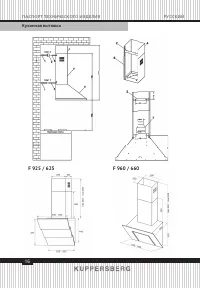
Mounting and dimensions
Please unpack and inspect the
appliance! Before starting installation,
make sure that the hood has no obvious
transport damages. If such defects are
detected, do not install or connect the
appliance to the mains.
1. To install the air cleaner above the
stove
, draw a vertical line on the wall
from the center of the stove vertically
to the ceiling. To comply with safety
regulations, the distance between the
cooking surface and the air cleaner
should be 700 mm. Accordingly, make
a mark with a pencil on the vertical
line at a height of 700+426=1126 mm
from the surface of the stove. Draw a
horizontal line through this point on
the wall. Measure 100 mm on this line
to the right and left from the point
of intersection of the vertical and
horizontal lines and make marks with
a pencil. Using a 6-mm drill bit, drill
holes in these marks. Insert dowels in
the holes just drilled and fi x the hooks.
2. Installation of decorative cover
Draw a horizontal line on a wall, at
a distance of 75 mm from the ceiling.
Measure 50 mm on this line to the right
and left from the point of intersection
with the vertical line and make marks
with a pencil. On these marks, drill the
holes, insert the 8-mm dowels in them
and tighten 2.5-mm screws which must
protrude 2 mm from the wall.
Step 1: Installation of hooks
Step 2: Installation of mounting
bracket
Step 3: Installation of housing
Step 4: Installation of external part
of decorative cover
Step 5: Installation of internal part
of decorative cover
1- Ø8 dowel
2- Mounting bracket
3- Hook
4- Internal part of decorative cover
5- External part of decorative cover
6- Air cleaner housing
7- Bushing adapter
8- Ø 2.5 screw
Содержание
- 14 Х А РА кТ Е Р И С Т И к И; А – Включение / Выключение мотора
- 15 Монтаж и размеры
- 18 пить к очистке прибора отключите его
- 19 Замена ламп освещения; может привести к возникновению пожара.; Используйте мягкую сухую тряпочку.; Внимание; свое место плафон лампы и слегка надавите на него, фиксируя.
- 20 Это может быть интересно
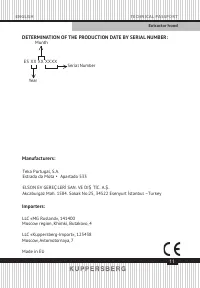
- 21 ОПРЕДЕЛЕНИЕ ДАТЫ ПРОИЗВОДСТВА ТОВАРА ПО СЕРИЙНОМУ НОМЕРУ:; Год; Уполномоченное изготовителем лицо/импортер:; Сделано в ЕС; Естрада дe Мота – Гафанха да Енcарначао, 3830-909 Ильхаво
- 22 При отсутствии документов подтверждающих покупку, эти сроки; АРАНТИИ; можно найти на официальном сайте компании:; Телефон горячей линии Kuppersberg:; Е Р В И С


