Вытяжки Gorenje WHI941ST - инструкция пользователя по применению, эксплуатации и установке на русском языке. Мы надеемся, она поможет вам решить возникшие у вас вопросы при эксплуатации техники.
Если остались вопросы, задайте их в комментариях после инструкции.
"Загружаем инструкцию", означает, что нужно подождать пока файл загрузится и можно будет его читать онлайн. Некоторые инструкции очень большие и время их появления зависит от вашей скорости интернета.


25
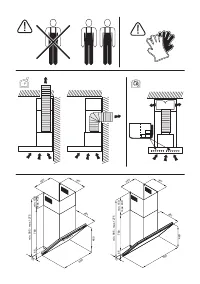
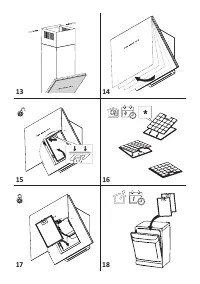
Otherwise put a thick, protective covering over countertop, cooktop or range to protect from damage and debris. Select a flat surface
for assembling the unit. Cover that surface with a protective covering and place all canopy hood parts and hardware in it.
•
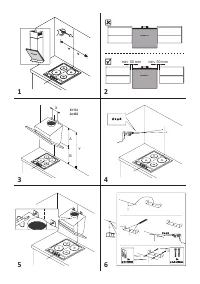
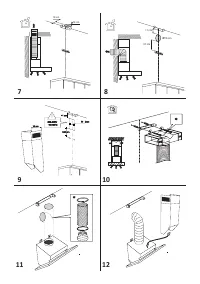
In addition check whether near the installation area of the hood (in the area accessible also with the hood mounted) an electric socket
is available and it is possible to connect a fumes discharge device to the outside (only suction version).
•
Carry out all the masonry work necessary (e.g. installation of an electric socket and/or a hole for the passage of the discharge tube).
Expansion wall plugs are provided to secure the hood to most types of walls/ceilings. However, a qualified technician must verify suitability
of the materials in accordance with the type of wall/ceiling. The wall/ceiling must be strong enough to take the weight of the hood. Do not tile,
grout or silicone this appliance to the wall. Surface mounting only.
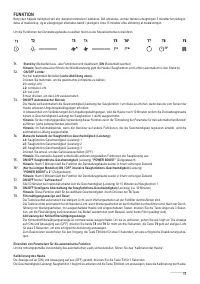
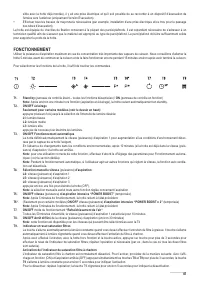
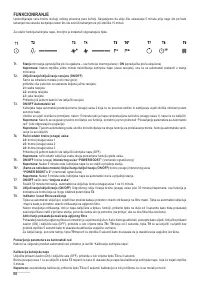
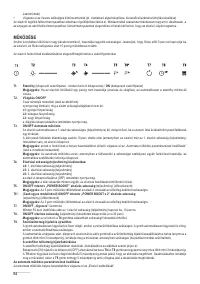
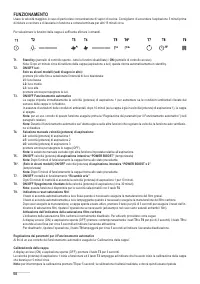
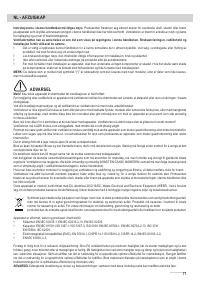
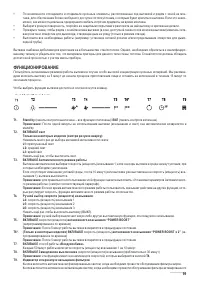
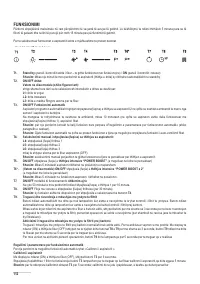
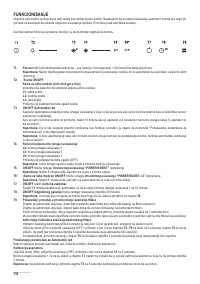
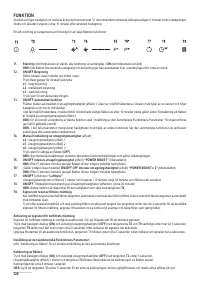
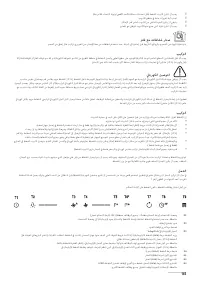
OPERATION
Use the high suction speed in cases of concentrated kitchen vapours. It is recommended that the cooker hood suction is switched on for
5 minutes prior to cooking and to leave in operation during cooking and for another 15 minutes approximately after terminating cooking.
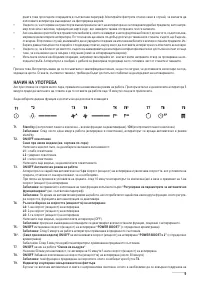
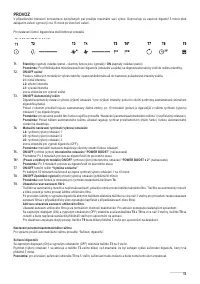
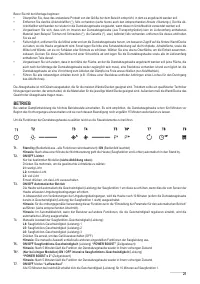
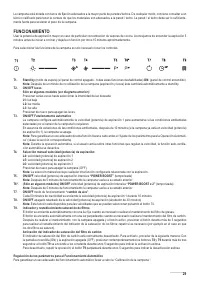
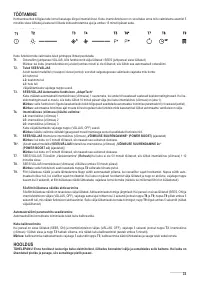
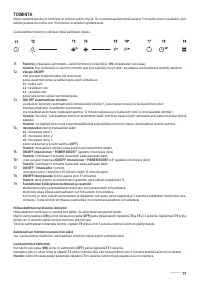
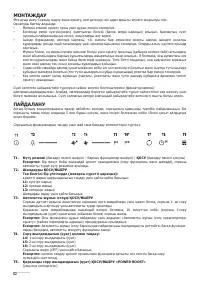
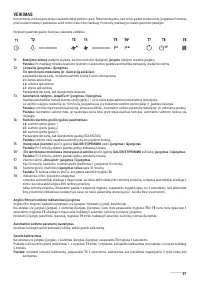
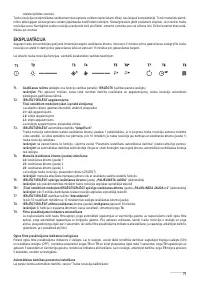
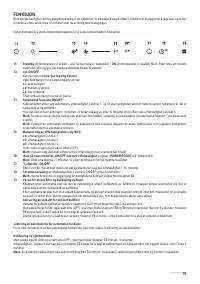
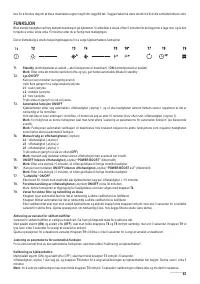
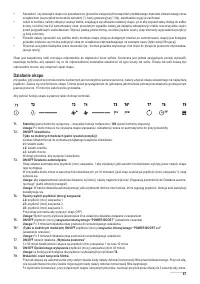
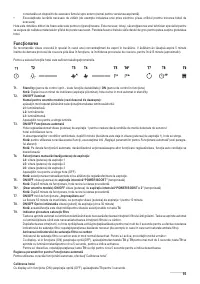
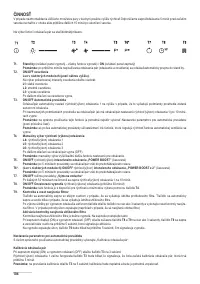
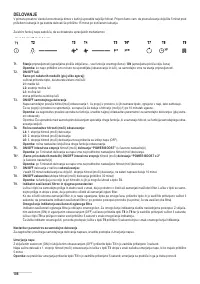
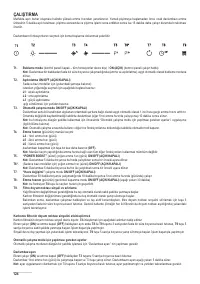
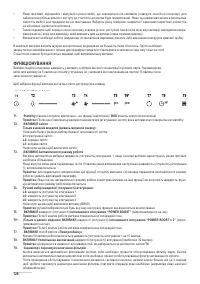
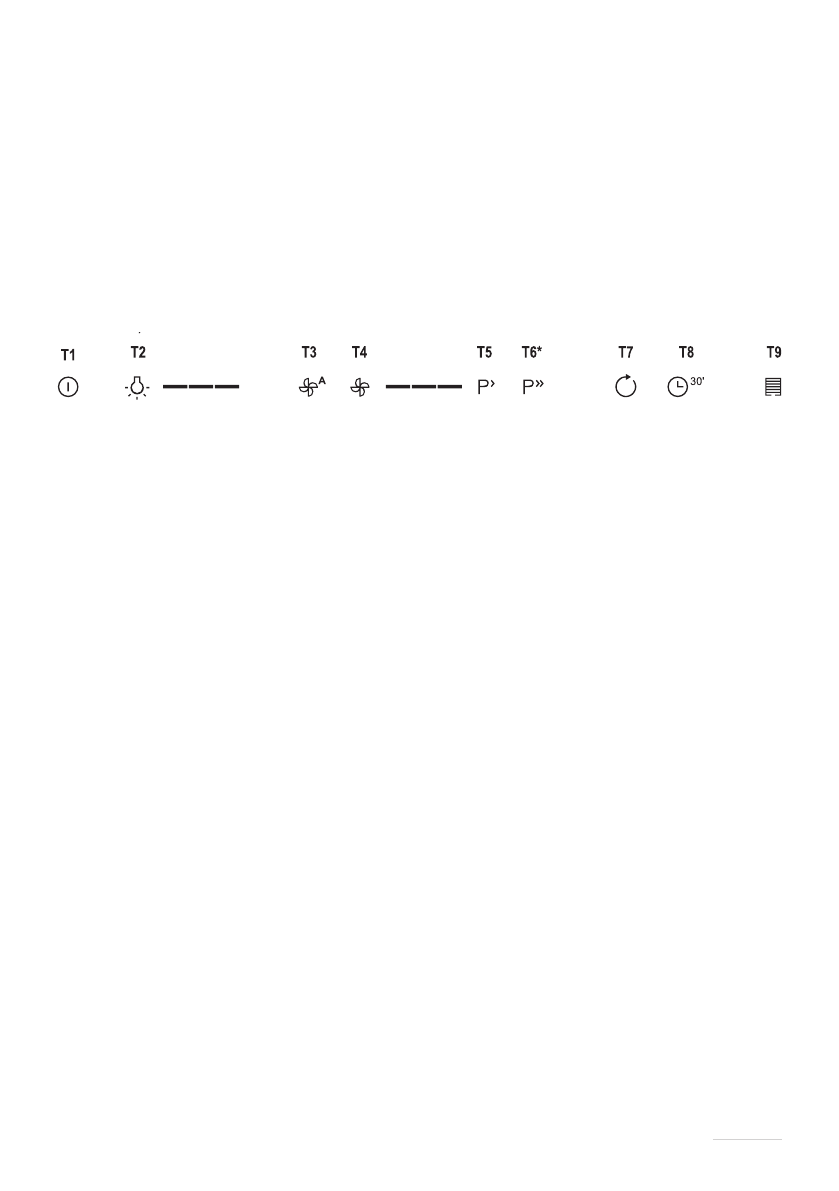
To select the functions of the hood, simply touch the controls.
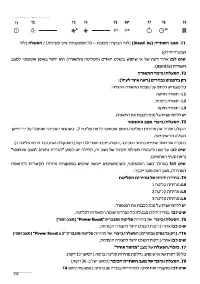
T1.
Standby mode
(the control panel off all functions disabled) /
ON
(control panel switched on)
Note:
After about a minute of inactivity (suction and lights), the hood will automatically switch to standby.
T2.
ON/OFF lights
On certain models only
(see drawing above):
press repeatedly to select the desired light intensity:
L1:
low light
L2:
medium light
L3:
high light
Press again to turn off the lights.
T3.
ON/OFF Automatic operation
The hood automatically sets the suction speed (power) 1 to increase if the environmental conditions detected by the hood sensor
require it.
If there are no variations in the environmental conditions, after 10 minutes (if the hood is already in suction speed (power) 1), the hood
turns off.
Note:
for a correct use of this function, first perform the “Setting of the parameters for Automatic Operation” (see corresponding
paragraph).
Note:
During automatic operation, if the user acts on the other functions that adjust the speed, auto ventilation function is switched
off.
T4.
Manual selection of the suction speed (power):
L4:
suction speed (power) 1
L5:
suction speed (power) 2
L6:
suction speed (power) 3
Press again to turn off the hood (OFF).
Note:
manual selection excludes any other suction related set function.
T5.
ON/OFF Intensive suction speed
(power)
„POWER BOOST”
(timed)
Note:
After 5 minutes of operation the hood returns to its previous state.
T6*. (Only certain models ON/OFF intensive suction speed
(power)
„POWER BOOST x 2”
(timed)
Note:
After 5 minutes of operation, the hood goes back to the previous status.
T7.
ON/OFF
operation mode
“Air refresh”
Every 50 minutes of inactivity, the suction speed (power 1 is turned on for 10 minutes.
T8.
ON/OFF Delayed switch off of the suction speed
(power) (approx. 30 minutes
Note:
this function is available for the speeds that can be selected with button
T4
.
T9.
Indicator and reset filter saturation
The button lights on automatically with steady light when it is necessary to perform the grease filter maintenance. The button lights
on automatically with flashing light when it is necessary to perform the charcoal filter maintenance.
After performing the maintenance, with the hood off and the button active, press the button for more than 3 seconds to perform the
reset of the filter saturation indicator; repeat the operation if necessary (for ex., when both filters are saturated).
Activation of the charcoal filter saturation indicator
The saturation indicator of the charcoal filter is normally disabled. To activate it, proceed in the following manner:
With the display on (ON) and the suction off (OFF), press simultaneously the buttons
T8
and
T9
for more than 3 seconds; the button
T9
lights on with steady light for approx. 5 seconds, to indicate the activation.
To disable it, repeat the operation; the button
T9
will flash for approx. 5 seconds to indicate the disabling.
Характеристики

Остались вопросы?Не нашли свой ответ в руководстве или возникли другие проблемы? Задайте свой вопрос в форме ниже с подробным описанием вашей ситуации, чтобы другие люди и специалисты смогли дать на него ответ. Если вы знаете как решить проблему другого человека, пожалуйста, подскажите ему :)


