
Вытяжки Falmec Tab (A+) 60 - инструкция пользователя по применению, эксплуатации и установке на русском языке. Мы надеемся, она поможет вам решить возникшие у вас вопросы при эксплуатации техники.
Если остались вопросы, задайте их в комментариях после инструкции.
"Загружаем инструкцию", означает, что нужно подождать пока файл загрузится и можно будет его читать онлайн. Некоторые инструкции очень большие и время их появления зависит от вашей скорости интернета.


15
N
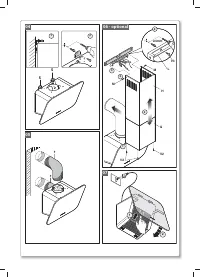
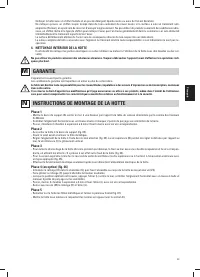
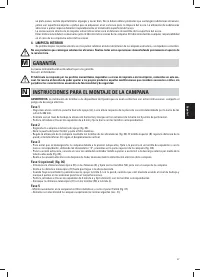
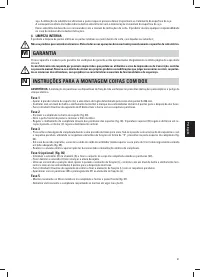
HOOD ASSEMBLY INSTRUCTIONS
WARNING: Failure to install the screws or fixing device in accordance with these instructions may result in an electric shock hazard.
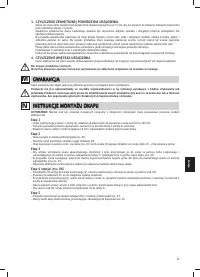
Step 1
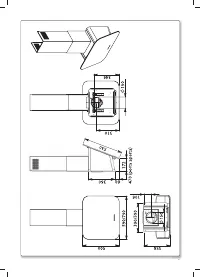
- Place the support bar (A) on the wall at the same height as the cooker, at the same distance as the sum of the heights X+346 mm.
- Use a spirit level to check the horizontal alignment and draw 2 marks at each end of the bar, this is where the holes will be drilled.
- Drill the holes, insert 2 ø 8mm expansion bolts and fasten the bar with the relative screws.
Step 2
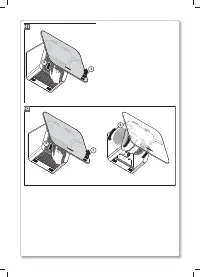
- Hook the hood onto the support bar (fig. 03).
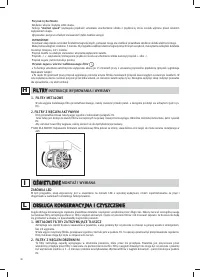
- Open the front door of the panel and remove the metal filter.
- Adjust the alignment of the hood, using the fixing screws (Fig. 03). The upper screw (B) adjusts the distance from the wall, the lower
one (C) the vertical scrolling.
Step 3
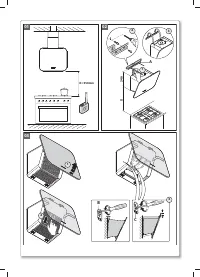
- To prevent the hood from falling due to pressure below, fasten it to the wall with an expansion plug and relative screw using the appro-
priate brackets “S” on the top of the hood (fig. 04).
- For the exhaust version, connect the output fitting of the fan (upper output or on rear) to the external discharge with a suitable pipe
(fig. 05).
- Set up the electric connection only after disconnecting the power supply of the hood.
Step 4 (optional) (fig. 06)
- Place extension (H) in the flue (G) and fasten this assembly to the body of the hood using the screws (V2).
- Slide the extension (H) until it is positioned at the desired height.
- Once you have found the best position, lean the bracket (L) on the wall, verify the horizontal alignment with a spirit level and mark 2
drilling points at the ends.
- Drill the holes, insert 2 expansion bolts of 4mm ø and fasten the bracket (L) with the relative screws.
- Tighten the extension (H) to the bracket (L) using screws (M).
Step 5
- Remount the hood, metal filters, and close the front panel (fig. 07).
- Power on the hood in accordance with current regulations (sec. D).
English
Содержание
- 32 èéÑäãûóÖçàÖ ùãÖäíêéùçÖêÉàà; Ö ÇõíüÜçéÖ ìëíêéâëíÇé ë ÇõÅêéëéå ÇéáÑìïÄ çÄêìÜì; äçéèäà ë ùãÖäíêéççõå ìèêÄÇãÖçàÖå
- 33 îàãúíêõ; åÖíÄããàóÖëäàÖ îàãúíêõ; éëÇÖôÖçàÖ; ДИОДНАЯ; óàëíäÄ à ìïéÑ; åÖíÄããàóÖëäàÖ îàãúíêõ Ñãü áÄÑÖêÜÄçàü ÜàêÄ
- 34 éóàëíäÄ ÇçìíêÖççÖâ óÄëíà; ÉÄêÄçíàà; ПРЕДУПРЕЖДЕНИЕ
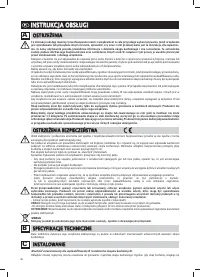
Характеристики

Остались вопросы?Не нашли свой ответ в руководстве или возникли другие проблемы? Задайте свой вопрос в форме ниже с подробным описанием вашей ситуации, чтобы другие люди и специалисты смогли дать на него ответ. Если вы знаете как решить проблему другого человека, пожалуйста, подскажите ему :)


