
Вытяжки Falmec Aura 120 - инструкция пользователя по применению, эксплуатации и установке на русском языке. Мы надеемся, она поможет вам решить возникшие у вас вопросы при эксплуатации техники.
Если остались вопросы, задайте их в комментариях после инструкции.
"Загружаем инструкцию", означает, что нужно подождать пока файл загрузится и можно будет его читать онлайн. Некоторые инструкции очень большие и время их появления зависит от вашей скорости интернета.


20
clean with a soft cloth, rinse and wipe dry thoroughly. Do not use products that contain
abrasive substances, rough cloths or cloths specifically designed for cleaning steel. Using
abrasive substances or rough cloths will inevitably damage the finish of steel. The steel
surface will be irrevocably damaged if the instructions above are not complied with.
Keep these instructions together with the instructions for use of your hood.
The manufacturer accepts no liability for any damage caused by non-compliance with the
instructions above.
4. CLEANING THE INSIDE OF THE APPLIANCE
The electrical parts or parts of the motor assembly inside the range hood must not be
cleaned using liquids or solvents.
Do not use abrasive products. All the above operations must be performed after having dis-
connected the appliance from the mains power supply.
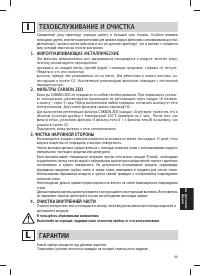
WARRANTY
L
The new equipment is covered by warranty.
The warranty conditions are provided by the distributor.
The manufacturer is not liable for any inaccuracies in this booklet resulting from printing or
transcription errors. The manufacturer reserves the right to modify its products as it consid-
ers necessary or in the interests of the user, without compromising their essential safety and
operating characteristics.
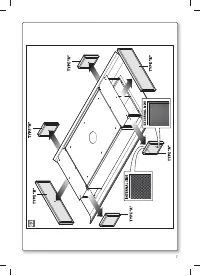
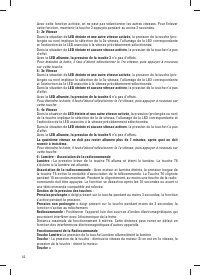
RANGE HOOD ASSEMBLY
M
WARNING:
Failure to install the screws or fixing device in accordance with these instruc-
tions may result in electrical hazards.
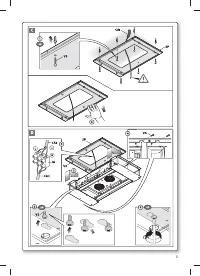
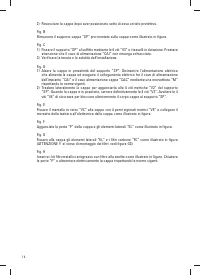
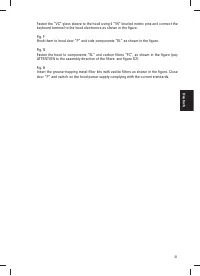
Fig. A
1) Remove the rubber caps and turn the 4 “V2” metric screws, loosening them without
removing them. These screws keep the pre-assembled “SP” support on the hood.
2) Turn the hood over, after putting a protective sheet under it.
Fig. B
Remove the pre-assembled “SP” hood support as shown in the figure.
Fig. C
1) Fix the “SP” support to the ceiling using 6 “V3” screws and the supplied plugs. Make sure
the “CAI” supply cable does not remain crushed.
2) Check the tightness and solidity of the installation.
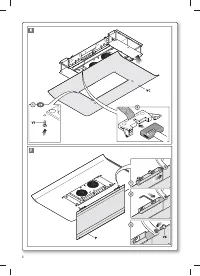
Fig. D
1) Lift the hood near the “SP” support. Disconnect the hood’s power supply and make the
electrical connection between the “CAI” system supply cable and the “CAC” hood sup-
ply cable, using terminal board “M” in compliance with current standards.
2) Move the hood sideways and hook it to the 4 “V2” metric screws of the “SP” support.
When the hood is in place, fully tighten the 4 “V2” screws. Tighten the 4 “V4” safety
screws to further lock the hood body to the “SP” support.
Fig. E
Характеристики

Остались вопросы?Не нашли свой ответ в руководстве или возникли другие проблемы? Задайте свой вопрос в форме ниже с подробным описанием вашей ситуации, чтобы другие люди и специалисты смогли дать на него ответ. Если вы знаете как решить проблему другого человека, пожалуйста, подскажите ему :)


