
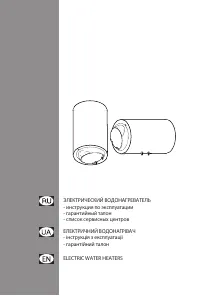
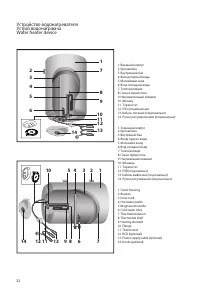
Водонагреватели Ariston ABS PRO R INOX 50 V - инструкция пользователя по применению, эксплуатации и установке на русском языке. Мы надеемся, она поможет вам решить возникшие у вас вопросы при эксплуатации техники.
Если остались вопросы, задайте их в комментариях после инструкции.
"Загружаем инструкцию", означает, что нужно подождать пока файл загрузится и можно будет его читать онлайн. Некоторые инструкции очень большие и время их появления зависит от вашей скорости интернета.


29
3. STARTING AND OPERATION
3.1. Commissioning
Before connect the appliance to electricity source, fill the tank up with mains water. To do this, turn on the domestic mains
tap and the hot water tap.
Once the water heater is full, the water will flow from the domestic mains tap. Visually check for water leaks from the flange
and slightly tighten it, if necessary.
Power the appliance at the switch.
3.2. Temperature control
In models equipped with external control, water temperature can be controlled by a handle connected to the thermostat in
accordance with marks.
If an appliance model does not have an external temperature controller, temperature can be set by turning the adjusting
screw of the thermostat in the range marked by the signs “+” and “-”. To do this, disconnect the water heater from the power
supply and remove the plastic cover of the appliance. It is recommended to install the controller in a position corresponding
to approximately 75% of the maximal value. In this case, the appliance is operated in economy mode, significantly reducing
the rate of scale formation.
4. MAINTENANCE AND REPAIR WORKS
All maintenance and repair works should be carried out by a competent person only in conformity with the safety
norms and with any provisions set forth in this manual.
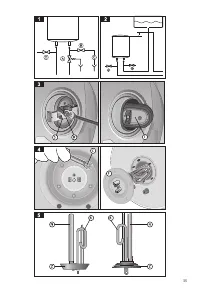
4.1. Water Drain
If there is a chance that the ambient temperature drops below 0°C in the room where the appliance is installed, drain water
from the water heater.
To do this, the following steps should be done:
4.1.1.
Disconnect the appliance from the electrical supply;
4.1.2.
Make sure that the water in the appliance is of safe temperature;
4.1.3.
Turn off the tap of cold water supply to the water heater;
4.1.4.
Turn on the hot water domestic mains tap for discharge of pressure inside the tank;
4.1.5.
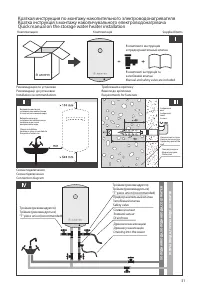
Turn on the tap (D in Fig. 1) to allow air into the tank. If it is absent, remove the supply tube to the hot water pipe of the
water heater (marked with the red collar);
4.1.6.
Connect drain hose directed into the sewer to the drain cock (B in Fig. 1) and open it. If there is no a "T" piece union
with the drain cock, remove the supply pipe to the cold water inlet of the water heater (marked with the blue collar), connect
drain hose directed to the sewer to the cold water inlet;
4.1.7.
After draining, make sure there is no water inside the water heater.
Freezing of water inside the water heater leads to irreversible changes and defects.
It invalidates all warranty liability on the part of the manufacturer.
4.2. Replacing internal parts
Disconnect the heater from the power supply. Remove the cover. To work with the thermostat, pull it straight out and
disconnect from the power supply.
In order to work on the heating element and the anode, the appliance must first be emptied. For models with an autoclave
flange, remove the nut (D in Fig. 3), remove the flange holder (S in Fig. 3) and open the flange (F in Fig. 3) by pressing it inside.
Remove the flange by turning it on its axis.
For other models, remove 5 nuts (C in Fig. 4) and remove the flange (F in Fig. 4). The heating element and anode are attached
to the flange. When assembling the appliance, be sure to put the heating element, flange seal, and thermostat into their
initial position. We recommend the flange gasket is replaced every time it is removed.
Use original spare parts of the manufacturer only.
4.3. Periodical maintenance
4.3.1. Magnesium anode
The magnesium anode is an integral part of the protection system of water tank against corrosion. Given that aggressive
properties of water cause faster wear of the magnesium anode, conditions of the magnesium anode should be checked
ANNUALLY. In case of severe wear, the magnesium anode must be replaced. The warranty for water-containing tank with the
worn magnesium anode (residual volume is less than 30%) is not valid. To replace the anode, disassemble the heating
element and unscrew from the support bracket.
The magnesium anode should be replaced at least 1 in 24 months (excluding the water heater with the inner tank of stainless
steel).
The magnesium anode is a consumable item that cannot be replaced under warranty.
Following the rules of scheduled maintenance will allow you to ensure a long life of the water heater.


