
Вентиляторы Vitek VT-1930 - инструкция пользователя по применению, эксплуатации и установке на русском языке. Мы надеемся, она поможет вам решить возникшие у вас вопросы при эксплуатации техники.
Если остались вопросы, задайте их в комментариях после инструкции.
"Загружаем инструкцию", означает, что нужно подождать пока файл загрузится и можно будет его читать онлайн. Некоторые инструкции очень большие и время их появления зависит от вашей скорости интернета.

4
ENGLISH
•
Check the unit for damages, do not use it in case
of damages.
•
Before using the unit for the first time, make sure
that the voltage in your mains corresponds to the
fan operating voltage.
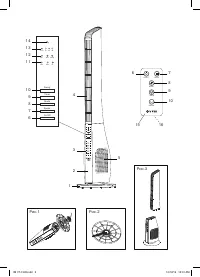
FAN ASSEMBLING
•
Unscrew the fastening nut on the bottom side of the
body (2) turning it counterclockwise
«
».
•
Run the power plug through the opening in the base
(1) and the fastening nut.
•
Install the base (1) on the bottom part of the fan
body (2).
•
Fix the base (1) with the fastening nut turning it
clockwise
«
» (pic. 1).
•
Put the power cord into the corresponding grooves
on the base (1) (pic. 2).
•
Install the upper part (4) of the fan on the unit body
(2) and move it towards the control panel (3). Make
sure that the upper part (4) of the fan is fixed prop-
erly (pic. 3).
USING THE REMOTE CONTROL (15)
•
Functions of the buttons on the remote control (15)
fully correspond to functions of the buttons on the
control panel (3).
ATTENTION!
The unit contains a lithium battery. Prevent children
from swallowing the lithium battery. If your child
has swallowed a battery, immediately see your
doctor.
Battery leakage can cause injuries or damage the
unit. To avoid the unit damage, follow the instruc-
tions given below:
– use only the «CR2025» battery;
– do not recharge the battery;
– insert the battery strictly following the polarity;
– remove the battery if you are not planning to use
the unit for a long time;
– replace the battery timely.
– apply to specialized centers for further recycling
of the battery;
– avoid the power nippers circuit.
Installing or replacing the battery
in the remote control (15)
•
Remove the battery holder (16) by pressing the
side clamp, install a CR2025 battery, strictly follow-
ing the polarity.
•
Install the battery holder (16) back to its place.
Note: - if there is an isolation insert, remove the insert.
USING THE FAN
•
Insert the plug into the socket, you will hear a sound
signal.
Notes: – every pressing of the control buttons is
accompanied by a sound signal.
•
Press the on/off button (6) «On/Off» or the button
(6) on the remote control (15), the fan will switch
on at the «Mid» speed. After some time the fan will
switch to the low speed «Low», and the speed indi-
cator «Low» will light up.
•
Select the speed mode by pressing the button
(7) «Speed» or the button (7) on the RC (15). You
can select any of three speed modes which will be
shown by the indicators (11) «Low, Mid, Hi».
•
Select the air flow mode by pressing the button (8)
«Mode» or the button (8) on the RC (15). You can set
three air flow modes which will be shown on the dis-
play with the indicators (12):
«Nor» - normal air flow mode, select the air flow
speed with the button (7) «Speed».
«Nat» - the air flow speed will increase and decrease
gradually;
«Sleep» - night mode.
•
Select the auto-switch off operation time with the
button (9) «Timer» or the button (9) on the RC
(15), the timer operation time will be shown on
the display with the indicators (13) «0,5h, 1h, 2h,
4h». Available operation time is from 0.5 hour to
7.5 hours with 0.5 hour setting step.
•
To switch the timer off repeatedly press the button
(9) «Timer» or the button (9) on the RC (15) until the
indicators (13) go out.
•
To switch the oscillation mode on, press the button
(10) «Swing» or the button (10) on the RC (15), the
indicator (14) will light up. To stop the oscillation
mode, press the button (10) «Swing» or the but-
ton (10) on the RC (15) once again, the indicator
(14) will go out.
•
To switch the fan off, press the on/off button (6)
«On/Off» or the button (6) on the RC (15) and
unplug the unit.
MAINTENANCE AND CARE
•
Before cleaning the fan switch it off by pressing the
on/off button (6) «On/Off» or the button (6) on the
RC (15) and unplug the unit.
•
Do not use abrasive cleaners and solvents to clean
the fan.
•
Clean the unit body (2) and the upper part (4) of
the fan with a slightly damp cloth, and then wipe
them dry.
•
You can clean the air inlet grids (5) with a vacuum
cleaner using a corresponding attachment.
•
Do not immerse the fan body (2), the power cord
and the power plug into water or any other liquids.
•
Make sure that no liquids get into the fan body
(2) to avoid its damage and prevent risk of elec-
tric shock.
IM VT-1930.indd 4
12/12/19 10:31 AM
Характеристики

Остались вопросы?Не нашли свой ответ в руководстве или возникли другие проблемы? Задайте свой вопрос в форме ниже с подробным описанием вашей ситуации, чтобы другие люди и специалисты смогли дать на него ответ. Если вы знаете как решить проблему другого человека, пожалуйста, подскажите ему :)


