
Варочная панель De Dietrich DPE7549XF - инструкция пользователя по применению, эксплуатации и установке на русском языке. Мы надеемся, она поможет вам решить возникшие у вас вопросы при эксплуатации техники.
Если остались вопросы, задайте их в комментариях после инструкции.
"Загружаем инструкцию", означает, что нужно подождать пока файл загрузится и можно будет его читать онлайн. Некоторые инструкции очень большие и время их появления зависит от вашей скорости интернета.


26
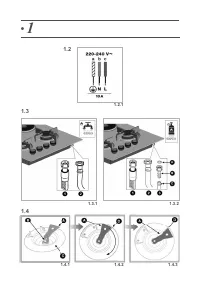
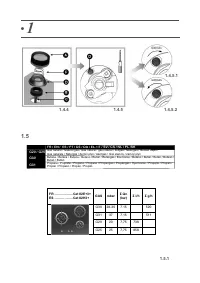
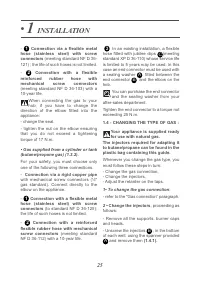
- Replace them with injectors for the gas
to be used, as shown in the gas
characteristics table
(1.5.2)
; for this:-
- Tighten them by hand as far as possible.
- Position the spanner fully on the injector.
- With a pencil, draw a line
on the
base plate at the location shown
(1.4.2)
.
- Turn the spanner clockwise until the line
appears on the other side
(1.4.3)
.
Do not go beyond this limit; you
could to damage the product.
- Re-fit the burner heads, caps and pan
supports.
Every time you change the type of
gas used, tick the appropriate box
on the label in the wallet. Refer to the
"corresponding gas connection“
paragraph.
3- Set the retarders on the taps:
these
can be found under the handles
(1.4.4)
.
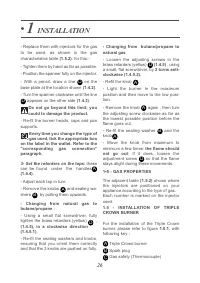
- Adjust each tap in turn.
- Remove the knobs
and sealing wa-
shers
by pulling them upwards.
- Changing from natural gas to
butane/propane
:
- Using a small flat screwdriver, fully
tighten the brass retarders (yellow)
,
(1.4.5), in a clockwise direction
(1.4.5.1)
.
- Re-fit the sealing washers and knobs,
ensuring that you orient them correctly
and that the 3 knobs are pushed on fully.
D
D
A
A
B
D
- Changing from butane/propane to
natural gas
- Loosen the adjusting screws in the
brass retarders (yellow)
(1.4.5)
, using
a small, flat screwdriver, by
2 turns anti-
clockwise (1.4.5.2).
- Refit the knob
,,
- Light the burner in the maximum
position and then move to the low posi-
tion.
- Remove the knob
again , then turn
the adjusting screw clockwise as far as
the lowest possible position before the
flame goes out.
- Re-fit the sealing washer
and the
knob
,
- Move the knob from maximum to
minimum a few times:
the flame should
not go out
; if it does, loosen the
adjustment screw
so that the flame
stays alight during these movements.
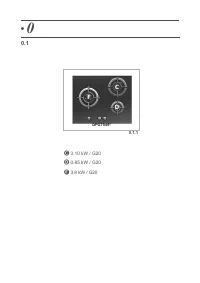
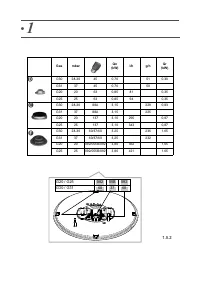
1•5 - GAS PROPERTIES
The adjacent table
(1.5.2)
shows where
the
injectors are positioned on your
appliance according to the type of gas.
Each number is marked on the injector
used.
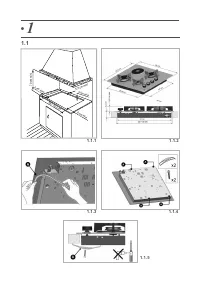
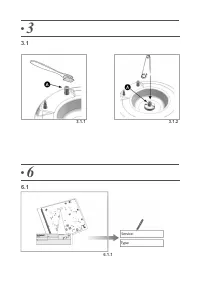
1.6 - INSTALLATION OF TRIPLE
CROWN BURNER
For the installation of the Triple Crown
burner, please refer to figure
1.6.1.
with
following key :
Triple Crown burner
Spark plug
Gas safety (Thermocouple)
D
A
A
B
A
D
A
B
C
•
1
INSTALLATION
Характеристики

Остались вопросы?Не нашли свой ответ в руководстве или возникли другие проблемы? Задайте свой вопрос в форме ниже с подробным описанием вашей ситуации, чтобы другие люди и специалисты смогли дать на него ответ. Если вы знаете как решить проблему другого человека, пожалуйста, подскажите ему :)


