
Варочная панель Korting HK 6002 X - инструкция пользователя по применению, эксплуатации и установке на русском языке. Мы надеемся, она поможет вам решить возникшие у вас вопросы при эксплуатации техники.
Если остались вопросы, задайте их в комментариях после инструкции.
"Загружаем инструкцию", означает, что нужно подождать пока файл загрузится и можно будет его читать онлайн. Некоторые инструкции очень большие и время их появления зависит от вашей скорости интернета.


ENGLISH
GB
GENERAL
Carefully read the contents of this leaflet since it provides
important instructions regarding safety of installation, use
and maintenance.
Keep the leaflet for possible future consultation. All the
operations relating to installation/replacement (electrical
connections) must be carried out by specialised personnel
in conformity with the regulations in force.
SAFETY WARNINGS
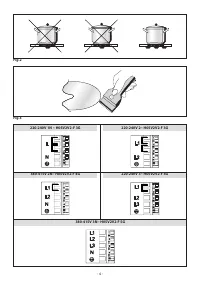
It is recommended to use flat-bottom pans with a diameter
equal to or slightly larger than that of the heated area. Do not
use pans with a rough base to prevent scratching the heat
surface of the cooktop (Fig.2).
This appliance is not suitable for use by children or persons
requiring supervision. Do not let children play with the ap-
pliance.
Important:
- Avoid spilling liquid, therefore to boil or heat liquids, reduce
the heat.
- Do not leave the heating elements on with empty pots and
pans or without receptacles.
- When you have finished cooking, switch off the relevant
heating element with the control indicated below.
Attention:
- Steam cleaners must not be used.
- If the surface is cracked, switch off the appliance to pre-
vent electric shock.
- This appliance is not intended for use by young children
or infirm persons without supervision.
- Young children should be supervised to ensure they do
not play with the appliance.
This appliance conforms to the European Directive EC/2002/96,
Waste Electrical and Electronic Equipment (WEEE). By making
sure that this appliance is disposed of in a suitable manner, the
user is helping to prevent potential damage to the environ-
ment or to public health.
The symbol on the product or on the accompanying pa-
perwork indicates that the appliance should not be treated as
domestic waste, but should be delivered to a suitable electric
and electronic appliance recycling collection point.
Follow local guidelines when disposing of waste. For more
information on the treatment, re-use and recycling of this
product, please contact your local authority, domestic waste
collection service or the shop where the appliance was
purchased.
INSTALLATION INSTRUCTIONS
These instructions address specialised installers and serve
as a guide for installation, adjustment and maintenance in
conformity with the laws and regulations in force. If a built-in
oven or any other appliance that generates heat must be fitted
directly under the glass-ceramic cooktop, THIS APPLIANCE
(oven) AND THE GLASS-CERAMIC COOKTOP MUST BE SUIT-
ABLY INSULATED in such a way that the heat generated by the
oven, measured on the bottom right of the cooktop, does not
exceed 60°C. Failure to respect this precaution may determine
improper functioning of the TOUCHCONTROL system.
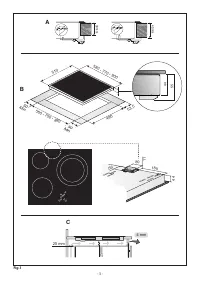
Positioning
(Fig.1)
:
The domestic appliance is designed to be built into a worktop
as illustrated in the specific figure. Apply sealant around the
entire perimeter (cut-out dimensions Fig.1B). Fix the domes-
tic appliance on the worktop by means of the 4 brackets
provided, taking the thickness of the worktop into account
(Fig.1A). If the lower part of the appliance, after installation, is
accessible via the lower part of the cabinet then it is necessary
to mount a separator panel respecting the distances indicated
(Fig.1C). If the appliance is installed with an oven underneath
then the separator is not necessary.
Electrical connections:
Before making the electrical connections, check that:
- the ground cable is 2cm longer than the other cables;
- the system ratings meet the ratings indicated on the identi-
fication plate fixed on the lower part of the worktop;
- the system is fitted with efficient earthing compliant to the
laws and regulations in force.
Earthing is obligatory by law.
If the appliance is not fitted with a cable, use type:
"H05V2V2-F"
for a power level of up to 6400 Watts. The cross-
section of the cable should be at least 2.5 mm², or 4 mm² for
greater power levels.
The cable should never reach a temperature which is 50°C
above the temperature of the room in which it is installed.
The appliance is designed for permanent connection to the
electricity supply and should therefore be fitted with an
omnipolar switch which has a minimum opening of 3mm
between contacts. The switch should be suitable for the char-
ge indicated on the appliance data plate and must conform to
all current legislation (the yellow/green earth wire must not
be interrupted by the switch).
The omnipolar switch must be easy to reach once the instal-
lation process has been completed.
USE AND MAINTENANCE
ATTENTION!
- The equipment has a 2800 - 3300 W power limiting system.
Please refer to the "Power Limiting" section to use this func-
tion.
- Before using the cooktop, turn on all heating plates for at least
15 minutes in 3-4 power level. This is a first-ignition process,
and must be repeated if cooktop is no used for some weeks.
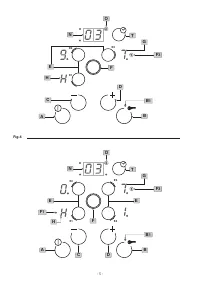
Use
(Fig.4)
:
A =
ON/OFF
button
B =
Key
button
B1 =
key button
ON/OFF
indicator
C =
"-"button
D =
"+"button
E =
Heating plate selection button
E1–E3 =
Prearrangement for double or triple heating plates
F =
Double or triple heating plate selection button
F1–F3 =
Double or triple active heating plate indicator
G =
heating plate display
H =
Residual heat indicator
"H"
T =
Timer button
N =
Timer Display
- 18 -
Характеристики

Остались вопросы?Не нашли свой ответ в руководстве или возникли другие проблемы? Задайте свой вопрос в форме ниже с подробным описанием вашей ситуации, чтобы другие люди и специалисты смогли дать на него ответ. Если вы знаете как решить проблему другого человека, пожалуйста, подскажите ему :)


