
Увлажнители Timberk THU UL 15M (M4) - инструкция пользователя по применению, эксплуатации и установке на русском языке. Мы надеемся, она поможет вам решить возникшие у вас вопросы при эксплуатации техники.
Если остались вопросы, задайте их в комментариях после инструкции.
"Загружаем инструкцию", означает, что нужно подождать пока файл загрузится и можно будет его читать онлайн. Некоторые инструкции очень большие и время их появления зависит от вашей скорости интернета.


www.timberk.com • ultrasonic humidifier
5
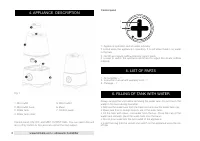
7. APPLIANCE OPERATION
OPERATION
Switching on
Install the appliance to a true vertical on an even and dry surface, then
connect it to the power line, having filled the tank with water first. Turn
the on/off and steam outflow intensity knob all the way to the right. The
appliance will switch on, the blue operation indicator will light up on the
control panel and steam will start coming from the atomizer. At the very
beginning of operation, the atomizing level may appear unstable, which is
caused by the temperature difference and water quality. It will take short
time for this process to stabilize.
Adjusting steam outflow intensity
You can adjust steam intensity by turning the on/off and steam outflow
intensity knob to the left or right.
Comfortable conditions are reached at 40 to 60% relative air humidity. You
can determine the humidity level favorable for you either according to your
feelings or by using a special device called a hygrometer (not included in
the scope of supply), measuring the relative humidity level.
Automatic switching off when there is no water
When water level in the tank drops below the minimum allowed one, the
appliance’s ultrasonic membrane will automatically switch off and a red
indicator will light up on the control panel. To continue operation of the
appliance it is necessary to fill the tank with water according to item 6 «Filling
of tank with water», and then connect the appliance to the electric mains.
Switching off
To switch the appliance off, turn the on/off and steam outflow intensity knob
all the way to the left and disconnect the appliance from the electric mains.
ATTENTION!
If a large amount of condensate is generated on the upper
part of the appliance when it is operating, then you need to
decrease the steam outflow intensity by turning the on/off
and steam outflow intensity knob counterclockwise.
8. CLEANING AND MAINTENANCE
IMPORTANT!
To avoid deformation or wear of working surfaces,
resulting in decreased atomizing or other malfunctions,
do not use metallic brushes, blades or talc powder to
wipe the atomizer’s surface. The water tank may leak
upon heavy impacts.
In case of water leakage, immediately stop using the
unit and contact a service center. To keep the unit dry,
remove water after cleaning and make sure to dry the
unit’s case. Make sure that there is no water left inside
the unit’s case. Prior to a long break in using the unit,
dry its surface and pack it into a plastic bag, then put
it into a box. Store the unit in a low-humidity room.
Storing the unit undried results in generation of mold.
• Always unplug the unit before removing the water tank.
• Do not touch the water in the base during operation!
• Caution-risk of electric shock and damage of the product!
• Switch off the appliance and unplug it from the socket before cleaning it.
Clean the water tank and the base regularly. Use water only, no detergents.
Содержание
- 7 СОДЕРЖАНИЕ; Уважаемый покупатель!
- 8 ПРАВИЛА БЕЗОПАСНОСТИ
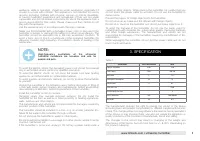
- 9 ТЕХНИЧЕСКИЕ ХАРАКТЕРИСТИКИ
- 10 НАПОЛНЕНИЕ РЕЗЕРВУАРА ВОДОЙ; Панель управления
- 11 Автоматическое отключение при отсутствии воды; ЭКСПЛУАТАЦИЯ ПРИБОРА; Включение прибора; ЧИСТКА И ОБСЛУЖИВАНИЕ ПРИБОРА
- 12 Вытрите остатки воды внутри основания под резервуаром влажной
- 13 УСТРАНЕНИЕ НЕИСПРАВНОСТЕЙ; ТРАНСПОРТИРОВКА И ХРАНЕНИЕ
- 14 По вопросам сервисной поддержки обращаться в организацию:; Сервисные центры Изготовителя:; Нормативные документы:; Сертификат соответствия:; ИНФОРМАЦИЯ О СЕРТИФИКАЦИИ; ГАРАНТИЙНЫЙ ТАЛОН
- 15 Гарантийные обязательства
- 17 Изготовитель не несет гарантийных обязательств за изделие в
- 18 Бланк гарантийного талона.; Заполняется фирмой-продавцом; Без подписи покупателя Гарантийный талон является недей-; ности (если прибор проверялся в его присутствии при продаже) приоб-
Характеристики

Остались вопросы?Не нашли свой ответ в руководстве или возникли другие проблемы? Задайте свой вопрос в форме ниже с подробным описанием вашей ситуации, чтобы другие люди и специалисты смогли дать на него ответ. Если вы знаете как решить проблему другого человека, пожалуйста, подскажите ему :)


