Утюги VITEK VT-1247 VT - инструкция пользователя по применению, эксплуатации и установке на русском языке. Мы надеемся, она поможет вам решить возникшие у вас вопросы при эксплуатации техники.
Если остались вопросы, задайте их в комментариях после инструкции.
"Загружаем инструкцию", означает, что нужно подождать пока файл загрузится и можно будет его читать онлайн. Некоторые инструкции очень большие и время их появления зависит от вашей скорости интернета.


5
ENGLISH
AUTOMATIC SWITCH OFF
This model has two automatic switching off modes.
1.
If the iron remains still for 30 seconds in hori-
zontal position, the unit heating element will
be switched off and the indicator (9) will be
flashing. The unit will be switched on automat-
ically once you resume ironing.
2.
If the iron remains still for 8 minutes in verti-
cal position, the unit heating element will be
switched off and the indicator (9) will be flash-
ing. The unit will be switched on automatically
once you resume ironing.
WATER SELECTION
Use tap water to fill the tank. If tap water is hard,
it is recommended to mix it with distilled water in
proportion 1:1; if tap water is too hard, mix it with
distilled water in proportion 1:2 or use distilled
water only.
FILLING THE WATER TANK
Before filling the tank with water make sure that
the unit is unplugged.
–
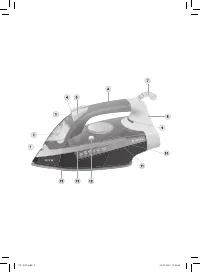
Set the temperature control knob (11) to the
«
min
» position and the continuous steam sup-
ply knob (3) to the position «
» (continuous
steam supply is off).
–
Open the water inlet lid (2).
–
Pour the water into the water tank (10) and
then close the lid (2).
Notes:
•
Do not fill the water tank (10) with scented
liquids, vinegar, starch solution, descaling
reagents, chemical agents etc.
•
Do not exceed the “MAX” mark (13).
•
If you need to refill water during ironing, then,
firstly, switch off and unplug the iron.
IRONING TEMPERATURE
–
Always check the recommended ironing tem-
perature indicated on the tag before ironing.
–
If the tag does not list the recommended iron-
ing temperature, but you know the type of fab-
ric, refer to the following table to determine
the proper temperature.
Symbol Fabric type (temperature)
•
Synthetics, nylon, acrylic, polyester
(low temperature)
••
Silk/wool (medium temperature)
•••
Cotton, linen (high temperature)
MAX
Maximum temperature
–
This table is only valid for smooth materials.
Fabrics of other types (crimped, raised etc.)
are best ironed at low temperature.
–
Sort items by ironing temperature first: syn-
thetics to synthetics, wool to wool, cotton to
cotton etc.
–
The iron heats up faster than it cools down.
For this reason it is recommended to begin
ironing at low temperature (for instance, syn-
thetic fabrics).
–
After that, start ironing at higher temperature
(silk, wool). Cotton and linen items should be
ironed last.
–
If an item is made of mixed fabrics, the iron
should be set to the lowest ironing tempera-
ture (for instance, if an item is made of acrylic
and cotton, it should be ironed at temperature
used for acrylic ironing «•»).
–
If you cannot define the fabric structure, find
a place that is inconspicuous while wearing
and select the ironing temperature experi-
mentally (always start with the lowest temper-
ature and raise it gradually until you get the
desired result).
–
Corduroy and other fabrics that become
glossy quickly should be ironed strictly in one
direction (in the direction of the pile) with little
pressure.
–
To avoid appearance of glossy spots on syn-
thetic and silk fabrics, it is recommended to
iron them from backside.
DRY IRONING
–
Place the iron on its base (8).
–
Insert the power plug into the mains socket.
–
Set the continuous steam supply knob (3) to
the position «
» (continuous steam sup-
ply is off).
–
Set the desired ironing temperature depend-
ing on the type of fabric by turning the knob
(11): «
•
», «
••
», «
•••
» or «
MAX
», the indica-
tor (9) will light up.
–
Once the soleplate temperature (14) reaches
the set one, the indicator (9) will go out, you
can start ironing.
–
After using the iron switch the temperature
control (11) to the «
min
» position, unplug the
unit and let the iron cool down completely.
STEAM IRONING
Steam ironing is possible only if the tempera-
ture control knob (11) is set to the position «
••
»,
«
•••
» or «
MAX
».
–
Place the iron on its base (8).
VT-1247.indd 5
01.07.2014 11:42:07


