Утюги VITEK VT-1234 - инструкция пользователя по применению, эксплуатации и установке на русском языке. Мы надеемся, она поможет вам решить возникшие у вас вопросы при эксплуатации техники.
Если остались вопросы, задайте их в комментариях после инструкции.
"Загружаем инструкцию", означает, что нужно подождать пока файл загрузится и можно будет его читать онлайн. Некоторые инструкции очень большие и время их появления зависит от вашей скорости интернета.
ПАРНА ЮТИЯ
МЕРКИ ЗА БЕЗОПАСНОСТ
Преди експлоатация внимателно прочетете
инструкцията, а също така обърнете внимание на
илюстрацията.
• Преди да включите ютията се убедете, че
напрежението в мрежата съответства на работното
напрежение на ютията.
• Използвайте ютията само за целите, предвидени в
инструкцията.
• Използвайте ютията само върху дъска за гладене.
• При напълване на резервоара на ютията с вода
винаги я изключвайте от мрежата.
• Бъдете особено внимателни при използването на
прибора в непосредствена близост до деца и хора с
ограничени възможностти.
• Не оставяйте ютията включена.
• Винаги изключвайте ютията от мрежата, ако не я
използвате.
• За да избегнете електрошок, не потапяйте ютията
във вода или в друга течност.
• Не допускайте контакт на отворени участъци на
кожата с горещите повърхности на ютията или с
излизащата пара, за да избегнете получаването на
изгаряния.
• Следете кабелът за мрежата да не увисва от края на
дъската за гладене, а също така той не бива да
докосва горещи повърхности.
• При изключване на ютията от електромрежата
винаги дръжте щепсела за мрежата, никога не
теглете кабела за мрежата.
• Преди да приберете ютията излейте останалата вода
и я оставете напълно да изстине.
• За да избегнете претоварване на електромрежата,
не включвайте едновременно няколко прибора с
голяма консумирана мощност.
• Не използвайте ютията при повреда на щепсела за
мрежата, кабела за мрежата, а също така при други
повреди.
• За
да
избегнете
електрошок,
никога
не
разглобявайте
ютията
самостоятелно,
при
откриване на неизправност се обръщайте в
упълномощения сервизен център.
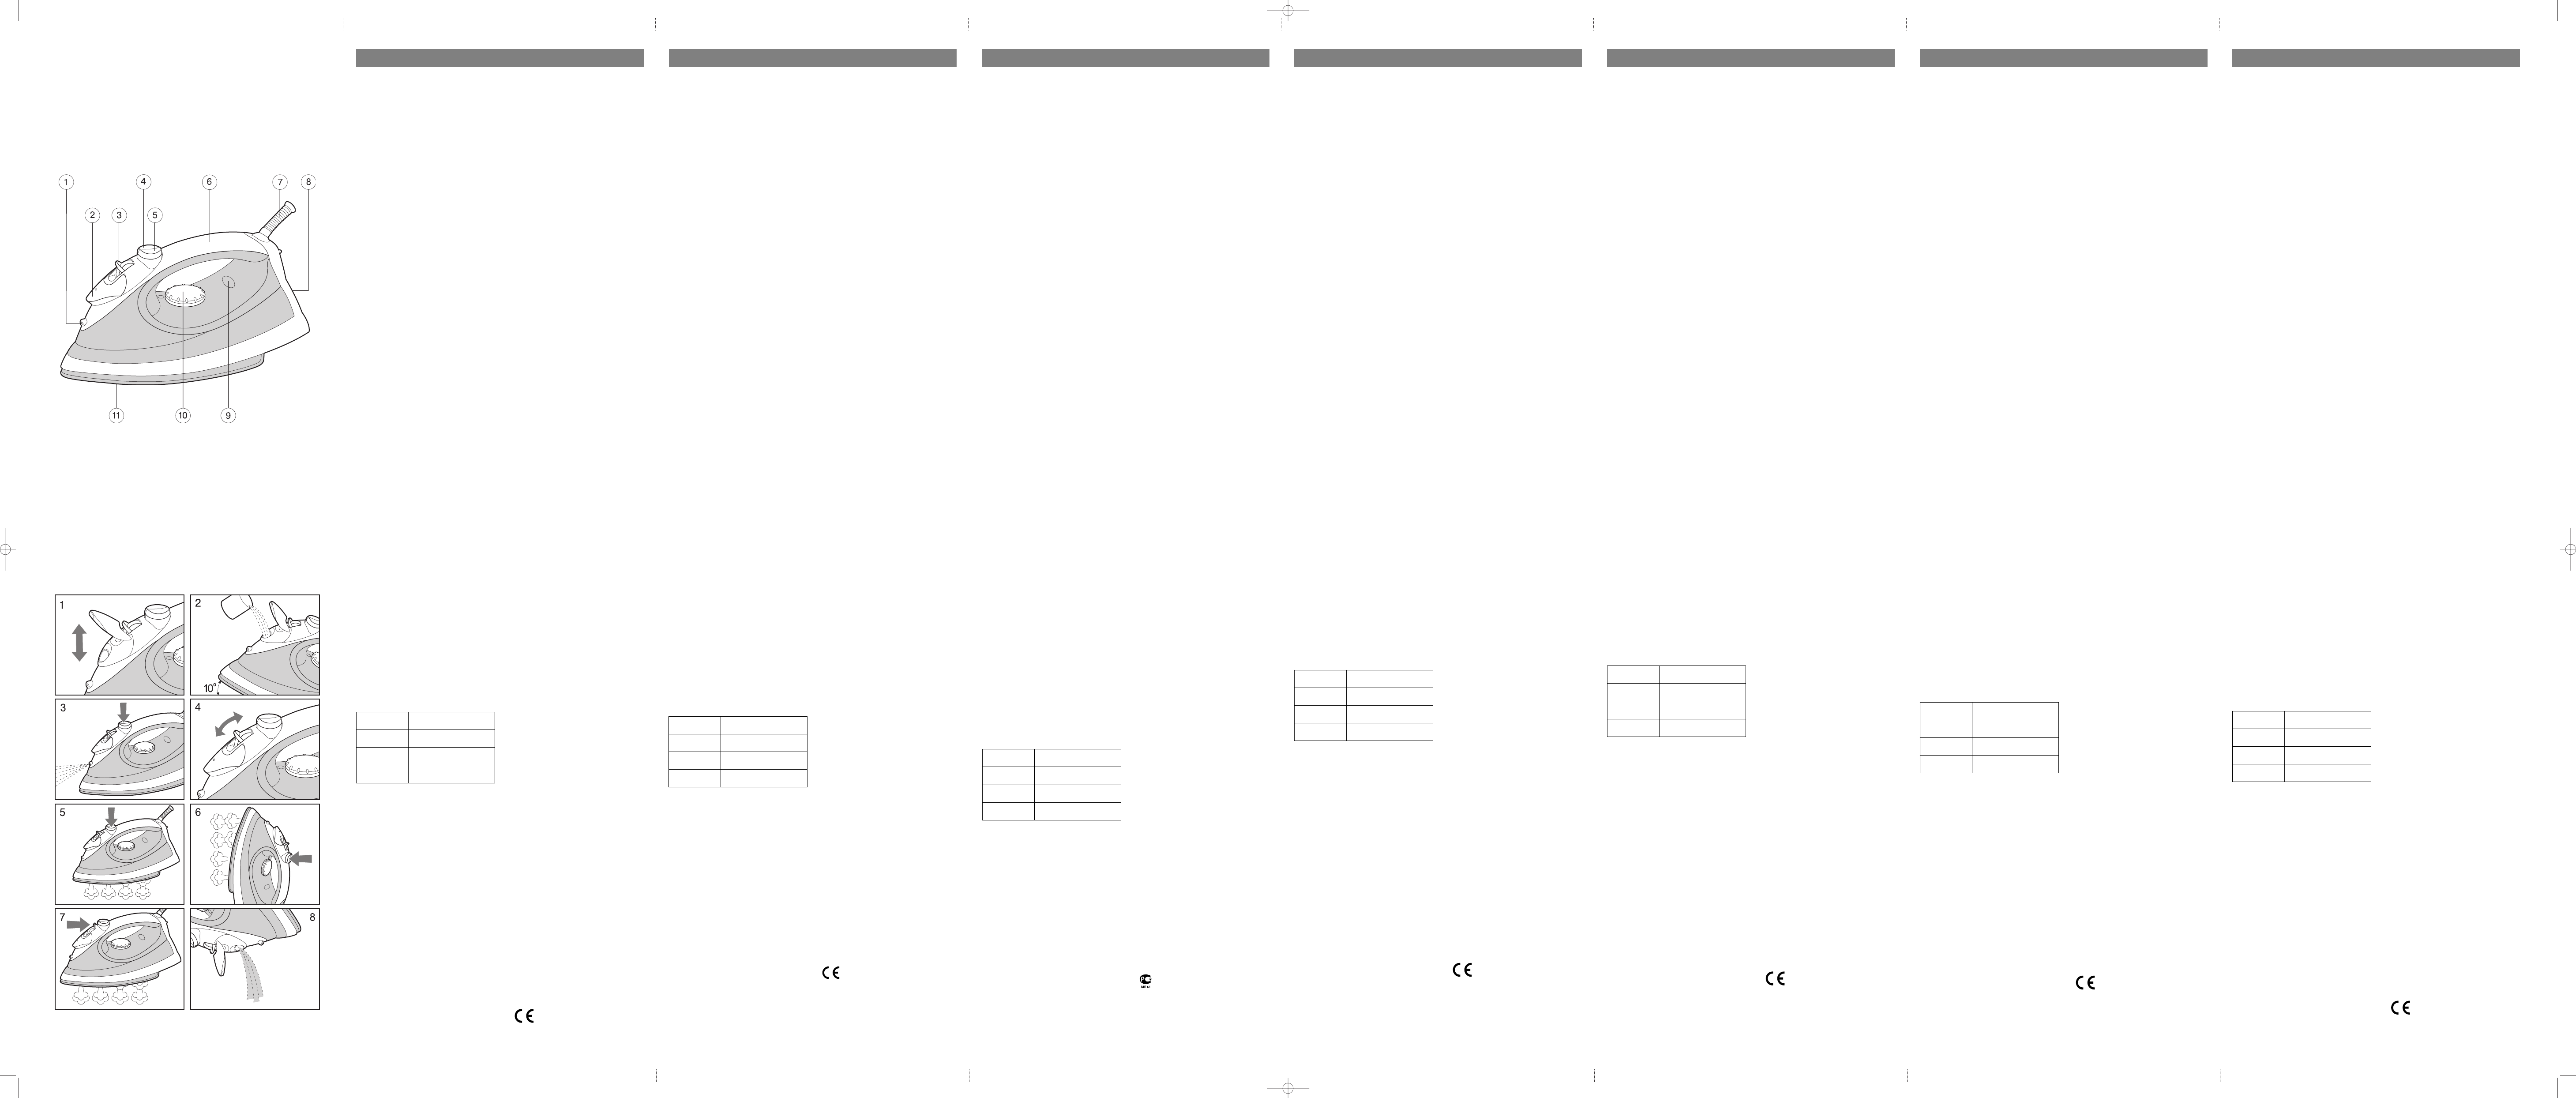
ОПИСАНИЕ
1.
Дюза на разпръсквателя на вода
2.
Капак на отвора за наливане на вода
3.
Включване/изключване на постоянно подаване на
пара/режима на почистване
4.
Бутон на разпръсквателя на вода
5.
Бутон за допълнително подаване на пара
6.
Дръжка на ютията
7.
Защита на кабела за мрежата
8.
Основа
9.
Светлинен индикатор за работа
10. Регулатор на температурата
11. Основа на ютията
ПРЕДИ ПЪРВО ИЗПОЛВАНЕ
• Извадете ютията от опаковката и махнете
картонената защита от основата на ютията.
• Убедете се, че напрежението в мрежата съответства
на работното напрежение на ютията.
Забележка:
При първото включване нагревателният елемент на
ютията обгаря, затова е възможна появата на неголямо
количество пушек.
ИЗБОР НА ВОДА
• За пълнене на резервоара използвайте чешмена
вода. Ако водопроводната вода е варовита,
препоръчва се да я смесвате с дистилирана вода в
съотношение 1 : 1, при много варовита вода,
смесвайте я с дистилирана вода в съотношение 1 : 2
или използвайте само дестилирана вода.
Забележка:
Забранява се да се наливат в резервоара за вода
ароматизирани течности, оцет, разтвор на нишесте,
реактиви за отстраняване на накип, химически
вещества или други течности.
НАПЪЛВАНЕ НА РЕЗЕРВОАРА ЗА ВОДА (рис. 1, 2)
Преди да напълните ютията с вода се убедете, че той е
изключен от мрежата.
• Установете регулатора на постоянно подаване на
пара (3) в крайното ляво положение - подаването на
пара е изключено.
• Отворете капака на отвора за наливане на вода (2).
• Налейте вода.
Забележка:
• Не наливайте вода над маркировката “MAX”.
• Ако по време на гладене е необходимо
допълнително да налеете вода, изключете ютията и
извадете щепсела от контакта.
• След като приключите гладенето преобърнете
ютията и излейте останалата вода (рис.8).
ТЕМПЕРАТУРА НА ГЛАДЕНЕ
Преди да започнете експлоатацията тестирайте
нагрялата се ютия върху парче стар плат, за да се
уверите, че основата на ютията и резервоара за вода са
чисти.
• Винаги преди гладене на дрехи обръщайте внимание
на препоръчителната температура, посочена на
етикета на изделието.
• Ако няма етикет с указания за гладене, но Вие знаете
вида плат, за избор на температурата на гладене
вижте таблицата.
• Таблицата може да се използва само за влакнести
платове. Ако платът е от друг вид (плисиран,
релефен и т.н.), е по-добре да го гладите при ниска
температура.
• Първоначално групирайте дрехите в зависимост от
подходящата температура на гладене: вълна с вълна,
памук с папук и т.н.
• Ютията се нагрява по-бързо, отколкото изстива. По
този начин се препоръчва да се започва гладенето с
ниска температура, например, на синтетични
платове. След което преминете към гладенето с по-
висока температура. Гладете дрехи от памук и лен
най-накрая.
• Ако дрехата е изработена от смесени платове, е
необходимо да установите температурата на гладене
на платове с най-ниската температура (например,
ако дрехата е 60% от полиестер и 40% от памук, тя
трябва да се глади при температура, подходяща за
полиестер “
•
”).
• Ако не можете да определите вида плат, от който е
изработена дрехата, намерете място върху дрехата,
което не се забелязва при носене и опитно изберете
температурата на гладене (винаги започвайте с най-
ниската температура и постепенно я повишавайте,
докато не достигнете необходимия резултат.)
• Платове от раирано кадифе и др., които бързо
започват да мазнеят, трябва да се гладят само в една
посока (по посока на мъха) с несилно натискане.
• За да избегнете поява на мазнеещи петна на
синтетичните и копринените платове, гладете ги от
опаката страна.
УСТАНОВЯВАНЕ НА ТЕМПЕРАТУРАТА НА ГЛАДЕНЕ
• Поставете ютията на основата (8).
• Вкарайте щепсела за мрежата в контакта.
• Установете регулатора на температура (10) на
изискваната температурата на гладене “
•
”, “
••
” или
“
•••
”, в зависимост от вида тъкан.
Установената температура ще бъде достигната, когато
светлинният индикатор (9) изгасне. Индикаторът (9) ще
светне отново, ако температурата се понижи под нивото
на което е била установена.
РАЗПРЪСКВАТЕЛ НА ВОДА
• Вие можете да навлажните плата като натиснете
няколко пъти бутона на разпръсквателя (4) (рис.3).
• Убедете се, че в резервоара има достатъчно вода.
ГЛАДЕНЕ С ПАРА
• Гладенето с пара е възможно само при висока
температура на основата на ютията при положение
на регулатора на температура (10) “
••
” или “
•••
”.
• Вкарайте щепсела за мрежата в контакта.
• Поставете ютията на нейната основа (8).
• Установете регулатора на температура (10) на
изискваната температурата на гладене “
••
” или
“
•••
”.
• Убедете се, че в резервоара има достатъчно вода.
• Изчакайте,
докато
се
изключи
светлинният
индикатор (9), и след това отново светне. Установете
регулатора на постоянно подаване на пара (3) в
крайно дясно положение - подаването на парата е
включено (рис.4), след което парата ще започне да
излиза от отворите на основата на ютията (11).
ВНИМАНИЕ:
Водата може да изтича от отворите на основата на
ютията, ако установената температура е прекалено
ниска, това може да предизвика появата на петна. Ако
това се случи, установете регулатора на температурата
(10) на по-висока температура. Подаването на пара ще
се възобнови веднага след като бъде достигната
установената температура на ютията.
ДОПЪЛНИТЕЛНО ПОДАВАНЕ НА ПАРА
Функцията за допълнително подаване на пара е полезна
при изглаждането на гънки и може да бъде използвана
само при високотемпературния режим на гладене,
регулаторът на температурата (10) е в положение “
•••
”.
• Установете регулатора на температурата (10) в
положение “
•••
”.
• При натискане на бутона за допълнително подаване
на пара (5), парата от основата на ютията ще излиза
по-интензивно (рис.5).
Забележка:
За да избегнете изтичането на вода от отворите за пара
задръжте бутона за допълнително подаване на парата
натиснат не повече от 15-20 секунди.
ВЕРТИК АЛНО ОБРАБОТВАНЕ С ПАРА
• Вкарайте щепсела за мрежата в контакта.
• Поставете ютията на нейната основа (8).
• Установете регулатора на температура (10) в
положение “
•••
”.
• Убедете се, что в резервоара има достатъчно вода.
• Изчакайте,
докато
се
изключи
светлинният
индикатор (9), а след това отново светне.
• Дръжте ютията вертикално и натиснете бутона за
допълнително подаване на пара (5), парата ще
излиза от основата на ютията (11) (рис. 6).
Важна информация:
• Не се препоръчва да се осъществява вертикално
обработване с пара на синтетични платове.
• При отпарване не докосвайте с основа на ютията
плата, за да избегнете разтапянето му.
• Никога не обработвайте с пара дрехи, облечени
човек, тъй като температура на парата е висока,
използвайте закачалки.
СУХО ГЛАДЕНЕ
• Вкарайте щепсела за мрежата в контакта.
• Поставете ютията на нейната основа (8).
• Установете регулатора на постоянно подаване на
пара (3) в крайно ляво положение - подаването на
пара е изключено.
• Установете регулатора на температура (10) на
изискваната
температурата
на
гладене
“
•
”,
“
••
”, “
•••
”.
• Изчакайте,
докато
се
изключи
светлинният
индикатор (9), и когато той след това отново светне,
необходимата температура на основата на ютията е
достигната, можете да започнете процеса на
гладене.
СИСТЕМА ЗА ПОЧИСТВАНЕ
За удължаване на срока на използване на ютията,
препоръчва се редовно да се почиства ютията (веднъж
или два пъти на месец в зависимост от варовитостта на
водата).
• Установете регулатора на постоянно подаване на
пара (3) в крайно ляво положение - подаването на
пара е изключено.
• Напълнете резервоара с вода до маркировката
“MAX”.
• Поставете ютията на нейната основа (8).
• Вкарайте щепсела за мрежата в контакта.
• Установете регулатора на температурата (10) в
положение “
•••
”.
• Оставете
ютията
да
се
нагрее,
изчакайте
светлинният индикатор (9) да изгасне.
• Извадете щепсела за мрежата от контакта и дръжте
ютията хоризонтално над мивка.
• Натиснете лоста на регулатора за подаване на пара
(3) по посока към бутоните (4, 5) и го задръжте
(рис.7).
• Врялата вода и парата заедно с накипа ще започнат
да излизат от отворите на основата на ютията.
Препоръчва се леко да разтърсите ютията напред и
назад по време на почистването на ютията.
• Отпуснете лоста на регулатора на пара (3) след една
минута, или когато в резервоара водата се свърши.
Поставете ютията на нейната основа.
• Вкарайте щепсела за мрежата в контакта и оставете
ютията отново да се нагрее.
• Изгладете с ютията парче ненужен плат, за да дадете
възможност на останалата вода да се изпари.
• Извадете щепсела за мрежата от контакта и
изчакайте докато основата на ютията напълно
изстине.
• Преди да приберете ютията за съхраняване се
убедете, че основата на ютията е напълно суха.
ПОДДЪРЖ АНЕ И ПОЧИСТВАНЕ
• Преди да почистите ютията, се убедете, че тя е
изключена от мрежата и вече е изстинала.
• След
премахване
на
наслагите
полирайте
повърхността на основата със сух плат.
• Не използвайте абразивни вещества за почистване
на основата и корпуса на ютията.
• Не допускайте контакт на основата на ютията с остри
метални предмети.
СЪХРАНЯВАНЕ
• Завъртете регулатора на температурата (10) против
часовниковата стрелка до ограничителя, установете
регулатора за постоянно подаване на пара (3) във
вертикално положение - подаването на пара е
изключено.
• Извадете щепсела за мрежата от контакта.
• Отворете капака на отвора за наливане на вода (2),
преобърнете ютията и излейте останалата вода
(рис.8).
• Поставете ютията вертикално и я оставете за
достатъчно време, за да изстине.
• Съхранявайте ютията във вертикално положение.
ТЕХНИЧЕСКИ ХАРАКТЕРИСТИКИ
Напрежение на захранването:
220-230В ~ 50 Хц
Използвана мощност:
1400 Вт
Производителят си запазва правото да изменя
характеристиките на приборите без предварително
уведомяване.
Срок на използване - над 3 години
Гаранция
Подробни условия на гаранцията могат да бъдат
получени от дилера, който е продал тази апаратура. При
всяка рекламация по време на срока на действие на
тази гаранция е необходимо да се представи чека или
квитанцията за купуване.
Това изделие съответства на
изискванията за електромагнитна
съвместимост на директива
89/336/ЕЕС на Съвета на Европа и на
нареждането 73/23 ЕЕС за апаратурата
с низко напрежение.
БЪЛГАРСКИ
8
PLANCHA A VAPOR
MEDIDAS DE SEGURIDAD
Antes de usar la plancha lea atentamente todas las
instrucciones, así como preste atención a las ilustra-
ciones.
• Antes de encender la plancha cerciórese que la ten-
sión de su red coincida con la de la plancha.
• Use la plancha sólo para los fines indicados en estas
instrucciones.
• Use la plancha tan sólo sobre una tabla de planchar.
• Siempre desenchufe la plancha de la red eléctrica
cuando deba llenar su depósito con agua.
• Preste especial atención cuando usa la plancha cerca
de los niños o discapacitados.
• No deja la plancha encendida sin atenderla.
• Siempre desenchufe la plancha si no la usa.
• Para evitar una descarga eléctrica no sumerja la plan-
cha en agua u otros líquidos.
• Para no quemarse evite el contacto de las partes des-
cubiertas del cuerpo con la superficie caliente o el
vapor que desprende la plancha.
• Trate que el cable de alimentación no cuelgue del
borde de la tabla ni roce una superficie caliente.
• No tire del cable para desconectar la plancha del
tomacorriente, tome el enchufe de la plancha y tire de
él para desconectarla.
• Antes de guardar la plancha vacíela y espere a que se
enfríe por completo.
• Para evitar una sobrecarga eléctrica de la línea no
encienda al mismo tiempo varios artefactos que ten-
gan gran potencia de consumo.
• No use la plancha si tiene el enchufe o cable deterio-
rados o cualquier otra falla.
• Para evitar una descarga eléctrica nunca desmonte la
plancha Usted mismo. Si descubre una falla recurra a
un centro de servicio técnico autorizado.
DESCRIPCION
1. Boquilla del spray
2. Tapa de la boca para agua
3. Encendido/apagado de vapor continuo/función de
limpieza
4. Botón del spray
5. Botón de vapor extra
6. Asa de la plancha
7. Protector del cable de alimentación
8. Base
9. Luz piloto
10. Control de temperatura
11. Suela de la plancha
ANTES DEL PRIMER USO
• Extraiga la plancha de la caja y quite de su suela el
cartón de protección.
• Cerciórese que la tensión de la red eléctrica de su
hogar coincida con la indicada en la plancha.
Observación:
Al encender la plancha por primera vez su elemento
calentador se quema. Por eso es posible que salga un
poco de humo.
TIPO DE AGUA A USAR:
• Para llenar el depósito de agua de la plancha use el
agua corriente.
Si el agua del grifo resulta dura, le recomendamos
mezclarla con agua destilada en la proporción 1:1, y en
caso de agua muy dura, mézclela con agua destilada en
la proporción 1: 2 o use sólo agua destilada.
Observación: Se prohíbe llenar el depósito de agua con
substancias aromáticas, vinagre, agua con almidón, pro-
ductos para la descalcificación de agua, productos
químicos u otros líquidos.
LLENADO DEL DEPOSITO CON AGUA (dib. 1, 2)
Antes de llenarlo con agua, cerciórese que la plancha
esté desenchufada.
• Posicione el control de vapor continuo (3) en el
extremo izquierdo para desactivar el vapor.
• Abra la tapa de la boca para agua (2).
• Vierta el agua.
Observación:
• No llene el depósito por encima del nivel “MAX”.
• Si durante el planchado desea agregar agua, apague
y desenchufe la plancha.
• Después de finalizar el planchado, déle vuelta a la
plancha y vierta el agua que queda (dib.8).
TEMPERATURA DE PLANCHADO
Antes de comenzar el planchado planche un pedacito de
tela vieja para cerciorarse que la suela de la plancha y el
depósito de agua están limpios.
• Antes de planchar tenga en cuenta la temperatura
indicada en la etiqueta de la prenda.
• Si la prenda no tiene etiqueta con las recomenda-
ciones de planchado, pero Usted conoce el tipo de
tela, seleccione la temperatura de planchado, según la
tabla que ofrecemos a continuación.
• Esta tabla sirve sólo para telas de fibra. Si la tela es de
otro tipo (plisada, con relieves, etc.), resulta más con-
veniente usar la plancha tibia.
• Antes de comenzar el planchado separe las prendas
de acuerdo a la temperatura de planchado, reuniendo
por un lado las de lana, por el otro, las de algodón, etc.
• Recuerde que la plancha tarda más tiempo en enfri-
arse que en calentarse. Por lo tanto se recomienda
comenzar el planchado con tejidos que requieran tem-
peraturas más bajas, como, por ejemplo, los sintéti-
cos. Luego pase a planchar a una temperatura más
alta. Por último, planche las prendas de algodón y lino.
• Si la prenda se compone de varios tipos de tejidos,
elija la temperatura menor de todos los componentes.
(Por ejemplo, si la prenda contiene un 60% de
poliéster y 40%, de algodón; para el planchado de
toda la prenda elija la temperatura para poliéster “
•
”).
• Si no sabe de qué tipo de tejido está fabricada la pren-
da, determine la correcta temperatura de planchado
pasando la plancha sobre un trozo de tela del lado
interno de la prenda, y seleccione una temperatura
(comenzando por la mínima y luego irá aumentando
hasta que logre el resultado deseado).
• Las prendas de corderoy o aquellas que comienzan a
brillar enseguida que se les pasa la plancha, deben
plancharse en un solo sentido (en la dirección del
pelo) haciendo poca presión sobre ellas.
• Para evitar que aparezcan partes brillantes en las telas
sintéticas o de seda, plánchelas del revés.
SELECCIÓN DE LA TEMPERATURA DE PLANCHADO
• Ponga la plancha sobre la base (8).
• Enchúfela al tomacorriente.
• Posicione el control de temperatura (10) a la temper-
atura de planchado deseada “
•
”, “
••
” o “
•••
”, de
acuerdo al tipo de tela.
La luz piloto (9) se apagará cuando la plancha alcance la
temperatura correspondiente. Y cuando la temperatura
sea inferior a la establecida, la luz piloto (9) se encenderá
nuevamente.
FUNCION SPRAY
• Si desea puede humedecer el tejido presionando
varias veces el botón de spray (4) (dib.3).
• Controle que el depósito tenga suficiente cantidad de
agua.
PLANCHADO A VAPOR
• El planchado a vapor se produce cuando la temper-
atura de la suela de la plancha es elevada, es decir,
que el control de temperatura (10) se encuentra posi-
cionado en “
••
”, “
•••
”.
• Enchufe la plancha al tomacorriente.
• Ponga la plancha sobre la base (8).
• Posicione el control de temperatura (10) en la temper-
atura deseada “
••
” o “
•••
”.
• Compruebe que el depósito contenga suficiente agua.
• Espere hasta que se apague la luz piloto (9), y encien-
da nuevamente.
• Posicione el control de vapor continuo (3) en el
extremo derecho, así activará el vapor(dib.4), que la
suela comenzará a despedir(11).
ATENCION:
Si la temperatura es muy baja, la suela de la plancha
puede perder agua, manchando las prendas. En este
caso, posicione el control de temperatura (10) a una tem-
peratura más alta. Al alcanzar la temperatura establecida,
la plancha seguirá generando vapor.
VAPOR EXTRA
Esta función es muy conveniente al tener que planchar
prendas con arrugas. Se la puede usar sólo con el plan-
chado a temperaturas altas, y el control de temperatura
(10) debe estar en la posición “
•••
”.
• Posicione el control de temperatura (10) en “
•••
”.
• Al presionar el botón de vapor extra (5), la suela de la
plancha despedirá más vapor (dib.5).
Observación:
Para evitar que la suela de la plancha pierda agua man-
tenga presionado el botón de vapor extra no más de 15-
20 segundos.
VAPOR VERTICAL
• Enchufe la plancha en el tomacorriente.
• Ponga la plancha sobre la base (8).
• Posicione el control de temperatura (10) en “
•••
”.
• Compruebe que el depósito contenga suficiente agua.
• Espere hasta que se apague la luz piloto (9), y
enciende nuevamente.
• Sostenga la plancha en posición vertical, presione el
botón de vapor extra (5), y la suela de la plancha (11)
despedirá vapor (dib. 6).
Información importante:
• No se recomienda efectuar el planchado vertical a
vapor de tejidos sintéticos.
• Al planchar a vapor trate que la suela de la plancha no
entre en contacto con el tejido, pues puede quemarlo.
• Jamás planche a vapor las prendas puestas en una
persona, pues la temperatura del vapor es muy alta. A
tal efecto, use perchas o colgadores.
PLANCHADO EN SECO
• Enchufe la plancha en el tomacorriente.
• Ponga la plancha sobre la base (8).
• Posicione el control de vapor continuo (3) en el
extremo izquierdo y dejará de salir vapor.
• Posicione el control de temperatura (10) en la temper-
atura de planchado deseada: “
•
”, “
••
”, “
•••
”.
• Espere hasta que se apague la luz piloto (9), y encien-
da nuevamente. Eso significa que ha alcanzado la
temperatura establecida y ya puede comenzar a plan-
char.
LIMPIEZA
Para prolongar la vida útil de la plancha le recomendamos
limpiarla regularmente (una o dos veces al mes, según la
dureza del agua).
• Posicione el control de vapor continuo (3) en el
extremo izquierdo y el vapor se corta.
• Llene el depósito de agua hasta el nivel “MAX“.
• Ponga la plancha sobre la base (8).
• Enchufe la plancha.
• Posicione el control de temperatura (10) en “
•••
”.
• Espere hasta que la plancha se caliente y la luz piloto
(9) se apague.
• Desenchufe la plancha y sosténgala en posición hori-
zontal.
• Presione y lleve el control de vapor (3) hacia los
botones (4,5), manteniéndolo presionado (dib.7).
• La suela de la plancha expulsará de sus orificios el
agua hirviendo y el vapor.
• Pasado un minuto suelte el control de vapor (3) o
espere a que se acabe el agua del depósito. Ponga la
plancha sobre la base.
• Pasado un minuto suelte el botón de limpieza (11) o
espere a que se acabe el agua del depósito. Ponga la
plancha sobre la base.
• Enchufe la plancha y espere hasta que se caliente.
• Planche un trozo de tela para que se evapore el resto
de agua.
• Desenchufe la plancha y espere a que la suela de la
plancha se enfríe por completo.
• Antes de guardar la plancha compruebe que la suela
esté totalmente seca.
MANTENIMIENTO
• Antes de limpiar la plancha cerciórese que esté des-
enchufada y fría.
• Después frote la suela con un paño seco.
• No use productos abrasivos para la limpieza de la
suela y del cuerpo de la plancha.
• Evite el contacto de la suela de la plancha con objetos
metálicos punzantes.
CONSERVACIÓN
• Posicione el control de temperatura (10) en sentido
contrario a las agujas del reloj, luego posicione el con-
trol de vapor continuo (3) verticalmente y el vapor deja
de salir.
• Desenchufe la plancha.
• Abra la tapa de la boca para agua (2), déle vuelta a la
plancha y saque el agua restante del depósito de agua
(dib.8).
• Ponga la plancha en posición vertical y espere a que
se enfríe por completo.
• Siempre conserve la plancha en posición vertical.
FICHA TÉCNICA
Voltaje y frecuencia:
220-230 V ~ 50 Hz
Potencia consumida:
1400 W
El fabricante se reserva el derecho de modificar las car-
acterísticas de la plancha sin previo aviso.
La vida útil del aparato es no menor de 3 años.
Garantía
La garantía detallada es entregada por el vendedor de
este aparato. Para efectuar cualquier reclamo, dentro
del plazo de vigencia de la presente garantía, se debe
presentar el ticket o factura de compra de este aparato.
Este producto cumple con las normas de
compatibilidad electromagnética, de la
directiva 89/336/EEC del Consejo de las
Comunidades Europeas, y las
reglamentaciones 73/23 CEE, para los
aparatos de bajo voltaje.
ESPAÑOL
7
FERRO DA STIRO A VAPORE
NORME DI SICUREZZA
Prima dell’utilizzo leggete le presenti istruzioni e prestate
l’attenzione anche ai disegni.
• Prima dell’accensione del ferro da stiro, assicuratevi
che la tensione della vostra rete corrisponde alla ten-
sione del ferro da stiro.
• Usate il ferro da stiro solo con gli scopi previsti dalle
istruzioni.
• Usate il ferro da stiro solo sull’asse da stiro.
• Durante il riempimento del ferro da stiro con l’acqua,
staccatelo dalla rete.
• Siete molto attenti durante l’uso dell’apparecchio dai
bambini o dalle persone handicappate.
• Non lasciate il ferro da stiro acceso senza bada.
• Staccate il ferro da stiro dalla rete se non lo usate.
• Per evitare la scossa elettrica, non immergete il ferro da
stiro nell’acqua o in qualsiasi altro liquido.
• Evitate il contatto della pelle con le superfici calde del
ferro da stiro o con il vapore, per evitare le ustioni.
• Badate che il cavo di rete non pendola dai margini del-
l’asse da stiro e non tocca le superfici calde.
• Quando staccate il ferro da stiro dalla rete elettrica,
trattenete la spina, non tirate il cavo di rete.
• Prima di mettere il ferro da stiro in custodia, lasciatelo
raffreddarsi completamente.
• Per evitare il sovraccarico della rete elettrica, non
accendete qualche apparecchio con la grande potenza
assorbita contemporaneamente.
• Non usate il ferro da stiro con la spina, il cavo danneg-
giati o con qualsiasi altro guasto.
• Per evitare la scossa elettrica, non smontate mai il ferro
da stiro da se’, se scoprite qualche guasto, rivolgetevi
al centro riparazioni autorizzato.
DESCRIZIONE
1. Ugello dello spruzzatore dell’acqua
2. Coperchio del foro del riempimento
3. Accensione/spegnimento dell’erogazione costante
del vapore/del regime della pulizia
4. Pulsante dello spruzzatore dell’acqua
5. Pulsante dell’erogazione supplementare del vapore
6. Manopola del ferro da stiro
7. Protezione del cavo di rete
8. Supporto
9. Indicatore luminoso del funzionamento
10. Regolatore della temperatura
11. Suola del ferro da stiro
PRIMA DELL’USO PER LA PRIMA VOLTA
• Tirate fuori il ferro da stiro dall’imballaggio, togliete la
protezione di cartone dalla suola del ferro da stiro.
• Assicuratevi che la tensione della vostra rete cor-
risponde alla tensione del ferro da stiro.
NOTA:
Durante la prima accensione l’elemento del riscaldamen-
to del ferro da stiro brucia, e’ possibile l’apparizione della
piccola quantita’ del fumo.
SCELTA DELL’ ACQUA:
• Nel ferro da stiro si puo’ mettere l’acqua normale dal
rubinetto. Se l’acqua e’ dura, si raccomanda mescolar-
la con l’acqua distillata in proporzione 1 : 1, se l’acqua
e’ molto dura, si raccomanda mescolarla con l’acqua
distillata in proporzione 1 : 2 per evitare l’apparizione
dell’incrostazione.
NOTA:
E’ vietato mettere nel ferro da stiro i liquidi aromatici,
l’aceto, la soluzione dell’amido, i reagenti per l’elimi-
nazione dell’incrostazione, le sostanze chimiche o gli altri
liquidi.
RIEMPIMENTO DEL FERRO DA STIRO CON L’ACQUA
(disegni 1,2)
Prima di riempire il ferro da stiro con l’acqua, assicuratevi
che esso e’ staccato dalla rete.
• Mettete il regolatore dell’erogazione costante del
vapore (3) in posizione sinistra estrema – l’erogazione
del vapore e’ spenta.
• Aprite il coperchio del foro del riempimento (2).
• Mettete l’acqua.
Nota:
• Non superate la scritta “MAX”.
• Se avete bisogno di aggiungere l’acqua mentre stirate,
staccate il ferro da stiro e staccate la spina dalla presa.
• Alla conclusione della stiratura, girate il ferro da stiro e
versate via i residui dell’acqua (disegno 8).
TEMPERATURA DELLA STIRATURA
Prima dell’inizio della manutenzione esaminate il ferro da
stiro riscaldato su un pezzettino del tessuto vecchio per
assicurarsi che la suola ed il serbatoio per l’acqua sono
puliti.
• Prima della stiratura, guardate la temperatura racco-
mandata indicata sull’etichetta.
• Se non c’e’ l’etichetta con le indicazioni per la stiratura,
ma voi conoscate il tipo del materiale, per la scelta della
temperatura guardate la tabella.
• La presente tabella e’ adatta ai materiali fibrosi. Se il
materiale e’ di un’altro tipo (goffrato, rilevato ecc.), e’
meglio stirarli con la temperatura bassa.
• Prima selezionate le cose secondo la temperatura della
stiratura: la lana insieme alla lana, il cotone insieme al
cotone ecc.
• Il ferro da stiro si riscalda piu’ velocemente che esso si
raffredda. Allora, si raccomanda di cominciare a stirare
dalla temperatura bassa, per esempio dai tessuti sin-
tetici. Poi passate alla stiratura con le temperature piu’
alte. Stirate il cotone e il lino in ultimo turno.
• Se la cosa e’ fatta dei tessuti mescolati, bisogna
inserire la temperatura della stiratura per il tessuto con
la temperatura piu’ bassa (per esempio, se il tessuto e’
composto al 60% di poliestere e al 40% del cotone,
bisogna stirarlo con la temperatura adatta al poliestere
«
•
»).
• Se non riuscite a capire di che tessuto e’ fatta una cosa,
trovate un posto che non si vede molto quando la usate
e trovate la temperatura della stiratura per sperimento
(cominciate sempre dalla temperatura piu’ bassa e soll-
evatela in modo graduale finche’ non ottenete il risulta-
to desiderato).
• I tessuti di velluto e gli altri tessuti che cominciano a
rilucere presto, bisogna stirare in una direzione (secon-
do la direzione del pelo) con la leggera pressione.
• Per evitare le macchie lucide sui tessuti sintetici o di
seta, stirateli al rovescio.
IMPOSTAZIONE DELLA TEMPERATURA DELLA STI-
RATURA
• Mettete il ferro da stiro sul supporto (8).
• Attaccate la spina alla presa.
• Mettete il regolatore della temperatura (10) sulla tem-
peratura della stiratura «
•
», «
••
» o «
•••
», secondo il
tipo del tessuto.
La temperatura viene raggiunta quando l’indicatore lumi-
noso (9) si spegne. L’indicatore luminoso (9) si accende di
nuovo se la temperatura diventa piu’ bassa di quella
impostata.
SPRUZZATORE DELL’ACQUA
• Potete umidificare il tessuto, premendo per qualche
volta il pulsante dello spruzzatore (4) (disegno 3).
• Assicuratevi che nel serbatoio c’e’ la sufficiente quanti-
ta’ dell’acqua.
STIRATURA A VAPORE
• E’ possibile effettuare la stiratura a vapore solo con la
temperatura alta della suola del ferro da stiro, le
posizioni del regolatore della temperatura (10) «
••
» o
«
•••
».
• Attaccate la spina alla presa.
• Mettete il ferro da stiro sul supporto (8).
• Mediante il regolatore della temperatura (10) impostate
la temperatura desiderata della stiratura: «
••
» o «
•••
».
• Assicuratevi che nel serbatoio c’e’ la sufficiente quanti-
ta’ dell’acqua.
• Aspettate finche’ l’indicatore luminoso (9) non si speg-
ne e poi si accende di nuovo.
• Mettete il regolatore dell’erogazione costante del
vapore (3) in posizione destra estrema – l’erogazione
del vapore e’ accesa (disegno 4), dopo di che il vapore
comincia ad uscire dai fori della suola del ferro da stiro
(11).
AT TENZIONE:
L’acqua puo’ fuoruscire dalla suola del ferro da stiro, se la
temperatura e’ troppo bassa, questo puo’ provocare l’ap-
parizione delle macchie. Se questo e’ successo, mediante
il regolatore della temperatura (10) mettete la temperatura
piu’ alta. L’erogazione del vapore si riprende, appena viene
raggiunta la temperatura impostata del ferro da stiro.
EROGAZIONE SUPPLEMENTARE DEL VAPORE
Questa funzione e’ molto utile durante la stiratura delle
pieghe.
La funzione dell’erogazione supplementare del vapore
puo’ essere usata solo con il regime della temperatura alta
della stiratura, il regolatore della temperatura (4) si trova in
posizione «
•••
».
• Mettete il regolatore della temperatura (4) in posizione
«
•••
».
• Grazie alla pressione del pulsante dell’erogazione sup-
plementare del vapore (6), il vapore dalla suola del ferro
da stiro esce in modo piu’ intenso (disegno 5).
Nota:
Per evitare la fuoruscita dell’acqua dai fori di vapore non
trattenete premuto il pulsante dell’erogazione supple-
mentare del vapore per piu’ di 15-20 secondi.
VAPORIZZAZIONE VERTICALE
• Attaccate la spina alla presa.
• Mettete il ferro da stiro sul supporto (8).
• Mettete il regolatore della temperatura (10) in posizione
«
•••
».
• Assicuratevi che nel serbatoio c’e’ la sufficiente quanti-
ta’ dell’acqua.
• Aspettate finche’ l’indicatore luminoso (9) non si speg-
ne e poi si accende di nuovo.
• Tenete il ferro da stiro in modo verticale e premete il
pulsante dell’erogazione supplementare del vapore
(5), il vapore esce dalla suola del ferro da stiro (11) (dis-
egno 6).
Informazioni importanti:
• Non si raccomanda di usare la funzione della vaporiz-
zazione verticale per i tessuti sintetici.
• Durante la vaporizzazione non toccate il materiale con
la suola del ferro da stiro, per evitare la sua fusione.
• Non vaporizzate i vestiti messi sull’uomo, perche’ la
temperatura del vapore e’ molto alta. Usate la gruccia o
l’attaccapanni.
STIRATURA ASCIUT TA
• Attaccate la spina alla presa.
• Mettete il ferro da stiro sul supporto (8).
• Mettete il regolatore dell’erogazione costante del
vapore (3) in posizione sinistra estrema – l’erogazione
del vapore e’ spenta.
• Mediante il regolatore della temperatura (10) impostate
la temperatura desiderata della stiratura: «
•
», «
••
» o
«
•••
».
• Aspettate finche’ l’indicatore luminoso (9) non si speg-
ne e poi si accende di nuovo. La temperatura imposta-
ta della suola del ferro da stiro e’ raggiunta, si puo’
iniziare il processo della stiratura.
SISTEMA DELLA PULIZIA
Per aumentare il periodo della durata del ferro da stiro, si
raccomanda di effettuare regolarmente la pulizia del ferro
da stiro (una o due volte al mese secondo la durezza del-
l’acqua).
• Mettete il regolatore dell’erogazione costante del
vapore (3) in posizione sinistra estrema – l’erogazione
del vapore e’ spenta.
• Riempite il serbatoio con l’acqua fino alla scritta “MAX”.
• Mettete il ferro da stiro sul supporto (8).
• Attaccate la spina alla presa.
• Mettete il regolatore della temperatura (10) in posizione
«
•••
».
• Lasciate il ferro da stiro riscaldarsi, aspettate finche’
l’indicatore luminoso (9) si spegne.
• Staccate la spina dalla presa e tenete il ferro da stiro in
modo orizzontale sopra il lavandino.
• Premete la leva del regolatore del vapore (3) in
direzione verso I pulsanti (4,5) e trattenetela
(disegno 7).
• L’acqua bollente e il vapore insieme alla incrostazione
escono dai fori della suola del ferro da stiro. Si puo’
dondolare il ferro da stiro mentre stanno uscenso il
vapore e l’acqua.
• Lasciate la leva del regolatore del vapore (3) dopo un
minuto dal momento in cui nel serbatoio finisce l’acqua.
Mettete il ferro da stiro sul supporto.
• Attaccate la spina alla presa, lasciate il ferro da stiro
riscaldarsi di nuovo.
• Stirate un pezzo del tessuto di cui non avete bisogno
per lasciare l’acqua rimasta vaporizzarsi.
• Staccate la spina dalla presa e aspettate finche la suola
non si raffredda completamente.
• Prima di mettere il ferro da stiro in custodia, assicurate-
vi che la suola del ferro da stiro e’ completamente
asciutta.
PULIZIA E CURA
• Prima di pulire il ferro da stiro, assicuretevi che esso e’
staccato dalla rete e che si e’ raffreddato.
• Dopo l’eliminazione delle deposizioni, lucidate la suola
con il tessuto asciutto.
• Non usate le sostanze abrasive per effettuare la pulizia
della suola e del corpo del ferro da stiro.
• Evitate il contatto della suola del ferro da stiro con gli
oggetti metallici taglienti.
CONSERVAZIONE
• Girate il regolatore della temperatura (10) in senso
antiorario, mettete il regolatore dell’erogazione
costante del vapore (3) in posizione verticale –
l’erogazione del vapore e’ spenta.
• Staccate la spina dalla presa.
• Aprite il coperchio del foro del riempimento (2), girate il
ferro da stiro e versate via i residui dell’acqua
(disegno 8).
• Mettete il ferro da stiro in posizione verticale e lasciate-
lo raffreddarsi.
• Tenete il ferro da stiro in posizione verticale.
CARAT TERISTICHE TECNICHE
Tensione dell’alimentazione:
220-230V ~ 50 Hz
Potenza assorbita:
1400 W
La casa produttrice si riserva il diritto di cambiare le carat-
terictiche tecniche dell’apparecchio senza alcun preavvi-
so.
La durata dell’apparecchio non e’ meno di 3 anni.
Garanzia
Le condizioni dettagliate della garanzia si possono
richiedere al rivenditore dell’apparecchio. Qualsiasi
reclamo deve essere richiesto prima della scadenza della
garanzia e deve essere accompagnato dallo scontrino fis-
cale oppure da un altro documento che attesti l’acquisto.
Questo prodotto corrisponde ai requisiti
di compatibilità elettromagnetica stabiliti
dalla direttiva 89/336/EEC del Consiglio
Europeo e dalla Direttiva 73/23 CEE sugli
apparecchi di bassa tensione.
ITALIANO
6
FER A VAPEUR
MESURES DE SECURITE
Avant l’utilisation lisez attentivement la notice d’utilisation
et faites aussi attention aux illustrations graphiques.
• Assurez-vous que la tension de votre installation corre-
spond à la tension de fonctionnement de l’appareil.
• Utilisez le fer à repasser à sa destination prévue par la
notice d’utilisation.
• Utilisez le fer à repasser sur une planche à repasser.
• Avant remplir le réservoir de l’appareil déconnectez-le
du secteur.
• Ne laissez pas le fer branché sans surveillance.
• Toujours débranchez l’appareil si vous ne l’utilisez pas.
• Au risque du choc électrique ne plongez pas l’appareil
dans l’eau ou autre liquide.
• Au risque des brûlures évitez le contact de la peau
avec les surfaces chauffées de l’appareil.
• Veillez à ce que le cordon d’alimentation ne se pende
pas du bord de la planche à repasser et ne touche pas
aux surfaces chaudes.
• En déconnectant l’appareil du secteur tirez-le par la
fiche et non pas par le cordon.
• Avant de ranger l’appareil laissez-le refroidir, ensuite
enroulez le cordon d’alimentation autour du socle.
• Pour éviter des surcharges du secteur ne branchez
pas plusieurs appareils en même temps.
• N’utilisez pas le fer à repasser avec le cordon endom-
magé ou avec autres défaillances techniques.
• Pour éviter le risque d’électrocution ne démontez pas
le fer à repasser, en cas de panne adressez-vous au
centre de service agréé.
DESCRIPTION
1. Pulvérisateur
2. Couvercle de l’orifice de remplissage
3. Activation du jet permanent de vapeur/ du régime de
nettoyage
4. Bouton de pulvérisation
5. Bouton de jet supplémentaire de vapeur
6. Poignée du fer à repasser
7. Protection du cordon d’alimentation
8. Socle
9. Indicateur lumineux de fonctionnement
10. Régulateur de température
11. Semelle du fer à repasser
AVANT LA PREMIERE UTILISATION
• Sortez le fer à repasser des emballages et enlevez le
corton de protection de la semelle.
• Assurez-vous que la tension de votre installation corre-
spond à la tension d’alimentation du fer à repasser.
Remarque:
Si vous branchez l’appareil pour la première fois une
petite quantité de fumée peut apparaître - c’est un effet
normal dû au brûlage de la résistance de chauffage.
CHOIX D’EAU
• Pour remplir le réservoir utilisez l’eau du robinet. Si
l’eau du robinet est dure il est conseillé de la mélanger
avec l’eau distillée au rapport 1 : 1, si l’eau est très
dure, mélangez-la avec de l’eau distillée au rapport 1
: 2 ou utilisez l’eau distillée pure.
Remarque:
Il est interdit de verser dans le réservoir d’eau des liq-
uides aromatiques, vinaigre, solution d’amidon, des
agents chimiques pour enlever le tartre ou autres liq-
uides.
REMPLISSAGE DU FER A REPASSER (fig. 1, 2)
Assurez-vous que le fer à repasser est débranché du
secteur.
• Mettez le régulateur de projection permanente de
vapeur (3) à la position «projection de vapeur
branchée».
• Ouvrez le couvercle de l’orifice de remplissage (2).
• Versez l’eau dans le réservoir.
Remarque:
• Ne remplissez pas le réservoir au-dessus de la mar-
que «MAX».
• Si pendant le repassage vous voulez ajouter de l’eau,
débranchez le fer et sortez sa fiche d’alimentation de
la prise de courant.
• Après que vous avez terminé le repassage, renversez
le fer et videz-le des restes de l’eau (fig.8).
TEMPERATURE DE REPASSAGE
Avant d’utiliser l’appareil testez le fer chauffé à un
morceau d’un ancien tissu, pour être sûr que la semelle
du fer à repasser et le réservoir d’eau sont propres.
• Toujours consultez l’étiquette de l’article à repasser
avant de commencer le repassage.
• Faute de l’étiquette mais si vous savez le type du
matériel, consultez la table ci-dessous pour choisir la
température de repassage.
• La table est utilisable uniquement pour les matériaux
fibreux. Si le matériel est d’autre type (gaufré, en relief
etc.), il vaut mieux de la repasser avec une basse tem-
pérature.
• D’abord triez les vêtements en fonction de la tempéra-
ture de repassage: laine avec laine, coton avec coton
etc.
• Le fer prend plus de temps à se refroidir qu’à se chauf-
fer. Alors il est recommandé de commencer par le
repassage à la plus basse température, par exemple
des tissus synthétiques. Ensuite passez aux tissus
exigeant la température plus haute. Repassez le coton
et le lin le dernier moment.
• Si le vêtement est fabriqué du mélange des tissus, il
faut régler la plus basse température requise par les
composants (par exemple si le vêtement se compose
de 60% de polyester et de 40% de coton il faut régler
la température requise pour le polyester «
•
»).
• Si vous ne pouvez pas définir le tissu de fabrication.
Trouvez un endroit qui ne sera pas visible pendant l’u-
tilisation du vêtement et en essayant les différentes
températures en commençant par la plus basse trou-
vez la température optimale.
• Les tissus en velours côtelé et autres tissus qui devi-
ennent vite luisants doivent être repassés en une seule
direction (au sens d’implantation des poils).
• Au risque d’apparition des tâches luisantes aux tissus
synthétiques et de soie, il faut les repasser de l’envers.
REGLAGE DE LA TEMPERATURE DE REPASSAGE
• Placez le fer sur le socle (8).
• Insérez la fiche d’alimentation dans la prise de
courant.
• Mettez le régulateur de température (10) à la position
requise «
•
», «
••
» ou «
•••
», selon le type du tissu.
La température réglée sera atteinte quand le voyant
lumineux (9) serait éteint. Le voyant lumineux (9) s’allume
de nouveau si la température baisse au-dessous de la
valeur réglée.
PULVERISATEUR
• Vous pouvez humecter le tissu en appuyant plusieurs
fois sur le bouton de pulvérisateur (4) (fig.3).
• Assurez-vous qu’il y a assez d’eau dans le réservoir.
REPASSAGE A VAPEUR
Le repassage à vapeur est possible uniquement à la haute
température de la semelle du fer - «
••
» ou «
•••
».
• Insérez la fiche d’alimentation de l’appareil dans la
prise de courant.
• Placez le fer sur le socle (8).
• Mettez le régulateur de la température (10) à la posi-
tion «
••
» ou «
•••
».
• Assurez-vous qu’il y a assez d’eau dans le réservoir.
• Attendez que le voyant lumineux (9) s’éteint et ensuite
s’allume de nouveau.
Mettez le régulateur de projection permanente de vapeur
(3) à la position extrême droite (fig.4), la vapeur com-
mencera à sortir des orifices de la semelle du fer (11).
AT TENTION:
L’eau peut couler des orifices de la semelle si la tem-
pérature réglée est trop basse, ça risque de causer l’ap-
parition des taches. Si un tel effet c’est passé, mettez le
régulateur de température de repassage (10) à la position
de la température plus haute. La projection de la vapeur
se recommencera dès que la température réglée serait
atteinte.
PROJECTION SUPPLEMENTAIRE DE VAPEUR
La fonction de projection supplémentaire de vapeur sert
au défroissage des plis et peut être utilisée uniquement à
la haute température de repassage (positions du régula-
teur de température (10) à la position «
•••
»)
• Mettez le régulateur de température (10) à la position
«
•••
».
• A la pression du bouton de projection supplémentaire
de vapeur (5), la vapeur sortira plus rapidement de la
semelle (fig.5).
Remarque:
Pour que l’eau ne commence pas à couler des orifices de
sortie de vapeur ne tenez pas le bouton de projection
supplémentaire de vapeur pendant plus de 15-20 secon-
des.
DEFROISSAGE VERTICAL
• Insérez la fiche d’alimentation de l’appareil dans la
prise de courant.
• Placez le fer sur le socle (8).
• Mettez le régulateur de température (10) à la position
«
•••
».
• Assurez-vous qu’il a assez d’eau dans le réservoir.
• Attendez que le voyant lumineux (9) s’éteint et s’al-
lume de nouveau.
• Tenez le fer verticalement et appuyez sur le bouton de
projection supplémentaire de vapeur (5), la vapeur
sortira des orifices de la semelle (11) (fig. 6).
Information importante:
• Il est déconseillé de procéder au défroissage vertical
des tissus synthétiques.
• Pendant le défroissage ne touchez pas le tissu par la
semelle du fer pour ne pas l’endommager.
• Ne défroissez jamais le vêtement qui est sur l’homme,
puisque la température de la vapeur est très élevée.
Utilisez les portes-habits ou des cintres.
REPASSAGE A SEC
• Insérez la fiche d’alimentation de l’appareil dans la
prise de courant.
• Placez le fer sur le socle (8).
• Mettez le régulateur de projection permanente de la
vapeur (3) à la position «X» - projection de la vapeur
désactivée.
• Mettez le régulateur de température (10) à la tempéra-
ture requise «
•
», «
••
» ou «
•••
».
• Attendez que le voyant lumineux (9) s’éteint et s’al-
lume de nouveau.
• Dès que la température réglée est attente vous pouvez
commencer le repassage.
SYSTEME DE NET TOYAGE
Pour prolonger le délai de service de l’appareil, nous con-
seillons de nettoyez régulièrement le fer (une ou deux fois
par mois).
• Mettez le régulateur de projection permanente de la
vapeur (3) à la position extrême gauche - projection de
la vapeur est désactivée.
• Remplissez le réservoir jusqu’à la marque «MAX».
• Placez le fer sur le socle (8).
• Insérez la fiche d’alimentation de l’appareil dans la
prise de courant.
• Mettez le régulateur de température (10) à la position
«
•••
».
• Laissez l’appareil se réchauffer, attendez que le voyant
lumineux (9) s’éteint.
• Sortez la fiche d’alimentation de l’appareil de la prise
de courant et maintenez le fer horizontalement au-
dessus de l’évier.
• Poussez le régulateur de jet de vapeur (3) dans la
direction des boutons (4,5) et maintenez-le (fig.7).
• L’eau bouillante et la vapeur avec du tartre seront éjec-
tées à travers les orifices de la semelle. Vous pouvez
balancer légèrement le fer en avant et en arrière.
• Libérez le régulateur de jet de vapeur (3) une minute
après ou lorsque le réservoir sera vide. Placez le fer
sur le socle.
• Placez le fer sur le socle.
• Insérez la fiche d’alimentation de l’appareil dans la
prise de courant et laissez le fer se chauffer.
• Essayez le fer sur un morceau de tissu inutile pour
laisser s’évaporer l’eau résiduelle.
• Sortez la fiche d’alimentation de l’appareil de la prise
de courant et laissez le fer à repasser se refroidir.
• Avant de ranger l’appareil assurez-vous que sa
semelle est complètement sèche.
ENTRETIEN ET NET TOYAGE
• Avant de nettoyer le fer assurez-vous qu’il est
débranché du secteur et qu’il est refroidi.
• Après l’enlèvement des dépôts polissez la semelle
avec un chiffon sec.
• N’utilisez pas des agents abrasifs pour le nettoyage
de la semelle ou du corps de l’appareil.
• Evitez le contact de la semelle avec des surfaces
métalliques.
RANGEMENT
• Tournez le régulateur de température (10) dans le sens
contraire des aiguilles d’une montre jusqu’à la fin,
placez le régulateur de jet de vapeur (3) sur la position
verticale – le jet de vapeur est désactivé.
• Sortez la fiche de l’appareil de la prise de courant.
• Ouvrez le couvercle de l’orifice (2), renverser le fer et
videz le réservoir (fig.8).
• Placez le fer verticalement et laissez-le refroidir.
• Toujours rangez l’appareil à la position verticale.
CARACTÉRISTIQUES TECHNIQUES
Tension d’alimentation:
220-230V ~ 50 Hz
Puissance consommée: 1400 W
Le producteur se réserve le droit de changer les carac-
téristiques des appareils sans préavis.
Le délai de service de l’appareil est pas moins de 3
ans.
Garantie
Pour des conditions de garantie plus détaillées adressez-
vous au distributeur qui vous a vendu l’appareil. En cas de
toute sorte de prétention pendant la période de la
présente garantie il faudra présenter le ticket quittance de
l’achat.
Le présent appareil satisfait aux exi-
gences de compatibilité électromagné-
tique en vertu de la directive
89/336/EEC du conseil de l’Europe et la
préscription 73/23 EEC pour l’appareil-
lage de bas voltage.
FRANÇAIS
5
ПАРОВОЙ УТЮГ
ОПИСАНИЕ
1.
Сопло разбрызгивателя воды
2.
Крышка заливочного отверстия
3.
Включение/выключение постоянной подачи
пара/режима очистки
4.
Кнопка разбрызгивателя воды
5.
Кнопка дополнительной подачи пара
6.
Ручка утюга
7.
Защита сетевого шнура
8.
Основание
9.
Световой индикатор работы
10. Регулятор температуры
11. Подошва утюга
МЕРЫ БЕЗОПАСНОСТИ
Перед эксплуатацией внимательно прочитайте
инструкцию, а также обратите внимание на
иллюстрации.
• Перед включением утюга убедитесь, что
напряжение в сети соответствует рабочему
напряжению утюга.
• Используйте утюг только в целях,
предусмотренных инструкцией.
• Пользуйтесь утюгом только на гладильной доске.
• Не оставляйте включенный утюг без присмотра.
• Всегда отключайте утюг от сети, если не
пользуетесь им.
• Будьте особенно внимательны при использовании
прибора в непосредственной близости от детей и
людей с ограниченными возможностями.
• Чтобы избежать поражения электрическим током,
не погружайте утюг в воду или в любую другую
жидкость.
• Избегайте контакта открытых участков кожи с
горячими поверхностями утюга или выходящим
паром, чтобы избежать получения ожогов.
• Следите, чтобы сетевой шнур не свешивался с
края гладильной доски, а также не касался горячих
поверхностей.
• При отключении утюга от электрической сети
всегда держитесь за сетевую вилку, никогда не
тяните за сетевой шнур.
• При наполнении резервуара утюга водой всегда
отключайте его от сети.
• Перед тем как убрать утюг, слейте остатки воды и
дайте ему полностью остыть.
• Во избежание перегрузки электрической сети не
включайте одновременно несколько приборов с
большой потребляемой мощностью.
• Не используйте утюг с поврежденной сетевой
вилкой, сетевым шнуром, а так же с любыми
другими неисправностями.
• Чтобы избежать поражения электрическим током,
никогда не разбирайте утюг самостоятельно. При
обнаружении неисправности обращайтесь в
авторизованный сервисный центр.
• Утюг предназначен только для домашнего
использования.
ПЕРЕД ПЕРВЫМ ИСПОЛЬЗОВАНИЕМ
• Извлеките утюг из упаковки и удалите упаковочные
материалы.
• Убедитесь, что напряжение в сети соответствует
рабочему напряжению утюга.
Примечание
При первом включении нагревательный элемент
утюга обгорает, поэтому может появиться небольшое
количество дыма - это нормальное явление.
ВЫБОР ВОДЫ
• Для
наполнения
резервуара
используйте
водопроводную воду. Если водопроводная вода
жесткая, то рекомендуется смешивать ее с
дистиллированной водой в соотношении 1:1, при
очень
жесткой
воде
смешивайте
ее
с
дистиллированной водой в соотношении 1:2 или
используйте только дистиллированную воду.
Примечание
Запрещается заливать в резервуар для воды
ароматизирующие жидкости, уксус, раствор
крахмала, реагенты для удаления накипи,
химические вещества и т.д.
НАПОЛНЕНИЕ РЕЗЕРВУАРА ДЛЯ ВОДЫ (рис. 1, 2)
Прежде чем залить воду в утюг, убедитесь, что он
отключен от сети.
• Установите регулятор постоянной подачи пара (3) в
вертикальное положение - подача пара выключена.
• Откройте крышку заливочного отверстия (2).
• Залейте воду.
Примечания
• Не наливайте воду выше отметки MAX.
• Если во время глаженья необходимо долить воду,
то отключите утюг и выньте сетевую вилку из
розетки.
• После того как вы закончите гладить, откройте
крышку заливочного отверстия (2), переверните
утюг и слейте остатки воды (рис. 8).
ТЕМПЕРАТУРА ГЛАЖЕНЬЯ
Перед началом эксплуатации протестируйте нагретый
утюг на кусочке старой ткани, чтобы убедиться в том,
что подошва утюга и резервуар для воды чистые.
• Всегда перед глаженьем вещей обращайте
внимание
на
рекомендуемую
температуру,
указанную на ярлыке изделия.
• Если ярлык с указаниями по глаженью отсутствует,
но вы знаете тип материала, то для выбора
температуры
глаженья
воспользуйтесь
приведенной ниже таблицей.
• Таблица применима только для волокнистых
материалов.
Если
материал
другого
типа
(гофрированный, рельефный и т.д.), то лучше всего
его гладить при низкой температуре.
• Сначала отсортируйте вещи по температуре
глаженья: шерсть - к шерсти, хлопок - к хлопку и т.д.
• Утюг нагревается быстрее, чем остывает, поэтому
рекомендуется сначала гладить вещи, требующие
низкой температуры (например, из синтетических
тканей). После чего переходите на глаженье при
более высоких температурах. Хлопок и лён гладьте
в последнюю очередь.
• Если вещь изготовлена из смесовых тканей, то
необходимо установить температуру глаженья для
ткани,
которой
необходима
самая
низкая
температура (например, если вещь состоит на 60%
из полиэстера и на 40% из хлопка, то её следует
гладить при температуре, подходящей для
полиэстера “
•
”).
• Если вы не можете определить ткань, из которой
сделана вещь, найдите место на вещи, которое не
заметно при носке, и опытным путём выберите
температуру глаженья (всегда начинайте с самой
низкой температуры и постепенно повышайте её,
пока не добьётесь желаемого результата).
• Вельветовые и другие ткани, которые быстро
начинают лосниться, следует гладить строго в
одном направлении (в направлении ворса) с
небольшим нажимом.
• Чтобы избежать появления лоснящихся пятен на
синтетических и шелковых тканях, гладьте их с
изнаночной стороны.
УСТАНОВК А ТЕМПЕРАТУРЫ ГЛАЖЕНЬЯ
• Поставьте утюг на основание (8).
• Вставьте сетевую вилку в розетку.
• Установите регулятор температуры (10) на
требуемую температуру глаженья :”
•
”, “
••
” или
“
•••
” (в зависимости от типа ткани).
Установленная температура будет достигнута, когда
световой индикатор (9) погаснет. Индикатор (9)
загорится снова, если температура опустится ниже,
чем была установлена.
РАЗБРЫЗГИВАТЕЛЬ ВОДЫ
• Вы можете увлажнить ткань, нажав несколько раз
на кнопку разбрызгивателя (4) (рис.3).
• Убедитесь, что в резервуаре достаточно воды.
ПАРОВОЕ ГЛАЖЕНЬЕ
• Паровое глаженье возможно только при высокой
температуре подошвы утюга (положения
регулятора температуры (10) “
••
” или “
•••
”).
• Вставьте сетевую вилку в розетку.
• Поставьте утюг на основание (8).
• Установите регулятор температуры (10) на
требуемую температуру глаженья: “
••
” или “
•••
”.
• Убедитесь, что в резервуаре достаточно воды.
• Подождите, пока выключится световой индикатор
(9), а затем снова загорится. Установите регулятор
постоянной подачи пара (3) в горизонтальное
положение - подача пара включена (рис.4), после
этого пар начнет выходить из отверстий подошвы
утюга (11).
ВНИМАНИЕ!
Вода может вытекать из отверстий подошвы утюга,
если установленная температура слишком низкая, это
может стать причиной появления пятен. Если это
случилось, установите регулятор температуры (10) на
более высокую температуру.
ДОПОЛНИТЕЛЬНАЯ ПОДАЧА ПАРА
Функция дополнительной подачи пара полезна при
разглаживании складок и может быть использована
только при высокотемпературном режиме глаженья
(регулятор температуры (10) находится в положении
“
•••
”).
• Установите
регулятор
температуры
(10)
в
положение “
•••
”.
• При нажатии кнопки дополнительной подачи пара
(5), пар из подошвы утюга будет выходить более
интенсивно (рис.5).
Примечание
Во избежание вытекания воды из паровых отверстий
нажимайте кнопку дополнительной подачи пара с
интервалом 15-20 секунд.
ВЕРТИК АЛЬНОЕ ОТПАРИВАНИЕ
• Вставьте сетевую вилку в розетку.
• Поставьте утюг на основание (8).
• Установите
регулятор
температуры
(10)
в
положение “
•••
”.
• Убедитесь, что в резервуаре достаточно воды.
• Подождите, пока выключится световой индикатор
(9), а затем снова загорится.
• Держите утюг вертикально и нажимайте кнопку
дополнительной подачи пара (5), пар будет
выходить из подошвы утюга (11) (рис. 6).
Важная информация
• Не
рекомендуется
выполнять
вертикальное
отпаривание синтетических тканей.
• При отпаривании не прикасайтесь подошвой утюга
к материалу, чтобы избежать его оплавления.
• Никогда не отпаривайте одежду, одетую на
человека, т.к. температура пара высокая - может
быть ожог, пользуйтесь плечиками или вешалкой.
СУХОЕ ГЛАЖЕНЬЕ
• Вставьте сетевую вилку в розетку.
• Поставьте утюг на основание (8).
• Установите регулятор постоянной подачи пара (3) в
вертикальное положение - подача пара выключена.
• Установите регулятор температуры (10) на
требуемую температуру глаженья: “
•
”, “
••
” или
“
•••
”.
• Подождите, пока выключится световой индикатор
(9), а затем снова загорится - заданная
температура подошвы утюга достигнута, можно
начинать процесс глаженья.
СИСТЕМА ОЧИСТКИ
Для увеличения срока службы утюга рекомендуется
регулярно выполнять очистку утюга (раз или два раза
в месяц в зависимости от жесткости воды).
• Установите регулятор постоянной подачи пара (3) в
вертикальное положение - подача пара выключена.
• Наполните резервуар водой до отметки MAX.
• Поставьте утюг на основание (8).
• Вставьте сетевую вилку в розетку.
• Установите
регулятор
температуры
(10)
в
положение “
•••
”.
• Дайте утюгу нагреться, дождитесь пока световой
индикатор (9) погаснет.
• Выньте сетевую вилку из розетки и держите утюг
горизонтально над раковиной.
• Нажмите на рычажок регулятора подачи пара (3) по
направлению к кнопкам (4, 5) и удерживайте его
(рис.7).
• Кипящая вода и пар вместе с накипью будут
выбрасываться из отверстий подошвы утюга.
Рекомендуется слегка покачивать утюг вперед-
назад во время очистки утюга.
• Отпустите рычажок регулятора пара (3) через
минуту или когда в резервуаре закончится вода.
Поставьте утюг на основание.
• Вставьте сетевую вилку в розетку и дайте утюгу
снова нагреться.
• Прогладьте утюгом кусочек ненужной ткани, чтобы
испарилась оставшаяся жидкость.
• Выньте сетевую вилку из розетки и подождите,
пока подошва утюга полностью остынет.
• Прежде чем убрать утюг на хранение, убедитесь,
что подошва утюга совершенно сухая.
УХОД И ЧИСТК А
• Прежде чем чистить утюг, убедитесь, что он
отключен от сети и уже остыл.
• Протирайте корпус утюга слегка влажной тканью,
после этого протрите его насухо.
• Не используйте абразивные вещества для чистки
подошвы и корпуса утюга.
• Избегайте контакта подошвы утюга с острыми
металлическими предметами, чтобы избежать ее
повреждения.
ХРАНЕНИЕ
• Поверните регулятор температуры (10) против
часовой стрелки до упора, установите регулятор
постоянной подачи пара (3) в вертикальное
положение - подача пара выключена.
• Выньте сетевую вилку из розетки.
• Откройте крышку заливочного отверстия (2),
переверните утюг и слейте остатки воды (рис.8).
• Поставьте утюг вертикально и дайте ему полностью
остыть.
• Храните утюг в вертикальном положении.
ТЕХНИЧЕСКИЕ ХАРАКТЕРИСТИКИ
Напряжение питания:
220-230 В~50 Гц
Потребляемая мощность:
1400 Вт
Производитель оставляет за собой право изменять
характеристики приборов без предварительного
уведомления.
Срок службы прибора не менее 3-х лет
Данное изделие соответствует всем
требуемым европейским и российским
стандартам безопасности и гигиены.
Производитель: АН-ДЕР ПРОДАКТС ГмбХ, Австрия
Нойбаугюртель 38/7А, 1070 Вена, Австрия
РУССКИЙ
4
DAMPFBÜGELEISEN
VORSICHTSMASSNAHMEN
Vor der Benutzung lesen Sie bitte vorliegende
Bedienungsanleitung gewissenhaft durch und achten Sie
dabei auf die Bilder.
• Vor dem Einschalten des Bügeleisens vergewissern Sie
sich, dass die Netzspannung der Betriebsspannung des
Bügeleisens entspricht.
• Gebrauchen Sie das Bügeleisen nur gemäss dessen in der
Bedienungsanleitung angegebenen Anwendungszweck.
• Benutzen Sie das Bügeleisen nur auf der Bügeltischplatte.
• Beim Füllen des Wasserbehälters schalten Sie das
Bügeleisen immer vom Netz ab.
• Seien Sie besonders aufmerksam bei der Benutzung des
Geräts in der Nähe von Kindern und behinderten Personen.
• Lassen Sie das eingeschaltete Bügeleisen nicht ausser
Sicht.
• Schalten Sie das Bügeleisen immer aus dem Netz aus,
wenn Sie es nicht benutzen.
• Um den Stromschlag zu vermeiden, tauchen Sie das
Bügeleisen ins Wasser oder eine andere Flüssigkeit nicht
ein.
• Vermeiden Sie Kontakt offener Haut mit heissen
Oberflächen des Bügeleisens oder dem herausgehenden
Dampf, um Verbrennungen zu vermeiden.
• Sehen Sie zu, dass die Netzschnur vom Rand der
Bügeltischplatte nicht herabhängt und heisse Oberflächen
nicht anrührt.
• Beim Abschalten des Bügeleisens vom Netz halten Sie den
Stecker immer fest, ziehen Sie die Netzschnur nicht.
• Bevor Sie das Bügeleisen verwahren, giessen Sie restlich-
es Wasser ab und lassen Sie das Bügeleisen sich abkühlen.
• Um die Überlastung des Netzes zu vermeiden, schalten Sie
mehrere Haushaltsgeräte von Hochleistung nicht gle-
ichzeitig ein.
• Benutzen Sie nicht das Bügeleisen mit kaputtem Stecker,
kaputter Netzschnur sowie mit anderen Störungen.
• Um den Stromschag zu vermeiden, bauen Sie das
Bügeleisen nie selbstständig auseinander, bei Befund von
Störungen wenden Sie sich an das autorisierte Service-
Center.
BESCHREIBUNG
1. Wasserzersträubertrichter
2. Deckel der Einfüllöffnung
3. Einschalten/Ausschalten der kontinuierlichen
Dampfzufuhr/des Reinigungsbetriebs
4. Taste des Wasserzersträubers
5. Taste für zusätzliche Dampfzufuhr
6. Griff des Bügeleisens
7. Schutz der Netzschnur
8. Basis
9. Lichtindikator des Betriebs
10. Temperaturregler
11. Bügeleisensohle
VOR DER ERSTEN BENUTZUNG
• Nehmen Sie das Bügeleisen aus der Verpackung heraus
und entfernen Sie den Pappeschutz von der
Bügeleisensohle.
• Vergewissern Sie sich, dass die Netzspannung der
Betriebsspannung des Bügeleisens entspricht.
Anmerkung:
Beim ersten Einschalten brennt das Heizelement des
Bügeleisens ab, dadurch kann eine kleine Menge Dampf her-
ausgehen.
WAHL DES WASSERS
• Für die Füllung des Wasserbehälters benutzen Sie das
Leitungswasser. Wenn das Leitungswasser zu hart ist, emp-
fiehlt es sich, es mit destilliertem Wasser im 1:1 Verhältnis,
bei zu hartem Leitnugswasser vermischen Sie es mit destil-
liertem Wasser im 1:2 Verhältnis oder benutzen Sie nur des-
tilliertes Wasser.
Anmerkung:
Es ist verboten, den Wasserbehälter mit aromatisierten
Flüssigkeiten, Essig, Stärkelösung, Reagenten für die
Entfernung des Ansatzes, chemischen Stoffen oder anderen
Flüssigkeiten zu füllen.
FÜLLEN DES WASSERBEHÄLTERS (Bild 1, 2)
Bevor Sie das Wasser in das Bügeleisen füllen, vergewissern
Sie sich, dass es vom Netz abgeschaltet ist.
• Stellen Sie den Regulator des ständigen Dampfauslasses
(3) in die linke Position – der Dampfauslass ist aus-
geschatet.
• Machen Sie den Deckel der Füllöffnung (2) auf.
• Füllen Sie das Wasser.
Anmerkung:
• Füllen Sie das Wasser nicht über den Strich «MAX».
• Wenn Sie beim Bügeln das Wasser nachzufüllen haben,
schalten Sie das Bügeleisen aus und nehmen Sie den
Stecker aus der Steckdose heraus.
• Nachdem Sie mit dem Bügeln fertig sind, drehen Sie das
Bügeleisen um und giessen Sie restliches Wasser ab (Bild
8).
BÜGELTEMPERATUR
Vor dem Betrieb testen Sie das angeheizte Bügeleisen am
Stück eines alten Stoffs, um sich zu vergewissern, dass die
Bügeleisensohle und der Wasserbehälter sauber sind.
• Vor dem Bügeln der Kleidung überprüfen Sie immer die
empfohlene Bügeltemperatur, die auf dem Etikett der
Kleidung angegeben ist.
• Wenn das Etikett mit Anweisungen zum Bügeln fehlt, aber
Sie wissen den Stofftyp, so benutzen Sie für die Wahl der
Bügeltemperatur folgende Tabelle.
• Die Tabelle ist nur für Faserstoffe anwendbar. Wenn es um
einen anderen Stoff geht (geriffelt, mit Relief u.s.w.), ist es
besser, ihn bei niedriger Temperatur zu bügeln.
• Bitte
sortieren
Sie
die
Kleidung
nach
derer
Bügeltemperatur: Wolle zusammen mit Wolle, Baumwolle
zusamen mit Baumolle u.s.w.
• Das Bügeleisen erwärmt sich schneller, als es sich abkühlt.
Es wird also empfohlen, das Bügeln mit niedriger
Temperatur zu beginnen, z.B. mit synthetischen Stoffen.
Danach übergehen Sie zum Bügeln mit höheren
Temperaturen. Baumwolle und Lein bügeln Sie zuletzt.
• Wenn das Kleidungsstück aus gemischtem Stoff gefertigt
ist, ist die Temperatur für Stoffe mit niedrigster Temperatur
einzugeben (z.B. wenn das Kleidungsstück zu 60% aus
Polyester und zu 40% aus Baumwolle besteht, ist es mit der
Temperatur «
•
» zu bügeln, die für Polyester passt).
• Wenn Sie den Stofftyp nicht feststellen können, finden Sie
am Kleidungsstück ein Stück Stoff, das beim Tragen nicht
auffällt und wählen Sie erfahrungsgemäss die
Bügeltemperatur (beginnen sie immer mit niedrigster
Temperatir und erhöhen Sie sie langsam, bevor Sie gewün-
schtes Resultat nicht erreicht haben.)
• Kord- und andere Stoffe, die schnell zu glänzen beginnen,
sind in einer Richtung (in Richtung des Strichs) mit kleinem
Andruck zu bügeln.
• Um Glanzflecke an synthetischen und Seidestoffen zu ver-
meiden, bügeln Sie diese von links.
EINGABE DER BÜGELTEMPERATUR
• Stellen Sie das Bügeleisen auf das Gestell (8).
• Stecken Sie den Stecker in die Steckdose herein.
• Stellen Sie den Temperaturregler (10) auf die richtige
Bügeltemperatur «
•
», «
••
» oder «
•••
», je nach Stofftyp.
Die eingegebene Temperatur wurd erreicht, wenn der
Lichtindikator (9) erlischt. Der Indikator (9) leuchtet wieder auf,
wenn die Temperatur niedriger als die eingegebene wird.
WASSERSPRITZER
• Sie können den Stoff anfeuchten, indem Sie ein paar Mal
auf den Knopf des Wasserspritzers drücken (4) (Bild 3).
• Vergewissern Sie sich, dass es im Wasserbehälter genug
Wasser gibt.
DAMPFBÜGELN
• Das Dampfbügeln ist nut bei hoher Temperatur der
Bügeleisensohle möglich, bei der Position des
Temperaturreglers (10) «
••
» oder «
•••
».
• Stecken Sie den Stecker in die Steckdose herein.
• Stellen Sie das Bügeleisen auf das Gestell (8).
• Stellen Sie den Temperaturregler (10) auf die richtige
Bügeltemperatur «
••
» oder «
•••
».
• Vergewissern Sie sich, dass es im Wasserbehälter genug
Wasser gibt.
• Warten Sie ab, bis der Lichtindikator (9) erlischt und dann
wieder aufleuchtet. Stellen Sie den Regulator des ständi-
gen Dampfauslasses (3) in die rechte Position – der
Dampfauslass ist ausgeschaltet (Bild 4), danach geht der
Dampf aus den Öffnungen der Bügeleisensohle heraus
(11).
ACHTUNG:
Das Wasser kann aus den Öffnungen der Bügeleisensohle her-
ausfliessen, wenn die eingegebene Temperatur zu niedrig ist.
Dies kann zur Erscheinung von Flecken führen. Wenn das
passiert ist, stellen Sie den Temperaturregler (10) auf höhere
Temperatir. Der Dampfauslass kommt wieder, sobald die
eingegebene Bügeltemperatur erreicht ist.
ZUSÄTZLICHER DAMPFAUSLASS
Die Funktion des zusätzlichen Dampfauslasses ist nötig beim
Bügeln von Bügelfalten und kann nur im
Hochtemperaturbetrieb verwendet werden, der
Temperaturregler (10) steht auf «
•••
».
• Stellen Sie den Temperaturregler (10) auf die Position
«
•••
».
• Beim Drücken des Knopfs des zusätzlichen
Dampfauslasses (5) wird der Dampf aus der
Bügeleisensohle intensiver herausgehen (Bild 5).
Anmerkung:
Um das Herausfliessen des Wassers aus den
Dampföffnungen zu vermeiden, halten Sie den Knopf des
zusätzlichen Dampfauslasses nicht über 15-20 Sekunden lang
gedrückt.
VERTIKALES ABDAMPFEN
• Stecken Sie den Stecker in die Steckdose herein.
• Stellen Sie den Bügeleisen auf des Gestell (8).
• Stellen Sie den Temperaturregler (10) auf die Position
«
•••
».
• Vergewissern Sie sich, dass es im Wasserbehälter genug
Wasser gibt.
• Warten Sie ab, bis der Lichtindikator (9) erlischt und dann
wieder aufleuchtet.
Halten Sie das Bügeleisen senkrecht und drücken Sie den
Knopf des zusätzlichen Dampfauslasses (5), der Dampf
wird aus den Öffnungen der Bügeleisensohle herausgehen
(11) (Bild 6).
Wichtige Information:
• Es empfiehlt sich nicht, vertikales Abdampfen sythetischer
Stoffe zu machen.
• Beim Abdampfen rühren Sie den Stoff mit der
Bügeleisensohle nicht an, um dessen Verschmelzung zu
vermeiden.
• Dampfen sie nie die am Menschen angezogene Kleidung
ab, weil die Dampftemperatur zu hoch ist, benutzen Sie
dafür eine Kleiderbügel oder einen Kleiderrechen.
TROCKENES BÜGELN
• Stecken Sie den Stecker in die Steckdose herein.
• Stellen Sie das Bügeleisen auf das Gestell (8).
• Stellen Sie den Regulator des ständigen Dampfauslasses
(3) in die linke Position – der Dampfauslass ist ausgeschal-
tet.
• Stellen Sie den Temperaturregler (10) auf die richtige
Bügeltemperatur «
•
», «
••
» oder «
•••
».
• Warten Sie ab, bis der Lichtindikator (9) erlischt und dann
wieder aufleuchtet, die eingegebene Temperatur der
Bügeleisensohle ist erreicht, man kann das Bügeln begin-
nen.
REINIGUNGSSYSTEM
Um die Lebensdauer des Bügeleisens zu prolongieren, emp-
fiehlt es sich, regelmässig die Reinigung des Bügeleisens
durchzuführen (einmal oder zweimal im Monat, je nach
Wasserhärte).
• Stellen Sie den Regulator des ständigen Dampfauslasses
(3) in die linke Position ein – der Dampfauslass ist aus-
geschaltet.
• Füllen sie den Wasserbehäter bis zum Strich «MAX».
• Stellen Sie das Bügeleisen auf das Gestell (8).
• Stecken Sie den Stecker in die Steckdose herein.
• Stellen Sie den Temperaturregler (10) in die Position «
•••
».
• Lassen Sie das Bügeleisen sich erwärmen, warten Sie ab,
bis der Lichtindikator (9) erlischt.
• Nehmen Sie den Stecker aus der Steckdose heraus und
halten Sie das Bügeleisen senkrecht über dem
Spülbecken.
• Drücken Sie auf die Taste der Dampzufuhr (3) in Richtung
Tasten (4, 5) und halten Sie sie gedrückt (Bild 7).
• Das Kochwasser und der Dampf zusammen mit dem Ansatz
werden aus der Bügeleisensohle herausgeworfen. Es emp-
fiehlt sich, das Bügeleisen bei der Reinigung des
Bügeleisens hin und her zu bewegen.
• Lassen Sie die Reinigungstaste (10) nach einer Minute oder
wenn sich im Wasserbehäter kein Wasser mehr befindet
los. Stellen Sie das Bügeleisen auf die Basis.
• Stecken Sie den Stecker wieder in die Steckdose herein
und lassen Sie das Bügeleisen sich erwärmen.
• Bügeln Sie ein Stück Teststoff, damit restliches Wasser ver-
dampft.
• Nehmen sie den Stecker aus der Steckdose heraus und
warten Sie ab, bis sich die Bügeleisensohle völlig abkühlt.
• Bevor Sie das Bügeleisen verwahren, vergewissern Sie
sich, dass die Bügeleisensohle vollkommen trocken ist.
WARTUNG UND REINIGUNG
• Bevor Sie das Bügeleisen reinigen, vergewissern Sie sich,
dass es vom Netz abgeschaltet ist und sich abgekühlt hat.
• Nach der Entfernung des Ansatzes polieren Sie die
Oberfläche der Sohle mit einem trockenen Stoff.
• Verwenden Sie keine abreibenden Mittel für die Reinigung
der Sohle und des Gehäuses des Bügeleisens.
• Vermeiden Sie Kontakt der Bügeleisensohle mit scharfen
metallischen Gegenständen.
VERWAHREN
• Drehen Sie den Temperaturregler (10) im
Gegenuhrzeigersinn bis zum Anschlag, stellen Sie den
Regler der kontinuierlichen Dampfzufuhr (3) auf die ver-
tikale Position ein – die Dampfzufuhr ist ausgeschaltet.
• Nehmen Sie den Stecker aus der Stekdose heraus.
• Öffnen Sie den Deckel der Einfüllöffnung (2), kippen Sie
das Bügeleisen um und entfernen Sie das übergebliebene
Wasser aus dem Wasserbehälter (Bild 8).
• Stellen Sie das Bügeleisen senkrecht und lassen Sie es sich
genug abkühlen.
• Verwahren Sie das Bügeleisen in vertikaler Position.
TECHNISCHE CHARAKTERISTIKEN
Speisespannung:
220-230 V ~ 50 Hz
Leistung:
1400 W
Der Produzent behält sich das Recht vor, die Charakteristiken
der Geräte ohne Vorankündigung zu ändern.
Benutzungsdauer der Teekanne nicht weniger als 3
Jahre
Gewährleistung
Ausführliche Bedingungen der Gewährleistung kann man
beim Dealer, der diese Geräte verkauft hat, bekommen. Bei
beliebiger Anspruchserhebung soll man während der Laufzeit
der vorliegenden Gewährleistung den Check oder die
Quittung über den Ankauf vorzulegen.
Das vorliegende Produkt entspricht den
Forderungen der elektromagnetischen
Verträglichkeit, die in 89/336/EWG -Richtlinie
des Rates und den Vorschriften 73/23/EWG über
die Niederspannungsgeräte vorgesehen sind.
DEUTSCH
3
STEAM IRON
DESCRIPTION
1.
Water spraying nozzle
2.
Water tank filler lid
3.
Constant steam release on/off switch
4.
Water spraying button
5.
Additional steam release button
6.
Iron handle
7.
Power cord protection
8.
Stand
9.
Function light indicator
10. Temperature regulator
11. Iron sole plate
Read these instructions carefully before using the device
and also pay attention to the illustrations.
• Before connecting the iron to electrical power, maker
sure that the voltage of your electrical system matches
the operating voltage of the iron.
• Only use the iron for the purposes outlined in these
instructions.
• Only use the iron on an ironing board.
• Always disconnect the iron from electrical power when
filling the tank with water.
• Be especially careful when using the device around
children and disabled persons.
• Do not leave the iron unattended while in use.
• Always disconnect the iron from electrical power when
not in use.
• In order to prevent electrical shock, do not submerse
the iron in water or any other liquid.
• Avoid contacting any open areas of skin with the hot
surfaces of the iron or the released steam in order to
prevent burns.
• Make sure that the power cord does not hang over the
edge of the ironing board and that it does not come
into contact with any hot surfaces.
• Always grip the power plug in order to disconnect the
iron from electrical power; never pull on the power
cord.
• Pour all the water out of the iron and allow to cool com-
pletely before storing.
• In order to avoid overloading the electrical circuit, do
not simultaneously operate several devices with high
power ratings.
• Do not use the iron if the power plug, power cord, or
any other part is damaged or malfunctioning.
• In order to prevent electrical shock, do not attempt to
take apart the iron yourself. Contact an authorized
service center for repairs if the iron is malfunctioning.
BEFORE USING FOR THE FIRST TIME
• Remove the iron from its packaging and remove the
protective cardboard from the sole.
• Make sure that the voltage of your electrical system
matches the operating voltage of the iron.
Note:
The iron's heating element will be “burnt-in” upon first
use, so it's possible that there may be a small amount of
smoke.
CHOOSING THE RIGHT WATER
• Use tap water to fill the water tank. If the tap water is
hard, then it is recommended you mix it with distilled
water at a rate of 1:1. If the water is very hard, mix it
with distilled water at a rate of 1:2 or use pure distilled
water.
Note:
Do not pour aromatic liquids, vinegar, starch solutions,
descaling reagents, chemical substances or other liquids
into the water tank.
FILLING THE WATER TANK (pic. 1, 2)
Make sure the iron is disconnected from electrical power
before filling the water tank.
• Place the constant steam release regulator (3) into the
left most position - steam release off.
• Open the lid of the water tank (2).
• Pour in the water.
Note:
• Do not fill past the “MAX” indication.
• If you must fill the water tank while ironing, first turn off
the iron and remove the power plug from the outlet.
• After you have finished ironing, turn the iron upside
down and pour out the remaining water (pic.8).
IRONING TEMPERATURE
Before using on a new piece of fabric, first test the heated
iron on a piece of old clothe in order to make sure that the
sole of the iron and water tank are clean.
• Before ironing, always look at the temperature recom-
mendations indicated on the garment tags.
• If there is no garment tag with ironing instructions, but
you know what type of material it is, you can use the
following table to determine the proper ironing tem-
perature.
• This table can only be used for fibrous materials. It is
best to iron other types of materials (crimped, raised,
etc.) at low temperature.
• First, sort all of your clothes according to ironing tem-
perature: wool with wool, etc.
• The irons heats faster than it cools, which is way it is
recommended to begin ironing at low temperature,
with synthetic fabrics, for example. Then proceed to
iron at higher temperatures. Cotton and flax should be
ironed last.
• If an item is made from a mixture of materials, then the
ironing temperature should be set for the fabric with
the lowest ironing temperature (for example, if an item
is made from 60% polyester and 40% cotton, then it
should be ironed a the temperature setting for poly-
ester, “
•
”).
• If you can't determine the type of fabric that the item is
made from, find an area on the item that won't be
noticed when worn and test various ironing tempera-
tures (always start with the lowest temperature and
gradually increase it until you achieve the desired
results).
• Velvet and other fabrics that quickly begin to shine
should be ironed strictly in one direction (with the nap)
with light pressure.
• In order to prevent shiny stains on synthetic and silk
fabrics, iron them inside out.
SET TING THE IRONING TEMPERATURE
• Place the iron on its stand (8).
• Insert the power plug into the jack.
• Set the temperature regulator (10) to the desired iron-
ing temperature “
•
”,”
••
” or “
•••
” depending on the
type of fabric.
The set temperature will have been reached when the illu-
minated indicator (9) turns off. The indicator (9) will light
again if the temperature of the iron falls below the set tem-
perature.
WATER SPRAYER
• You can moisten the fabric with a few pushes on this
spraying button (4) (pic.3).
• Make sure there is enough water in the tank.
STEAM IRONING
• Steam ironing is only possible at high temperatures;
the temperature regulator should be set to (10) “
••
” or
“
•••
”.
• Place the power plug into the outlet.
• Place the iron on its stand (8).
• Set the temperature regulator (10) to the desired tem-
perature - “
••
” or “
•••
”.
• Make sure there is enough water in the water tank.
• Wait until the illuminated indictor (9) turns off, and then
turns on again. Set the constant steam release regula-
tor (3) to the right-most position, steam release on
(pic.4); the steam will begin to come out of the holes in
the heel of the iron (11).
AT TENTION:
Water my leak from the openings in the iron's sole if the
temperature is set too low. This can lead to the appear-
ance of stains. If this happens, set the temperature regu-
lator (10) to a higher temperature setting. Steam release
will begin just as soon as the proper temperature has
been reached.
Additional steam release
The additional steam release function is useful when iron-
ing wrinkles and can be used only at high ironing temper-
atures, when the temperature regulator (10) is set to
“
•••
”.
• Set the temperature regulator (10) to the “
•••
” posi-
tion.
• When the additional steam release button (5) is
pressed, steam is released from the iron more inten-
sively (pic.5).
Note:
In order to prevent water from leaking form the steam
openings, hold down the additional steam release button
for no more than 15-20 seconds at a time.
VERTICAL STEAMING
• Insert the power plug into the outlet.
• Place the iron on its stand (8).
• Set the temperature regulator (10) to the “
•••
” posi-
tion.
• Make sure that the water tank has enough water in it.
• Wait until the power indicator (9) goes out and then
light again.
• Hold the iron vertically and press the additional steam
release button (5); steam will be released from the
iron's sole (11) (pic. 6).
Important information
• It is not recommended to vertically steam synthetic
material.
• To prevent the fabric from melting, do not allow the
iron's sole to touch the material while steaming.
• Never steam clothes while they are being worn by a
person, as the temperature of the steam is very high;
use a hanger.
DRY IRONING
• Insert the power plug into the outlet.
• Place the iron on its stand (8).
• Set the constant steam release button (3) to its left-
most position - steam release off.
• Set the temperature regulator (10) to the desired iron-
ing temperature “
•
”, “
••
”, or “
•••
”.
• Wait until the power indicator (9) goes out and then
turns on again; at this point the desired ironing tem-
perature has been release and you may begin the iron-
ing process.
CLEANING SYSTEM
In order to increase the service life of this iron, it is rec-
ommended that you regularly conduct a cleaning of the
iron (once or twice a month depending on the hardness of
the water).
• Set the constant steam release regulator (3) to the
left-most position - steam release off.
• Fill the water tank to the “MAX” indicator.
• Place the iron on its stand (8).
• Insert the power plug into the outlet.
• Set the temperature regulator (10) to the “
•••
” posi-
tion.
• Let the iron heat up; wait until the power indicator (9)
goes out.
• Remove the power plug from the outlet and hold the
iron horizontally over a sink.
• Press the steam release switch (3) towards the buttons
(4, 5) and hold it (Pic.7).
• Boiling water and steam, together with scaling will be
ejected from the holes in the iron's sole. It is recom-
mended that you lightly rock the iron back and forward
during the cleaning process.
• Release the steam switch (3) after a minute or when
the water tank runs out of water. Place the iron on its
stand.
• Insert the power plug into the outlet and allow the iron
to heat up again.
• Iron a piece of unwanted fabric in order to allow all of
the remaining water to evaporate.
• Remove the power plug from the outlet and wait until
the sole of iron has completely cooled.
• Make sure that the iron's sole is completely dry before
storing.
CARE AND CLEANING
• Before cleaning the iron, make sure that it is discon-
nected from power and has cooled.
• Polish the surface of the sole with a dry cloth after
removing any deposits.
• Do not use abrasive cleaning instruments to clean the
sole and housing of the iron.
• Do not touch the iron sole with sharp, metal objects.
STORAGE
• Turn the temperature regulator (10) counter-clockwise
up to the stop and set the constant steam release
switch (3) to the vertical position - steam release is off.
• Remove the power plug from the outlet.
• Open the water tank lid (2), turn the iron up side down
and pour out any remaining water from the tank
(pic.8).
• Set down the iron vertically and allow to cool.
• Store the iron in a vertical position.
TECHNICAL CHARACTERISTICS
Power requirements:
220-230 V ~ 50 Hz
Power rating:
1400 W
The manufacturer reserves the right to change the char-
acteristics of the device without prior warning.
Service life of the unit is not less than 3 years
GUARANTEE
Details regarding guarantee conditions can be obtained
from the dealer from whom the appliance was purchased.
The bill of sale or receipt must be produced when making
any claim under the terms of this guarantee.
This product conforms to the EMC-
Requirements as laid down by the
Council Directive 89/336/EEC and to the
Low Voltage Regulation (73/23 EEC)
ENGLISH
2
1
Обозначения
Тип ткани/температура
•
синтетика, нейлон, акрил,
полиэстер (низкая температура)
••
шелк/шерсть
(средняя температура)
•••
хлопок/лен
(высокая температура)
Symbol
Type of fabric / temperature
•
Synthetics, nylon, acryl, polyester
(low temperature)
••
Silk / wool (medium temperature)
•••
Cotton / flax (high temperature)
Bezeichnungen
Stofftyp / Temperatur
•
Synthetik, Nylon, Akryl, Polyester
(niedrige Temperatur)
••
Seide / Wolle (mittlere Temperatur)
•••
Baumwolle / Lein
(hohe Temperatur)
Désignations
Type de tissu/ Température
•
Synthétique, nylon, acryle, poly-
ester (basse température)
••
Soie, laine (température moyenne)
•••
coton / lin (haute température)
Simboli
Tipo del tessuto/temperatura
•
Materiale sintetico, nylon, acrilico,
poliestere (temperatura bassa)
••
Seta/lana (temperatura media)
•••
Cotone/lino (temperatura alta)
Símbolos
Tipo de tela / temperatura
•
Sintética, nylon, acrílica, poliéster
(temperatura mínima)
••
seda / lana (temperatura media)
•••
algodón / lino
(temperatura máxima)
Означения
Вид плат / температура
•
синтетика, найлон, акрил,
полиестер (ниска температура)
••
коприна / вълна
(средна темпераура)
•••
памук / лен
(висока температура)
1234.qxd 19.09.05 10:26 Page 1
Характеристики

Остались вопросы?Не нашли свой ответ в руководстве или возникли другие проблемы? Задайте свой вопрос в форме ниже с подробным описанием вашей ситуации, чтобы другие люди и специалисты смогли дать на него ответ. Если вы знаете как решить проблему другого человека, пожалуйста, подскажите ему :)


