Утюги Philips GC2048/30 - инструкция пользователя по применению, эксплуатации и установке на русском языке. Мы надеемся, она поможет вам решить возникшие у вас вопросы при эксплуатации техники.
Если остались вопросы, задайте их в комментариях после инструкции.
"Загружаем инструкцию", означает, что нужно подождать пока файл загрузится и можно будет его читать онлайн. Некоторые инструкции очень большие и время их появления зависит от вашей скорости интернета.
English
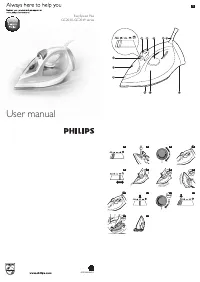
general description (Fig. 1)
1
Spray nozzle
2
Cap of filling opening
3
Steam control
-
CAlC ClEAn
= Calc-Clean function
-
t
= dr y ironing
-
ECO
= optimal steam
-
;
= maximum steam
-
= turbo steam
4
Steam boost button
5
Spray button
6
Temperature dial
7
Temperature light (specific types only: with safety-auto off indication)
8
Mains cord
9
Type plate
10 Water tank with MAX water level indication
11 Soleplate
Using the appliance
Filling the water tank
Note: Your appliance has been designed to be used with tap water. If you live in an area with very hard water,
fast scale build-up may occur. In this case, it is recommended to mix 50% distilled water and 50% tap water to
prolong the lifetime of your appliance.
Note: Do not put perfume, vinegar, starch, descaling agents, ironing aids, chemically descaled water or other
chemicals in the water tank.
1
Set the steam control to position
t
(dry ironing). (Fig. 2)
2
Fill the water tank up to the MAX indication (Fig. 3).
3
Close the cap of the filling opening.
selecting temperature and steam setting
Table 1
Fabric type
Temperature
setting
Steam setting
Steam boost
Spray
Linen
MAX
;
,
Yes
Yes
Cotton
3
;
,
Yes
Yes
Wool
2
ECO
No
Yes
Silk
1
t
No
No
Synthetic fabrics (e.g.
acr ylic, nylon, polyamide,
polyester).
1
t
No
No
1
Consult table 1 to set the temperature dial to the appropriate setting for your garment (Fig. 4).
2
Put the iron on its heel and plug it in. The temperature light goes on to indicate that the iron is
heating up (Fig. 5).
3
When the temperature light goes out, the iron has reached the correct temperature.
4
Consult table 1 to select a steam setting that corresponds to the temperature you have set (Fig. 6).
Note: To use turbo steam , keep the steam control pressed to the turbo steam position continuously.
Caution: Do not set the steam control to a steam setting if the set temperature is below
2
or when
the iron is still heating up (when the temperature light is on). Otherwise water may leak from the iron.
Features
spray function
-
Press the spray button to moisten the ar ticle to be ironed. This helps remove stubborn creases (Fig. 7).
steam boost function
-
Press and release the steam boost button for a powerful boost of steam to remove stubborn
creases (Fig. 8).
Vertical steam
-
You can use the steam boost function when you hold the iron in ver tical position for removing creases
from hanging clothes, cur tains etc (Fig. 9).
Safety auto-off function (specific types only)
-
The iron switches off automatically if it has not been moved for 30 seconds in horizontal position or
8 minutes in ver tical position. The auto-off light star ts flashing (Fig. 10).
-
To let the iron heat up again, pick up the iron or move it slightly until the auto-off light goes out.
ECO steam setting
-
Select the
ECO
steam setting instead of the maximum steam setting
;
to save energy, yet to achieve
satisfactor y ironing results. (Fig. 11)
Dry ironing
-
Set the steam control to
t
(dr y ironing) to iron without steam. (Fig. 2)
Cleaning and maintenance
Cleaning
1
Set the steam control to
t
(dry ironing), unplug the iron and let it cool down. (Fig. 2)
2
Pour any remaining water out of the water tank.
3
Wipe flakes and any other deposits off the soleplate with a damp cloth and a non-abrasive (liquid)
cleaning agent.
Caution: To keep the soleplate smooth, avoid hard contact with metal objects. Never use a scouring pad,
vinegar or other chemicals to clean the soleplate.
Note: Regularly rinse the water tank with tap water. Empty the water tank after rinsing it.
Calc-Clean function
iMPORTAnT: To prolong the lifetime of your appliance and to maintain good steaming
performance, use the Calc-Clean function once every two weeks. if the water in your area
is very hard (i.e. when flakes come out of the soleplate during ironing), use the Calc-Clean
function more frequently.
1
Make sure the appliance is unplugged and the steam control is set to
t
(dry ironing). (Fig. 2)
2
Fill the water tank to the MAX indication (Fig. 3).
Do not pour vinegar or other descaling agents into the water tank.
3
Plug in the iron and set the temperature dial to MAX (Fig. 12).
4
Unplug the iron when the temperature light goes out.
5
Hold the iron over the sink. Push the steam control to the Calc-Clean position and hold it (Fig. 13).
6
Gently shake the iron until all water in the water tank has been used up (Fig. 14).
Caution: While scale is flushed out, steam and boiling water also come out of the soleplate.
7
Set the steam control back to
t
(dry ironing). (Fig. 2)
Note: Repeat the Calc-Clean process if the water that comes out of the iron still contains scale particles.
After the Calc-Clean process
1
Plug in the iron. Let the iron heat up to let the soleplate dry.
2
Unplug the iron when the temperature light goes out.
3
Move the iron gently over a piece of cloth to remove any water stains on the soleplate.
4
Let the iron cool down before you store it.
storage
1
Unplug the iron and set the steam control to
t
(dry ironing). (Fig. 2)
2
Wind the mains cord round the cord storage facility and store the iron on its heel (Fig. 15).
Troubleshooting
This chapter summarises the most common problems you could encounter with the appliance. If you
are unable to solve the problem with the information below, visit www.philips.com/suppor t for a list of
frequently asked questions or contact the Consumer Care Centre in your countr y (see the worldwide
guarantee leaflet for contact details).
Problem
Possible cause
Solution
Water drips from the
soleplate or wet spots
appear on the garment
during ironing.
The set temperature is too
low for steam ironing.
Set an ironing temperature that is
suitable for steam ironing. See table 1.
You have put an additive in
the water tank.
Rinse the water tank and do not put any
additive in the water tank.
The steam boost function
does not work properly
(water leaks out of the
soleplate).
You have used the steam
boost function too often
within a ver y shor t period.
Wait a while before you use the steam
boost function again.
You have used the steam
boost function at a too low
temperature.
Set an ironing temperature at which
the steam boost function can be used
(
2
to MAX).
Flakes and impurities come
out of the soleplate during
ironing.
Hard water forms flakes
inside the soleplate.
Use the Calc-Clean function
(see chapter ‘Cleaning and maintenance’,
section ‘Calc-Clean function’).
Water drips from the
soleplate after the iron has
cooled down or has been
stored.
You have put the iron in
horizontal position while
there was still water in the
water tank.
Empty the water tank and set the steam
control to position ‘dr y’ after use. Store
the iron on its heel.
Water leaks from the cap of
the filling opening.
You have overfilled the
water tank.
Do not fill the water tank beyond the
MAX indication. Pour excess water out
of the water tank.
When I push the steam
control to the turbo steam
position, the steam control
jumps back.
You did not keep the steam
control in the turbo steam
position.
If you want to use turbo steam, you have
to keep the steam control in the turbo
steam position continuously. For other
steam settings, this is not necessar y.
Ελληνικα
Γενική περιγραφή (Εικ. 1)
1
Στόμιο ψεκασμού
2
Καπάκι στομίου πλήρωσης νερού
3
Διακόπτης ατμού
-
CAlC ClEAn
= Λειτουργία καθαρισμού αλάτων
-
t
= στεγνό σιδέρωμα
-
ECO
= βέλτιστη ροή ατμού
-
;
= μέγιστος ατμός
-
= ατμός turbo
4
Κουμπί βολής ατμού
5
Κουμπί ψεκασμού
6
Διακόπτης θερμοκρασίας
7
Λυχνία θερμοκρασίας (μόνο σε συγκεκριμένους τύπους: με ένδειξη αυτόματης απενεργοποίησης
ασφαλείας)
8
Καλώδιο
9
Πινακίδιο στοιχείων προϊόντος
10 Δεξαμενή νερού με ένδειξη μέγιστης στάθμης νερού (MAX)
11 Πλάκα


