
Триммеры SKIL F0150731RA - инструкция пользователя по применению, эксплуатации и установке на русском языке. Мы надеемся, она поможет вам решить возникшие у вас вопросы при эксплуатации техники.
Если остались вопросы, задайте их в комментариях после инструкции.
"Загружаем инструкцию", означает, что нужно подождать пока файл загрузится и можно будет его читать онлайн. Некоторые инструкции очень большие и время их появления зависит от вашей скорости интернета.


10
- after striking a foreign object
- whenever the tool starts vibrating abnormally
• Always ensure that the ventilation openings are kept clear
of debris
AFTER USE
• Always switch off tool and disconnect plug from
power source before making adjustments, changing
spools, cleaning or leaving the tool unattended for
any period
• Store the tool
indoors
in a dry and locked-up place, out
of reach of children
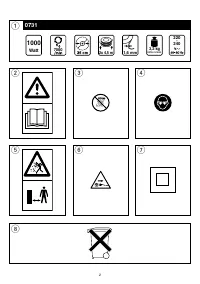
EXPLANATION OF SYMBOLS ON TOOL
2
Warning
! Read the instruction manual
3
Do not expose tool to rain
4
Wear protective glasses
5
Pay attention to the risk of injury caused by flying
debris
(keep bystanders a safe distance away from work
area)
6
Immediately disconnect the plug if the (extension) cord is
damaged or cut through while working
7
Double insulation (no earth wire required)
8
Do not dispose of the tool together with household waste
material
WHEN CONNECTING NEW 3-PIN PLUG (U.K. ONLY):
• If for any reason the old plug is cut of the cord of this tool,
it must be disposed of safely and not left unattended
• Do not connect the blue (= neutral) or brown (= live) wire
in the cord of this tool to the earth terminal of the plug
USE
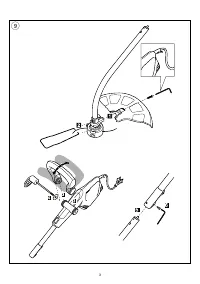
• Assembly instructions
9
- the sequence of the numbers appearing in the drawing
corresponds with the sequence of the steps to be
followed for assembling the tool
- guide handle A
0
can be adjusted by loosening/
tightening knob B
0
! never use the tool without cutting guard C
0
! firmly tighten all screws, bolts and nuts
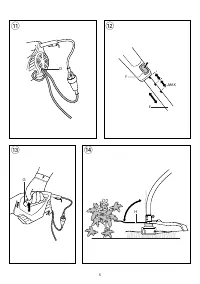
• Cord restraint
!
- hook the loop in the extension cord over restraint D as
illustrated
- pull tight to secure the extension cord
• Height adjustment
@
For adjusting the tool height so that your front arm is
straight when trimming
- unlock tube E by pushing button F
- extend tube E to the desired height (3 positions)
• On/of
#
- switch on tool by pressing trigger switch G
- switch of tool by releasing trigger switch G
! after switching off the tool the cutting lines
continue to rotate for a few seconds
- allow the cutting lines to stop rotating before switching
on again
! do not rapidly switch on and off
• Trimming
! ensure that the cutting area is free of stones,
debris and other foreign objects
! start trimming only when tool runs at full speed
- start trimming near the mains socket and move away
while working
- cut long grass in layers (always start from the top)
- only trim with the tip of the cutting line
- do not cut damp or wet grass
- prevent the cut grass from clogging the spool (do not
make heavy cuts)
- do not overload the tool
- carefully cut around trees and bushes, so that they do
not come into contact with the cutting lines
- use lower guard H
$
to protect vulnerable lowers
- keep the tool away from solid objects in order to
protect the cutting lines against excessive wear
- be aware of the kickback forces that occur when solid
objects are touched
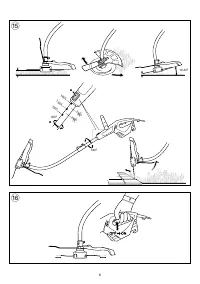
• Holding and guiding the tool
%
- for cutting long grass slowly swing the tool from right to
left and vice versa
- for cutting shorter grass tilt the tool as illustrated
- for trimming edges turn the cutting head 180° as
illustrated (
possible only when lower tube E is
fixed in one of the three height positions
)
- hold tool irmly with both hands, so you will have full
control of the tool at all times
- maintain a stable working position
- always hold the tool well away from your body
• Line feeding
^
- two cutting lines will be released and cut of to the
correct length by line cutting blade J each time the tool
is switched on
! take care against injury from line cutting blade J
- after line feeding always return the tool to its normal
operating position before switching on
- feed the lines regularly to maintain full cutting circle
- when the motor runs without load and no grass is cut,
the cutting lines are worn or broken; rewind the spool
or replace the spool system
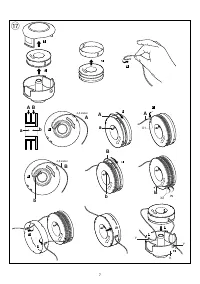
• Rewinding spool
&
In case the cutting lines fail to protrude from spool cap K
! switch off the tool and disconnect the plug
- remove spool system from tool and take out spool from
spool cap K
- tightly rewind both cutting lines evenly in layers in
arrow direction
- insert both lines into spool slots X and ensure that they
are securely in place (leave suicient length of line)
- thread both lines through spool holes Y before placing
the rewound spool into spool cap K
! ensure that the spool is located securely in place,
then release both lines from slots X by pulling
them firmly
- mount spool system onto tool (
turn spool clockwise
until it clicks into place
)
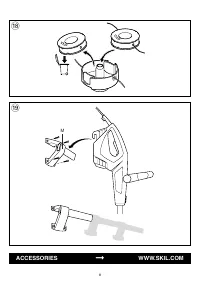
*
• Replacing spool
*
! switch off the tool and disconnect the plug
- simply remove/mount old/new spool as illustrated
- after replacing the spool test-run the tool for at least
one minute without load to ensure that the tool is
operating properly
! be sure tool is switched off when plugging in
MAINTENANCE / SERVICE
• This tool is not intended for professional use
• Always disconnect plug from power source before
cleaning and/or maintenance


