
Триммеры Einhell PXC GC-CT 18/24 - инструкция пользователя по применению, эксплуатации и установке на русском языке. Мы надеемся, она поможет вам решить возникшие у вас вопросы при эксплуатации техники.
Если остались вопросы, задайте их в комментариях после инструкции.
"Загружаем инструкцию", означает, что нужно подождать пока файл загрузится и можно будет его читать онлайн. Некоторые инструкции очень большие и время их появления зависит от вашей скорости интернета.


GB
- 23 -
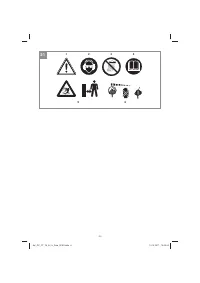
•
Adapt your way of working to the equipment.
•
Do not overload the equipment.
•
Have the equipment checked if necessary.
•
Switch off the equipment when not in use.
•
Wear gloves.
5. Before putting into operation
The equipment is supplied without batteries
and without a charger.
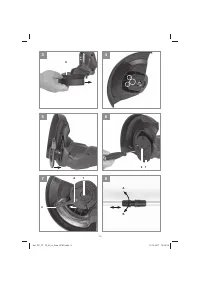
5.1 Fitting the safety hood (Fig. 3-4)
Push the guard hood (Item 8) in the direction of
the arrow onto the motor housing as shown in
Fig. 3. Make sure that it latches in place correctly!
Make sure that the guard hood is
fi
tted as in Fig.
4.
5.2 Fitting the blade plate (Fig. 5-6)
Fit the blade plate (Item 7) onto the mounting
shaft and fasten it with the screw (Item 9).
5.3 Fitting the blade (Fig. 7)
Fit the larger opening of the blade (Item 6) onto
the blade mount (A) of the blade plate (Item 7)
and pull it outwards in the direction of the arrow
until the blade latches into place as shown in Fig.
20.
5.4 Height adjustment (Fig. 8)
Undo (A) the union nut until the grass trimmer
handle can be moved in and out freely. Now set
the required working height and secure the hand-
le in this position by tightening the union nut again
(B).
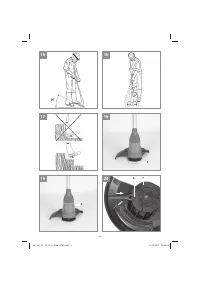
5.5 Fitting the additional handle (Fig. 9)
Fit the additional handle (Item 2) to the mount
provided, paying attention to the teeth. Then
secure the additional handle with the help of the
screw provided (Item 3).
5.6 Adjusting the additional handle (Fig. 9)
Undo the fastening screw (Item 3) on the additi-
onal handle until it can be moved forwards and
backwards without any great resistance. Set the
required position and tighten the adjustment lock
again.
5.7 Fitting the edge guide (Fig. 10)
Pull the ends of the edge guide (Item 5) slightly
apart and insert the ends in the holes provided in
the motor housing.
5.8 Installing the battery (Fig. 11/12)
Press the side pushlock (E) buttons of the battery
pack as shown in Fig. 12 and push the battery
pack into the mount provided. When the battery
pack is positioned as in Fig. 11, make sure that
the pushlock buttons latch in place! To remove the
battery pack, proceed in reverse order.
5.9 Charging the battery (Fig. 13)
1. Take the battery pack out of the equipment.
Do this by pressing the side pushlock buttons.
2. Check that your mains voltage is the same as
that marked on the rating plate of the battery
charger. Insert the power plug of the charger
(10) into the mains socket outlet. The green
LED will then begin to
fl
ash.
3. Insert the battery pack (11) into the battery
charger (10).
4. In section „Charger indicator“ you will
fi
nd a
table with an explanation of the LED indicator
on the charger.
The battery pack can become a little warm during
the charging. This is normal. If the battery pack
fails to charge, check:
•
whether there is voltage at the socket outlet
•
whether there is good contact at the charging
contacts
If the battery pack still fails to charge, send
•
the charging unit
•
and the battery pack
to our customer service center.
To ensure that the battery pack provides long ser-
vice, you should take care to recharge it promptly.
You must recharge the battery pack when you
notice that the power of the cordless grass trim-
mer drops. Never fully discharge the battery pack.
This will cause it to develop a defect.
5.10 Battery capacity indicator (Fig. 14)
Press the switch for the battery capacity indicator
(Item F). The battery capacity indicator (Item H)
shows the charge status of the battery using 3
LEDs.
All 3 LEDs are lit:
The battery is fully charged.
2 or 1 LED(s) are lit:
The battery has an adequate remaining charge.
1 LED
fl
ashes:
The battery is empty, recharge the battery.
Anl_GC_CT_18_24_Li_Solo_SPK9.indb 23
Anl_GC_CT_18_24_Li_Solo_SPK9.indb 23
19.10.2017 13:03:28
19.10.2017 13:03:28
Характеристики

Остались вопросы?Не нашли свой ответ в руководстве или возникли другие проблемы? Задайте свой вопрос в форме ниже с подробным описанием вашей ситуации, чтобы другие люди и специалисты смогли дать на него ответ. Если вы знаете как решить проблему другого человека, пожалуйста, подскажите ему :)


