
Строительные пылесосы Bosch GAS 18V-1 - инструкция пользователя по применению, эксплуатации и установке на русском языке. Мы надеемся, она поможет вам решить возникшие у вас вопросы при эксплуатации техники.
Если остались вопросы, задайте их в комментариях после инструкции.
"Загружаем инструкцию", означает, что нужно подождать пока файл загрузится и можно будет его читать онлайн. Некоторые инструкции очень большие и время их появления зависит от вашей скорости интернета.


English |
13
Bosch Power Tools
1 609 92A 3TD | (21.9.17)
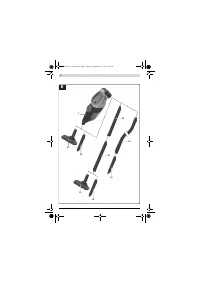
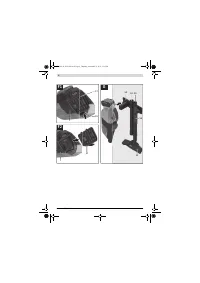
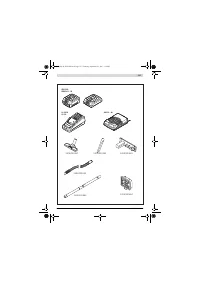
Mounting VAC Accessories (see figure B)
Remove the battery before cleaning or performing
maintenance on the vacuum cleaner, making tool ad-
justments, changing accessories or storing the vacuum
cleaner.
This safety measure prevents the vacuum cleaner
from being started accidentally.
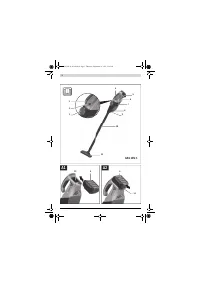
The vacuum cleaner accessories can be connected directly to
the dust cup
7
.
The combination possibilities of the various vacuum cleaner
accessories can be viewed in the figure.
– Connect the vacuum cleaner accessories firmly to the con-
nection at the dust cup
7
and in to each other.
Operation
Remove the battery before cleaning or performing
maintenance on the vacuum cleaner, making tool ad-
justments, changing accessories or storing the vacuum
cleaner.
This safety measure prevents the vacuum cleaner
from being started accidentally.
Starting Operation
Make sure that the filters are fitted securely before
vacuuming.
Only use an undamaged filter (no cracks, small holes,
etc.). Replace a damaged filter immediately.
Switching On and Off
To save energy, only switch the vacuum cleaner on when us-
ing it.
– To
switch on
the vacuum cleaner, press the On/Off button
3
.
– To
switch off
the vacuum cleaner, press the On/Off button
3
again.
Maintenance and Service
Maintenance and Cleaning
Remove the battery before cleaning or performing
maintenance on the vacuum cleaner, making tool ad-
justments, changing accessories or storing the vacuum
cleaner.
This safety measure prevents the vacuum cleaner
from being started accidentally.
For safe and proper working, always keep the vacuum
cleaner and ventilation slots clean.
– Clean the vacuum cleaner housing from time to time using
a moist cloth.
– Clean soiled charger contacts using a dry cloth.
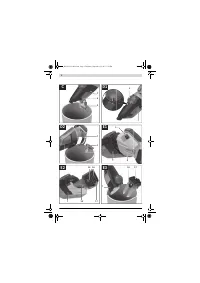
Emptying the Dust Box (see figure C)
To maintain the optimum performance of the vacuum cleaner,
clean the dust cup
7
after each use.
– Hold the vacuum cleaner over a suitable waste bin.
– Press the release button
8
to open the emptying flap
9
.
– Shake out the dust container
7
.
– Close the emptying flap
9
again (you should hear it click in-
to place).
– Clean the coarse dirt filter
1
(see “Emptying the coarse dirt
filter”, page 13) if required.
If necessary, clean the filter (see “Cleaning the Filter”, page
13).
Emptying the coarse dirt filter (see figures D1 – D2)
– Turn the coarse dirt filter
1
as far as it will go in the direc-
tion of rotation “
” and remove it from the dust contain-
er
7
.
– Shake out the coarse dirt filter
1
and the dust container
7
over a suitable waste bin.
– Place the coarse dirt filter
1
in the dust container
7
and
turn it as far as it will go in the direction of rotation “
”.
Cleaning the rotational airflow unit with filter
(see figures E1 – E3)
– Hold the vacuum cleaner down slightly so that dust cannot
fall out of the dust container when the vacuum cleaner is
opened.
– Press release button
2
and remove the dust cup
7
from the
motor housing
6
.
– Hold onto the filter grips
16
and pull the rotational airflow
unit with filter
18
out of the dust container
7
.
– Shake out the the dust container
7
and the rotational air-
flow unit
18
over a suitable waste bin.
– Put the rotational airflow unit filter
18
back in the dust con-
tainer
7
.
Cleaning the Filter (see figures F1 – F2)
– Push the locking tab
19
up and remove the filter
17
.
– Gently tap the filter
17
against a solid surface to loosen the
dust.
– Assembly is carried out in reverse order.
– Afterwards, hang the dust cup at the bottom into the motor
housing, apply light pressure until the dust cup can be
heard to engage.
Storage
– Optionally, use the wall bracket
20
for the space-saving
storage of the vacuum cleaner and its accessories (see fig-
ure G).
Malfunctions
In the case of insufficient vacuuming performance, check the
following:
– Is the dust cup
7
full?
▷
See “Emptying the Dust Box”, page 13.
– Is the coarse dirt filter
1
clogged with dust?
▷
See “Cleaning the Filter”, page 13.
– Is the filter
17
clogged with dust?
▷
See “Cleaning the rotational airflow unit with filter”,
page 13.
– Is the capacity of the battery pack too low?
▷
See “Battery Charging”, page 12.
Regularly emptying the dust container
7
and cleaning the fil-
ters will ensure optimum suction power.
If the vacuuming performance is not achieved thereafter, take
the vacuum cleaner to customer service.
OBJ_BUCH-3129-003.book Page 13 Thursday, September 21, 2017 5:19 PM
Содержание
- 70 Указания по безопасности; Иначе
- 71 Символы; Применение по назначению; Изображенные составные части; Сборка; Зарядка аккумулятора
- 72 Работа с инструментом; Включение электроинструмента; Техобслуживание и сервис; Техобслуживание и очистка
- 74 Транспортировка; Українська; Вказівки з техніки безпеки; Цей пилосмок не розрахований; Інакше можливе
Характеристики

Остались вопросы?Не нашли свой ответ в руководстве или возникли другие проблемы? Задайте свой вопрос в форме ниже с подробным описанием вашей ситуации, чтобы другие люди и специалисты смогли дать на него ответ. Если вы знаете как решить проблему другого человека, пожалуйста, подскажите ему :)


