
Смесители Smeg MT0 - инструкция пользователя по применению, эксплуатации и установке на русском языке. Мы надеемся, она поможет вам решить возникшие у вас вопросы при эксплуатации техники.
Если остались вопросы, задайте их в комментариях после инструкции.
"Загружаем инструкцию", означает, что нужно подождать пока файл загрузится и можно будет его читать онлайн. Некоторые инструкции очень большие и время их появления зависит от вашей скорости интернета.


6
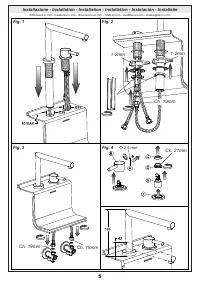
INSTALLAZIONE (Fig.1-2-3)
Prima di inserire il comando e la bocca separata nei fori del lavello assicurarsi che le guarnizioni di base
siano ben posizionate nelle proprie sede e che i flessibili di alimentazione siano ben avvitati al corpo del
comando remoto. Sistemare il comando e la bocca separata nel foro del lavello.
Inserire quindi i kit di fissaggio nella sequenza indicata e rispettivamente:
· la guarnizione sagomata e la flangia nel caso si installi il monocomando su un lavello di spessore 3-4
cm;
· la guarnizione sagomata, la flangia triangolare in plastica e la flangia nel caso si installi il monocomando
su un lavello in acciaio inox di spessore 1-2 mm.
Serrare a fondo l’apposito tirante o dado filettato. Procedere al collegamento del flessibile di uscita al
tubetto del corpo e dei flessibili di alimentazione alla rete idrica.
SOSTITUZIONE DELLA CARTUCCIA (Fig. 4)
Prima di sostituire la cartuccia, accertarsi che il raccordo dell’acqua sia chiuso. Togliere il tappino in finitura
facendo attenzione a non danneggiarlo e svitare il grano (A) utilizzando una chiave a brugola, estrarre
quindi la maniglia (B) sfilandola dalla cartuccia (E). Sollevare la ghiera copricartuccia (C). Svitare la ghiera
di fissaggio (D) e togliere la cartuccia (E) dal corpo del miscelatore (F). Infine introdurre la nuova cartuccia,
accertandosi che le due spine di centraggio siano nella loro sede e che le guarnizioni siano correttamente
posizionate.
INSTALLATION (Fig.1-2-3)
Before introducing the remote control and spout in the holes of the sink, check that the basis seals are well
positioned in their proper seats and that the feeding flexible hoses are well screwed on the remote control
body. Place the the remote control and spout in the holes of the sink, orienting the spout toward the sink
tank.
Insert the fixing kits with the indicated sequence, and respectively:
· the shaped gasket and flange in case the single lever group is installed on a sink having thickness of 3-4
cm;
· the shaped gasket, the triangular plastic flange and the flange in case of a stainless steel sink having
thickness of 1-2 mm.
Tighten well the tie rod or the threaded nut. Proceed connecting the outlet flexible hose to the pipe of the
body and the supply hose to the supply net.
CARTRIDGE REPLACEMENT (Fig.4)
Before carrying out this operation make sure that water supply is turned off. Remove the finish plug paying
attention not to damage it and unscrew the screw (A) using an Allen key, remove the handle (B) from the
cartridge (E). Lift the finishing ring nut (C). Unscrew the fixing ring nut (D) and take the cartridge (E) out
from the mixer body (F). Put the new cartridge into the body checking that the two centering pins enters
into the respective seats and that gaskets are well positioned.
INSTALLATION (Fig.1-2-3)
Avant d’insérer la commande et la bouche séparée dans les trous de l’évier il faut s’assurer que les joints
de base sont bien placés dans leurs emplacements et que les flexibles d’alimentation sont bien vissés
au corps de la commande à distance. Il faut placer le commande et la bouche sur les trous de l’évier en
orientant la bouche de distribution vers le bac de l’évier.
Insérer donc le kit de fixage dans la séquence indiquée et respectivement:
· le joint façonné et la bride si on installe le monocommande sur un évier d’une épaisseur de 3-4 cm;
· le joint façonné, la bride triangulaire en plastique et la bride dans le cas d’un évier en acier inox d’une
épaisseur de 1-2 mm.
Serrer à fond le tirant ou l’écrou fileté.
Procéder à la liaison des flexible de sortie au tuyau sous le corps et les flexibles de aliméntation au réseau
d’alimentation.
SUBSTITUTION DE LA CARTOUCHE (Fig.4)
Avant d’effectuer la substitution de la cartouche, vérifier que la connexion de l’eau est fermée. Enlever le
bouchon en finition faisant attention à ne pas l’abîmer et dévisser les grains de fixage (A) utilisant une clé
à griffe, extraire en suite la poignée (B) en la soulevant de la cartouche (E). Soulever la virole de finition
(C). Dévisser la virole de fixation (D) et enlever la cartouche (E) du corps de mitigeur (F). Introduire enfin la
Installazione - Installation - Installation - Installation - Instalación - Installatie
Характеристики

Остались вопросы?Не нашли свой ответ в руководстве или возникли другие проблемы? Задайте свой вопрос в форме ниже с подробным описанием вашей ситуации, чтобы другие люди и специалисты смогли дать на него ответ. Если вы знаете как решить проблему другого человека, пожалуйста, подскажите ему :)


