Швейная машина Singer 4423 - инструкция пользователя по применению, эксплуатации и установке на русском языке. Мы надеемся, она поможет вам решить возникшие у вас вопросы при эксплуатации техники.
Если остались вопросы, задайте их в комментариях после инструкции.
"Загружаем инструкцию", означает, что нужно подождать пока файл загрузится и можно будет его читать онлайн. Некоторые инструкции очень большие и время их появления зависит от вашей скорости интернета.

20
2
1
4
3
A
D
a
b
E
B
C
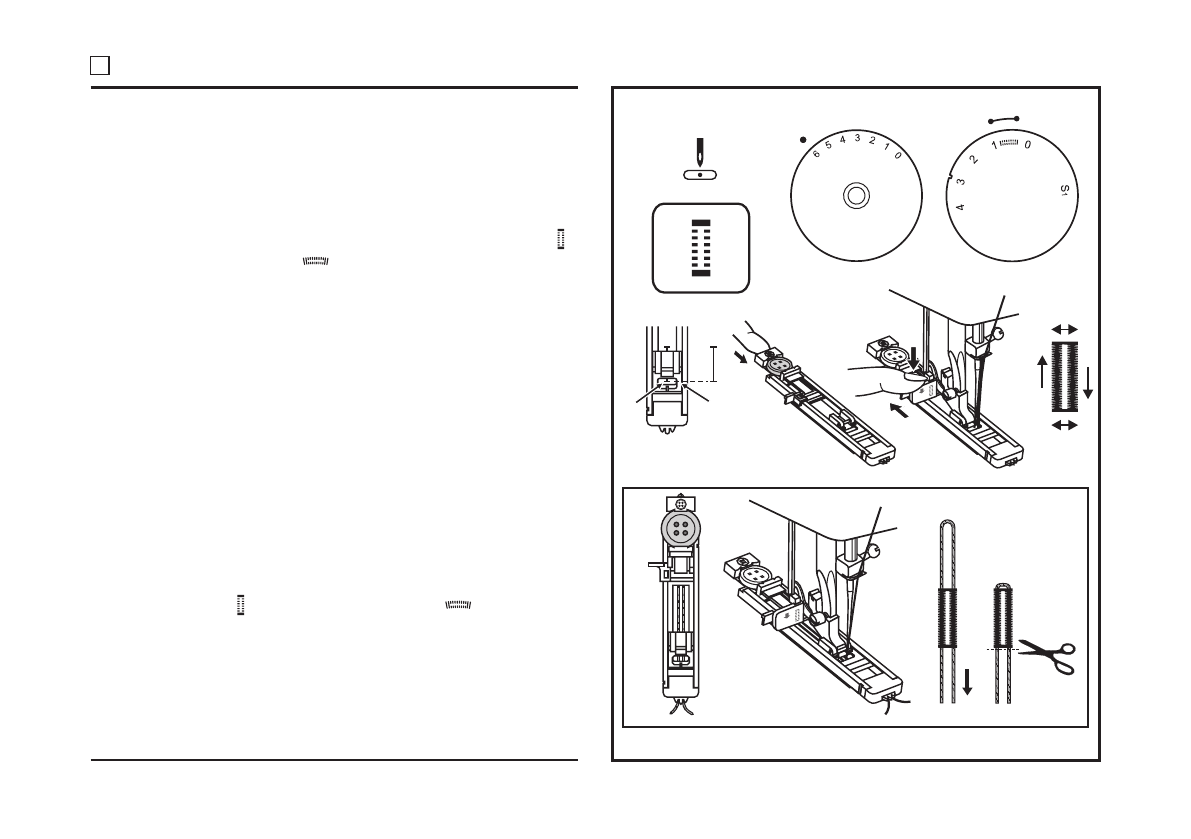
Buttonhole sewing is a simple process that provides reliable
results. However, it is strongly suggested to always make a
practice buttonhole on a sample of your fabric and stabilizer.
Making a Buttonhole
Making a Buttonhole on Stretch Fabrics (E)
1. Using tailor's chalk, mark the position of the buttonhole on the
fabric.
2. Attach the buttonhole foot and set the Pattern Selector Dial to "
".
Set stitch length dial to "
". Set the stitch width at "6". The
width however may need to be adjusted according to the
project. Sew a test first to determine this.
3. Lower the presser foot aligning the marks on foot with the
marks on the fabric (A). (The front bar tack will be sewn first.)
(Align the mark on the fabric (a) with the mark on the foot (b).)
4. Open the button plate and insert the button (B).
5. Lower the buttonhole lever and gently push it back (C).
6. While lightly holding the upper thread, start the machine.
7. Buttonhole stitching is done in the order (D).
8. Stop the machine when the buttonhole cycle has completed.
When sewing buttonholes on stretch fabric, hook heavy thread or
cord under the buttonhole foot. When the buttonhole is sewn the
legs will overcast the cord.
1. Mark the position of the buttonhole on the fabric with the
tailor's chalk, attach the buttonhole foot, and set the pattern
selector dial to "
". Set stitch length dial to "
".
2. Hook the heavy thread onto the back end of the buttonhole foot,
then bring the two heavy thread ends to the front of the foot,
insert them into the grooves and temporarily tie them there.
3. Lower the presser foot and start sewing.
*Set the stitch width to match the diameter of the gimp thread.
4. Once sewing is completed, gently pull the heavy thread to
remove any slack, then trim off the excess.
PUS
H
PUSH
M
Sew 1-step Buttonholes
Характеристики
Остались вопросы?Не нашли свой ответ в руководстве или возникли другие проблемы? Задайте свой вопрос в форме ниже с подробным описанием вашей ситуации, чтобы другие люди и специалисты смогли дать на него ответ. Если вы знаете как решить проблему другого человека, пожалуйста, подскажите ему :)


