
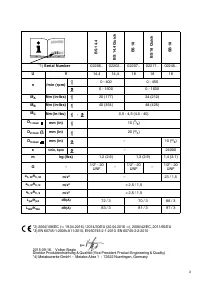
Шуруповерты Metabo SB 18 602245840 - инструкция пользователя по применению, эксплуатации и установке на русском языке. Мы надеемся, она поможет вам решить возникшие у вас вопросы при эксплуатации техники.
Если остались вопросы, задайте их в комментариях после инструкции.
"Загружаем инструкцию", означает, что нужно подождать пока файл загрузится и можно будет его читать онлайн. Некоторые инструкции очень большие и время их появления зависит от вашей скорости интернета.


ENGLISH
en
10
- Ensure good ventilation of the workplace and
keep it clean using a vacuum cleaner. Sweeping
or blowing stirs up dust.
- Vacuum or wash protective clothing. Do not blow,
beat or brush.
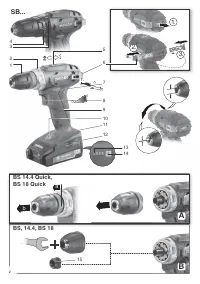
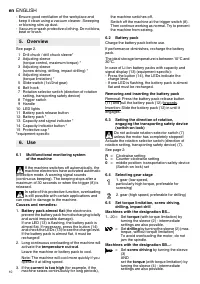
See page 2.
1 Drill chuck / drill chuck sleeve*
2 Adjusting sleeve
(torque control, maximum torque) *
3 Adjusting sleeve
(screw driving, drilling, impact drilling) *
4 Adjusting sleeve
(torque limitation) *
5 Slide-switch (1st/2nd gear)
6 Belt hook
7 Rotation selector switch (direction of rotation
setting, transporting safety device)
8 Trigger switch
9 Handle
10 LED lights
11 Battery pack release button
12 Battery pack *
13 Capacity and signal indicator *
14 Capacity indicator button *
15 Protective cap *
*equipment-specific
6.1
Multifunctional monitoring system
of the machine
If the machine switches off automatically, the
machine electronics have activated automatic
protection mode. A warning signal sounds
(continuous beeping). The beeping stops after a
maximum of 30 seconds or when the trigger (8) is
released.
In spite of this protective function, overloading
is still possible with certain applications and
can result in damage to the machine.
Causes and remedies:
1.
Battery pack almost flat
(the electronics
prevent the battery pack from discharging totally
and avoid irreparable damage).
If one LED (13) is flashing, the battery pack is
almost flat. If necessary, press the button (14)
and check the LEDs (13) to see the charge level.
If the battery pack is almost flat, it must be
recharged!
2. Long continuous overloading of the machine will
activate the
temperature cut-out
.
Leave the machine or battery pack to cool.
Note: The machine will cool more quickly if you
operate it at idling speed.
3. If the
current is too high
(for example, if the
machine seizes continuously for long periods),
the machine switches off.
Switch off the machine at the trigger switch (8).
Then continue working as normal. Try to prevent
the machine from seizing.
6.2
Battery pack
Charge the battery pack before use.
If performance diminishes, recharge the battery
pack.
The ideal storage temperature is between 10°C and
30°C.
In case of Li-Ion battery packs with capacity and
signal display (13) (equipment-specific):
- Press the button (14), the LEDs indicate the
charge level.
- If one LED is flashing, the battery pack is almost
flat and must be recharged.
Removing and inserting the battery pack
Removal: Press the battery pack release button
(11) and pull the battery pack (12) forwards.
Insertion: Slide the battery pack (12) in until it
engages.
6.3
Setting the direction of rotation,
engaging the transporting safety device
(switch-on lock)
Do not activate rotation selector switch (7)
unless the motor has completely stopped!
Actuate the rotation selector switch (direction of
rotation setting, transporting safety device) (7).
See page 2:
R
= Clockwise setting
L
= Counter-clockwise setting
0
= middle position: transportation safety device
(Switch-on lock) set
6.4
Selecting gear stage
1. gear (low speed,
particularly high torque, preferable for
screwing)
2. gear (high speed, preferable for drilling)
6.5
Set torque limitation, screw driving,
drilling, impact drill
Machines with the designation BS...
1...20 = Set
torque
(with torque limitation) by
turning the sleeve (2) - intermediate
settings are also possible.
= Set
drilling
by turning the sleeve (2) (max.
torque, without torque limitation)
To avoid overloading the motor, do not
jam the spindle.
Machines with the designation SB...:
= Set
screw driving
by turning the sleeve
(3)
AND
set the
torque
(with torque limitation) by
turning the sleeve (4) - intermediate
settings are also possible.
5. Overview
6. Use
1
2
1
2


