
Шуруповерты Metabo PowerMaxx BS Basic600080930 - инструкция пользователя по применению, эксплуатации и установке на русском языке. Мы надеемся, она поможет вам решить возникшие у вас вопросы при эксплуатации техники.
Если остались вопросы, задайте их в комментариях после инструкции.
"Загружаем инструкцию", означает, что нужно подождать пока файл загрузится и можно будет его читать онлайн. Некоторые инструкции очень большие и время их появления зависит от вашей скорости интернета.


ENGLISH
en
11
6.6
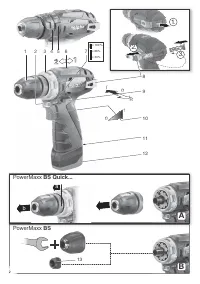
Change accessory
Opening the drill chuck:
Turn the drill chuck sleeve (1) clockwise.
Clamping the tool:
Open the drill chuck and insert the tool as far as
possible. Turn the drill chuck sleeve (1) in clockwise
direction until the tool is clamped securely. With a
soft tool shank, retightening may be required after a
short drilling period.
6.7
Switching power tool on/off, setting
speed
To start the machine, press the trigger (10). The
speed can be changed by pressing in the trigger.
6.8
Chuck with Quick replacement
system
(for PowerMaxx BS Quick...)
To remove:
See page 2, fig. A. Push the interlock
ring forward (a), advance and pull off the chuck (b).
To mount:
Push the interlock ring forward and move the
chuck as far as the limit stop on the drill spindle.
6.9
Chuck
(for PowerMaxx BS)
See page 2, fig. B.
To mount:
unscrew protective cap (13). Screw the
quick-clamping chuck onto the spindle thread. The
quick-clamping chuck can be tightened (
and
released again
) with an open-jawed spanner.
When working with long screw bits or bit holders, we
recommend the use of the bit clamping bush
6.31281 (see Accessories chapter).
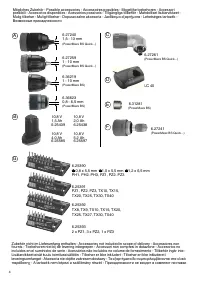
Use only genuine Metabo accessories.
See page 4.
Only use accessories which fulfil the requirements
and specifications listed in these operating
instructions.
A
Quick-clamping chuck
.
Fitting, PowerMaxx BS: unscrew protective cap
(13). Screw the quick-clamping chuck onto the
spindle thread. The quick-clamping chuck can
be tightened (
and released again
) with an
open-jawed spanner.
B Battery pack
C Angle screwdriver attachment.
D Battery charger
E Bit clamping bush
F Bit holder with Quick replacement system
G Bit box
For a complete range of accessories, see
www.metabo.com or the catalogue.
Repairs to electrical tools must be carried out
by qualified electricians ONLY!
If you have Metabo electrical tools that require
repairs, please contact your Metabo service centre.
For addresses see www.metabo.com.
You can download spare parts lists from
www.metabo.com.
Observe national regulations on environmentally
compatible disposal and on the recycling of disused
machines, packaging and accessories.
Battery packs must not be disposed of with regular
waste. Return faulty or used battery packs to your
Metabo dealer!
Do not allow battery packs to come into contact with
water!
To protect the environment, do not dispose of
power tools or battery packs in household
waste. Observe national regulations on
separated collection and recycling of disused
machines, packaging and accessories.
Before disposal, discharge the battery pack in the
power tool. Prevent the contacts from short-
circuiting (e. g. by protecting them with adhesive
tape).
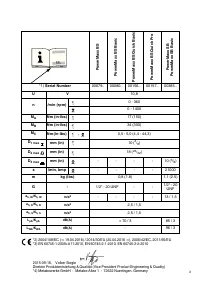
Explanatory notes on the specifications on page 3.
Changes due to technological progress reserved.
U
=Voltage of battery pack
n =No-load
speed
Tightening torque for screwing:
M
A
=soft screwing application (wood)
M
B
=hard screwing application (metal)
M
C
= adjustable torque (with torque control)
Max. drill diameter:
D
1 max
=in steel
D
2 max
=in softwood
D
3 max
= in masonry
s
= max. impact rate
m
= weight (with battery pack)
G
= spindle thread
Measured values determined in conformity with
EN 60745.
Direct current
The technical specifications quoted are subject to
tolerances (in compliance with the relevant valid
standards).
Emission values
Using these values, you can estimate the
emissions from this power tool and compare these
with the values emitted by other power tools. The
actual values may be higher or lower, depending on
the particular application and the condition of the
tool or power tool. In estimating the values, you
should also include work breaks and periods of low
use. Based on the estimated emission values,
specify protective measures for the user - for
7. Tips and Tricks
8. Accessories
9. Repairs
10. Environmental Protection
11. Technical Specifications


