
Шуруповерты Makita FS4300JX2 - инструкция пользователя по применению, эксплуатации и установке на русском языке. Мы надеемся, она поможет вам решить возникшие у вас вопросы при эксплуатации техники.
Если остались вопросы, задайте их в комментариях после инструкции.
"Загружаем инструкцию", означает, что нужно подождать пока файл загрузится и можно будет его читать онлайн. Некоторые инструкции очень большие и время их появления зависит от вашей скорости интернета.


7 ENGLISH
5.
Maintain power tools and accessories. Check
for misalignment or binding of moving parts,
breakage of parts and any other condition that
may affect the power tool’s operation. If dam-
aged, have the power tool repaired before use.
Many accidents are caused by poorly maintained
power tools.
6.
Keep cutting tools sharp and clean.
Properly
maintained cutting tools with sharp cutting edges
are less likely to bind and are easier to control.
7.
Use the power tool, accessories and tool bits
etc. in accordance with these instructions, tak-
ing into account the working conditions and
the work to be performed.
Use of the power tool
for operations different from those intended could
result in a hazardous situation.
8.
Keep handles and grasping surfaces dry,
clean and free from oil and grease.
Slippery
handles and grasping surfaces do not allow for
safe handling and control of the tool in unexpected
situations.
9.
When using the tool, do not wear cloth work
gloves which may be entangled.
The entangle-
ment of cloth work gloves in the moving parts may
result in personal injury.
Service
1.
Have your power tool serviced by a qualified
repair person using only identical replacement
parts.
This will ensure that the safety of the power
tool is maintained.
2.
Follow instruction for lubricating and chang-
ing accessories.
Screwdriver safety warnings
1.
Hold the power tool by insulated gripping
surfaces, when performing an operation where
the fastener may contact hidden wiring or its
own cord.
Fasteners contacting a "live" wire may
make exposed metal parts of the power tool "live"
and could give the operator an electric shock.
2.
Always be sure you have a firm footing.
Be sure no one is below when using the tool in
high locations.
3.
Hold the tool firmly.
4.
Keep hands away from rotating parts.
5.
Do not touch the bit or the workpiece immedi-
ately after operation; they may be extremely
hot and could burn your skin.
6.
Always secure workpiece in a vise or similar
hold-down device.
SAVE THESE INSTRUCTIONS.
WARNING:
DO NOT let comfort or familiarity
with product (gained from repeated use) replace
strict adherence to safety rules for the subject
product.
MISUSE or failure to follow the safety rules stated
in this instruction manual may cause serious
personal injury.
FUNCTIONAL
DESCRIPTION
CAUTION:
•
Always be sure that the tool is switched off and
unplugged before adjusting or checking function
on the tool.
Depth adjustment
For model FS4000, FS4200, FS4300,
FS6200, FS6300, FS6300R
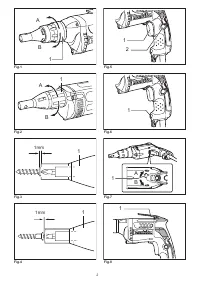
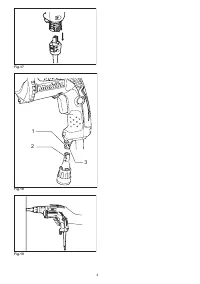
►
Fig.1:
1.
Lock ring
The depth can be adjusted by turning the lock ring. Turn
it in "B" direction for less depth and in "A" direction for
more depth. One full turn of the lock ring equals 2.0 mm
change in depth.
For model FS4000X, FS4300X,
FS6300X
►
Fig.2:
1.
Locking sleeve
The depth can be adjusted by turning the locking
sleeve. Turn it in "A" direction for less depth and in "B"
direction for more depth. One full turn of the locking
sleeve equals 1.5 mm change in depth.
For all Models
Adjust the lock ring so that the distance between the
tip of the locator and the screw head is approximately 1
mm as shown in the figures. Drive a trial screw into your
material or a piece of duplicate material. If the depth is
still not suitable for the screw, continue adjusting until
you obtain the proper depth setting.
►
Fig.3:
1.
Locator
►
Fig.4:
1.
Locator
Switch action
►
Fig.5:
1.
Switch trigger
2.
Lock button
CAUTION:
•
Before plugging in the tool, always check to see
that the switch trigger actuates properly and
returns to the "OFF" position when released.
To start the tool, simply pull the switch trigger. Tool
speed is increased by increasing pressure on the switch
trigger. Release the switch trigger to stop.
For continuous operation, pull the switch trigger and
then push in the lock button.
To stop the tool from the locked position, pull the switch
trigger fully, then release it.
NOTE:
•
Even with the switch on and motor running, the
bit will not rotate until you fit the point of the bit
in the screw head and apply forward pressure to
engage the clutch.


