
Шуруповерты Hitachi D13VH - инструкция пользователя по применению, эксплуатации и установке на русском языке. Мы надеемся, она поможет вам решить возникшие у вас вопросы при эксплуатации техники.
Если остались вопросы, задайте их в комментариях после инструкции.
"Загружаем инструкцию", означает, что нужно подождать пока файл загрузится и можно будет его читать онлайн. Некоторые инструкции очень большие и время их появления зависит от вашей скорости интернета.


English
5
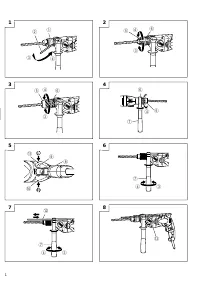
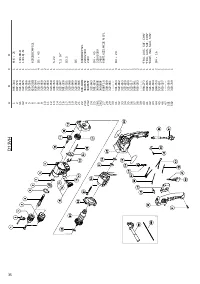
(2) Place the chuck wrench in each of the three holes
in the chuck, and turn it in the clockwise direction
(viewed from the front side). Tighten securely.
(3) To remove the bit, place the chuck wrench into one
of the holes in the chuck and turn it in the
counterclockwise direction.
For keyless chuck (Fig. 2, 3)
(1) Mounting the bit
Turn the sleeve counterclockwise and open the chuck.
After inserting the drill bit into the chuck as far it will
go, grip the retaining ring and close the chuck by
turning the sleeve clockwise as viewed from the front.
(2) Dismounting the bit
Grip the retaining ring and open the chuck by turning
the sleeve counterclockwise.
NOTE
When the sleeve does not become loose any further,
fix the side handle to retaining ring, hold side handle
firmly, then turn the sleeve to loosen by hand (Fig. 4).
6. Check the rotational direction (Fig. 5)
The bit rotates clockwise (viewed from the rear side)
by pushing the R-side of the push button.
The L-side of the push button is pushed to turn the bit
counterclockwise.
(The
L
and
R
marks are provided on the body.)
7. Fixing the side handle (Fig. 6)
Attach the side handle to the mounting part.
Rotate the side handle grip in a clockwise direction
to secure it.
Set the side handle to a position that is suited to the
operation and then securely tighten the side handle
grip.
To attach a depth gauge on the side handle, insert
the gauge into the U-shaped groove on the side
handle, adjust the position of the depth gauge in
accordance with the desired depth of the hole, and
firmly tighten the side handle grip (Fig. 7).
8. High-speed/Low-speed changeover
Prior to changing speed, ensure that the switch is in
the OFF position, and the drill has come to a complete
stop.
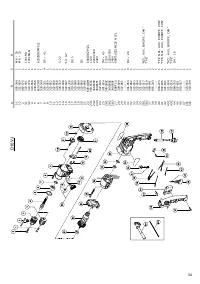
STANDARD ACCESSORIES
(1) Chuck Wrench (Spec. only for keyed chuck) ........... 1
(2) Side Handle ................................................................ 1
(3) Depth Gauge .............................................................. 1
Standard accessories are subject to change without
notice.
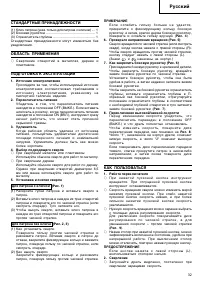
APPLICATIONS
䡬
Boring holes in metal, wood and plastic.
PRIOR TO OPERATION
1. Power source
Ensure that the power source to be utilized conforms
to the power requirements specified on the product
nameplate.
2. Power switch
Ensure that the power switch is in the OFF position. If
the plug is connected to a receptacle while the power
switch is in the ON position, the power tool will start
operating immediately, inviting serious accident.
3. Extension cord
When the work area is removed from the power
source, use an extension cord of sufficient thickness
and rated capacity. The extension cord should be
kept as short as practicable.
4. Selecting the appropriate drill bit
䡬
When boring metal or plastic
Use an ordinary metalworking drill bit.
䡬
When boring wood
Use an ordinary woodworking drill bit.
However, when drilling 6.5 mm or smaller holes, use
a metalworking drill bit.
5. Mounting and dismounting of the bit
For keyed chuck (Fig. 1)
(1) Open the chuck jaws, and insert the bit into the
chuck.
PRECAUTIONS ON USING DRILL
1. Before drilling into walls, ceilings or floors, ensure
that there are no concealed power cables inside.
2. Use auxiliary handles supplied with the tool.
Loss of control can cause personal injury.
3. Do not wear gloves made of stuff liable to roll up
such as cotton, wool, cloth or string, etc.
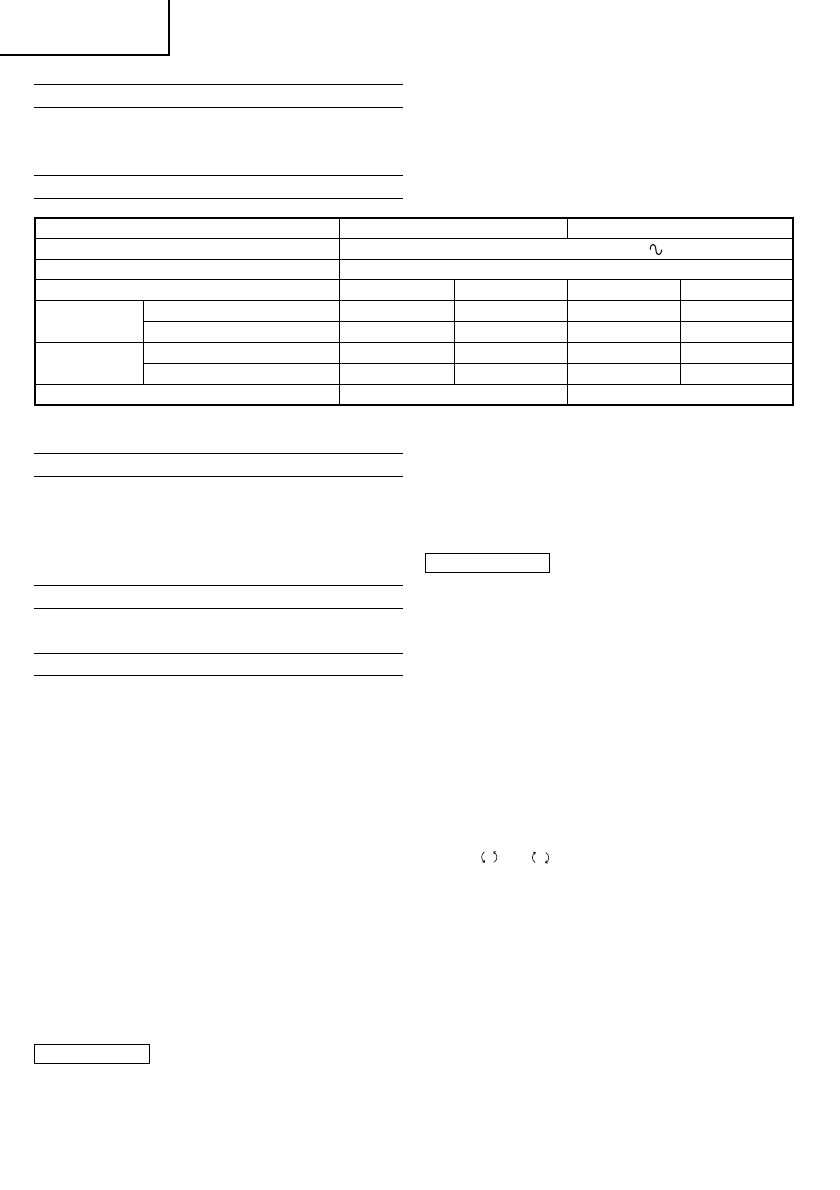
Model
D10VJ
D13VH
Voltage (by areas)*
(110V, 220V, 230V, 240V)
Power input
690 W*
Speed change
1
2
1
2
No load speed
Forward rotation
0 – 1000 min
-1
0 – 3000 min
-1
0 – 1000 min
-1
0 – 3000 min
-1
Reverse rotation
0 – 600 min
-1
0 – 1800 min
-1
0 – 600 min
-1
0 – 1800 min
-1
Capacity
Steel
10 mm
6 mm
13 mm
8 mm
Wood
25 mm
13 mm
40 mm
25 mm
Weight (without cord)
1.8 kg
1.9 kg
SPECIFICATIONS
* Be sure to check the nameplate on product as it is subject to change by areas.


