Шуруповерты Einhell X-Change TE-CD 18-2 Li-i - инструкция пользователя по применению, эксплуатации и установке на русском языке. Мы надеемся, она поможет вам решить возникшие у вас вопросы при эксплуатации техники.
Если остались вопросы, задайте их в комментариях после инструкции.
"Загружаем инструкцию", означает, что нужно подождать пока файл загрузится и можно будет его читать онлайн. Некоторые инструкции очень большие и время их появления зависит от вашей скорости интернета.


GB
- 21 -
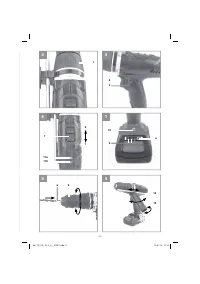
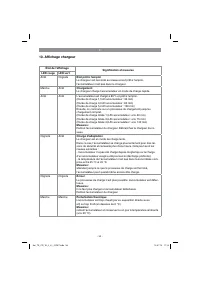
6.7 LED display for clockwise/counter-clock-
wise operation (Figure 6/Item 11)
The LED display for counter-clockwise/clockwise
(11) indicates the position of the changeover
switch (3).
Green LED (11a) is lit: clockwise
Red LED (11b) is lit: counter-clockwise
6.8 Battery capacity indicator (Fig. 7 – Item 2)
Press the battery capacity indicator switch (a).
The battery capacity indicator (2) shows the char-
ge status of the battery using 3 LEDs.
All 3 LEDs are lit:
The battery is fully charged.
2 or 1 LED(s) are lit:
The battery has an adequate remaining charge.
1 LED blinks:
The battery is empty, recharge the battery.
All LEDs blink:
The battery pack has undergone exhaustive di-
scharge and is defective. Do not use or charge a
defective battery pack.
6.9 LED lamp (Fig. 7 / Item 10)
The LED lamp (10) can be used in poor lighting
conditions to illuminate the area where you want
to drill or screw. The LED lamp (10) will be lit
automatically as soon as you press the ON/OFF
switch (4).
6.10 Changing the tool (Fig. 8)
Caution!
Set the changeover switch (3) to its
center position whenever you carry out any work
(for example changing the tool, maintenance
work, etc.) on the cordless hammer drill/screwdri-
ver.
•
The cordless screwdriver is fitted with a
quick-action chuck (9) with an automatic
spindle stop.
•
Open the chuck (9). The chuck opening (a)
must be large enough to hold the tool (drill bit
or screwdriver bit).
•
Select the suitable tool. Push the tool as far
as possible into the chuck opening (a).
•
Tighten the chuck (9) and then check that the
tool is secure.
6.11 Screwdriving
We recommend using self-centering screws (e.g.
Torx screws, recessed head screws) designed for
reliable working. Be sure to use a bit that matches
the screw in shape and size. Set the torque, as
described elsewhere in these operating instruc-
tions, to suit the size of screw.
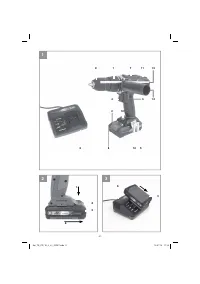
6.12 Removable holding clip (Fig. 1 / Item 12)
When the holding clip (12) is
fi
tted, the equipment
can be hung e.g. on a belt. The removable holding
clip can be screw-
fi
tted to either the left or right-
hand side of the equipment. Fitting is possible but
not necessary.
6.13 Fitting the additional handle
(Fig. 9/Item 14)
The additional handle (14) enables you to achieve
better stability whilst using the hammer drill. Do
not use the tool without the additional handle.
The additional handle (14) is secured to the ham-
mer drill by a clamp. During the handle clockwise
tightens this clamp. Turning it anti-clockwise will
release the clamp.
•
The supplied additional handle (14) must
first be fitted. To do this, the clamp must be
opened by turning the handle until it is wide
enough for the additional handle to be slid
over the chuck (1) and on to the hammer drill.
•
After you have positioned the additional
handle (14), turn it to the most comfortable
working position for you.
•
Now turn the handle in the opposite direction
again until the additional handle is secure.
•
The additional handle (14) is suitable for both
left-handed and right-handed users.
6.14 Fitting and adjusting the depth stop
(Fig. 9/Item 13)
The depth stop (13) is held in place by the additi-
onal handle (14) by clamping. The clamp can be
released and tightened by turning the handle.
•
Release the clamp and fit the depth stop (13)
in the recess provided for it in the additional
handle.
•
Set the depth stop (13) to the same level as
the drill bit.
•
Pull the depth stop back by the required dril-
ling depth.
•
Turn the handle on the additional handle (14)
until it is secure.
•
Now drill the hole until the depth stop (13)
touches the workpiece.
Anl_TE_CD_18_2_Li_i_SPK7.indb 21
Anl_TE_CD_18_2_Li_i_SPK7.indb 21
14.07.14 11:14
14.07.14 11:14
Характеристики

Остались вопросы?Не нашли свой ответ в руководстве или возникли другие проблемы? Задайте свой вопрос в форме ниже с подробным описанием вашей ситуации, чтобы другие люди и специалисты смогли дать на него ответ. Если вы знаете как решить проблему другого человека, пожалуйста, подскажите ему :)


