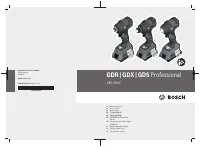
Шуруповерты Bosch GDX 18V-200 C (0.615.990.M46) - инструкция пользователя по применению, эксплуатации и установке на русском языке. Мы надеемся, она поможет вам решить возникшие у вас вопросы при эксплуатации техники.
Если остались вопросы, задайте их в комментариях после инструкции.
"Загружаем инструкцию", означает, что нужно подождать пока файл загрузится и можно будет его читать онлайн. Некоторые инструкции очень большие и время их появления зависит от вашей скорости интернета.


10
| English
Press the battery charge indicator button
(19)
to show the
state of charge. This is also possible when the battery is re-
moved.
If no LED lights up after pressing the battery charge indicator
button
(19)
, the battery is defective and must be replaced.
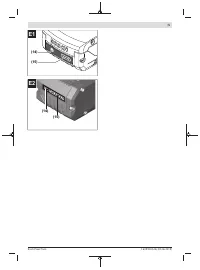
Battery Model GBA 18V… (see figure E1)
LEDs
Capacity
3× continuous green light
60−100 %
2× continuous green light
30−60 %
1× continuous green light
5−30 %
3× flashing green light
0−5 %
Battery Model ProCORE18V… (see figure E2)
LEDs
Capacity
5× continuous green light
80−100 %
4× continuous green light
60−80 %
3× continuous green light
40−60 %
2× continuous green light
20−40 %
1× continuous green light
5−20 %
1× flashing green light
0−5 %
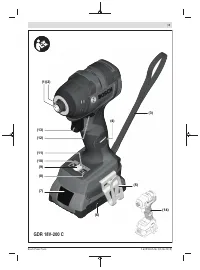
Changing the Tool
u
Remove the battery from the power tool before carry-
ing out work on the power tool (e.g. maintenance,
changing tool, etc.). The battery should also be re-
moved for transport and storage.
There is risk of injury
from unintentionally pressing the on/off switch.
u
Regularly clean the power tool’s air vents.
The motor’s
fan can draw the dust inside the housing and excessive
accumulation of powdered metal may cause electrical
hazards.
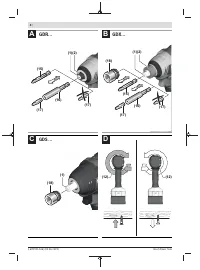
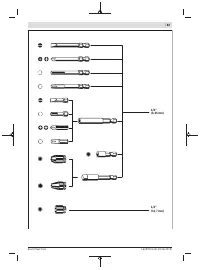
Use application tool: GDR/GDX 18 V-200 C (see figure
A – B)
Pull the locking sleeve
(2)
forward, guide the application tool
(1)
into the tool holder up to the stop and release the locking
sleeve
(2)
to lock the application tool.
Impact-proof screwdriver bits
(17)
can be inserted using a
universal bit holder with ball catch
(16)
.
Impact-proof screwdriver bits
(17)
can be inserted using a
universal bit holder with ball catch
(16)
.
Use application tool: GDX/GDS 18 V-200 C (see figure
B – C)
u
When working with an application tool, pay attention
that the application tool is connected securely to the
tool holder.
When the application tool is not securely
connected with the tool holder, it can come off during ap-
plication.
Slide the application tool
(18)
onto the square drive of the
tool holder
(1)
.
Due to the way the system operates, the application tool
(18)
will move around slightly in the tool holder
(1)
; this has
no influence on the function/safety.
Some application tools (e.g. double bits) cannot be safely
secured in the tool holder.
Removing
Pull the locking sleeve
(2)
forward and remove the applica-
tion tool.
Operation
Method of Operation
The tool holder
(1)
(with the application tool) is driven by an
electric motor via a gear and impact mechanism.
The working procedure is divided into two phases:
Screwing in
and
tightening
(impact mechanism in action).
The impact mechanism is activated as soon as the screwed
connection runs tight and load is therefore put on the motor.
The impact mechanism then converts the power of the mo-
tor to steady rotary impacts. When loosening screws or nuts,
the process is reversed.
Starting Operation
Inserting the Battery
u
Use only original Bosch
lithium-ion batteries with the
voltage stated on the type plate of your power tool.
Using other batteries can lead to injuries and pose a fire
hazard.
Set the rotational direction switch
(12)
to the middle posi-
tion to avoid unintentionally switching it on. Insert the
charged battery
(6)
into the handle until you feel it engage
and it is flush with the handle.
Set the rotational direction (see figure D)
The rotational direction switch
(12)
is used to change the ro-
tational direction of the power tool. However, this is not pos-
sible while the on/off switch
(13)
is being pressed.
Right rotation:
To drive in screws and tighten nuts, press
the rotational direction switch
(12)
through to the left stop.
Left Rotation:
To loosen and unscrew screws and nuts,
press the rotational direction switch
(12)
through to the
right stop.
Switching on/off
To
start
the power tool, press and hold the on/off switch
(13)
.
To
switch off
the power tool, release the on/off switch
(13)
.
Preselecting the speed/impact rate
With the button
(8)
, you can preselect the required speed/
impact rate in three stages. Press the button
(8)
repeatedly
until the desired setting appears in the speed indicator
(11)
.
The selected setting will be saved.
The required speed/impact rate is dependent on the mater-
ial and the work conditions and can be determined by prac-
tical trials.
Adjusting the Speed
You can adjust the speed of the power tool when it is on by
pressing in the on/off switch
(13)
to varying extents.
1 609 92A 546 | (05.06.2019)
Bosch Power Tools
Характеристики

Остались вопросы?Не нашли свой ответ в руководстве или возникли другие проблемы? Задайте свой вопрос в форме ниже с подробным описанием вашей ситуации, чтобы другие люди и специалисты смогли дать на него ответ. Если вы знаете как решить проблему другого человека, пожалуйста, подскажите ему :)


